Billing Profiles
In AdaptSuite systems with an active back office, the billing profile is the location to save client accounts payable, accounts receivable, invoice method and invoice requirement information.
Locate a Billing Profile
1) Locate a Billing Profile record from the Client by selecting Policies and Billing from the segments control panel.
2) The Billing Profiles will be displayed in a list box on the segment.
§ Select a record and click the View/Edit button to view the record.
§ Click the company name link to view the A/R Company record.
§ Click the ![]() icon to view the help tip.
icon to view the help tip.
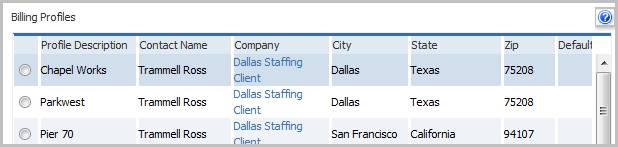
3) Workflows for Billing Profiles are listed below the list box.
§ Create –select this option to create a Billing Profile record.
§ View/Edit –select a record and then use this button to open the record to view and modify. Note: in systems without an active back office the billing profile does not exist as a separate entity. Using the View/Edit button will open a workflow view to display a simple billing profile for accounts payable purposes.
§ Set Default – select a record and then use this option to mark a Billing Profile as the primary one to use when creating job orders.
![]()
4) The billing profile is connected to job orders, assignments and placements through the Job Order’s Worksite and Billing segment.
§ From the job order select the segment from the segments control panel.
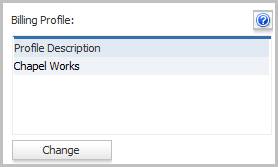
5) The billing profile can be viewed but is not accessible from the job order.
§ Click on the Change button below the list box to modify which billing profile is used for the job order.
§ The billing profile can be changed at the job order level but remains the same for all assignments or placements connected to the job order.
§ Click the ![]() icon to view the help tip.
icon to view the help tip.
Billing Profile Summary and Workflow
If the back office is active, after accessing the Billing Profile record, AdaptSuite will display the Summary segment.
1) The Summary Segment displays details of the Billing Profile; click on any of the blue links to view the records associated with the record.
§ Click Edit, on the Summary segment, to update the address, contacts, invoicing details and notes.
§ While updating the form, fields marked in red are required to complete the workflow. Click on the buttons to the right of certain fields to open a new window which will allow you to search and select options related to that specific field.
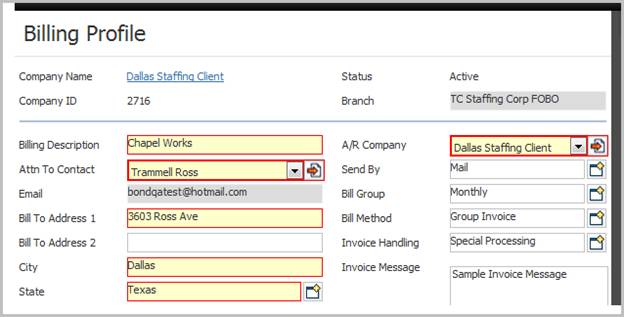
2) An explanation by field of the billing profile:
§ Billing Description – a unique identifier used to identify the billing profile.
§ Attn to Contact – the contact who is designated as the invoice recipient. This is a drop down list of all contacts connected to the client either directly or via a parent/subsidiary relationship.
§ A/R Company – can be the same as the client or another company linked to the client through the parent/subsidiary relationship. The A/R Company is the record where receivables are captured for the client.
§ Send By – is the method by which the invoices are actually transmitted to the customer. Options are email and mail; if the email option is selected invoice email recipients must be designated in the list boxes at bottom of the segment.
§ Bill Group – is the timeframe in which the client is billed; options are weekly or monthly.
§ Bill Method – is the grouping of the invoice; in other words, are all transactions on one invoice or are the invoiced individually. The invoiced individually selection will produce a single invoice for each timecard or direct hire billing created for the client.
§ Invoice Handling –indicator used to determine where the invoice is processed.
§ Invoice Message – is a free text field that will add a note to each invoice produced for this billing profile.
3) If the invoice send by is set to email, recipients of the invoices are designated in the Invoice Email section.
§ Note: recipients cannot be added or removed from the billing profile while the summary segment is in edit mode. After changing the send by method to email, save the segment then add the recipients.
§ Invoices are emailed to contacts and can also be sent to users within the system.
§ The list box separates the two recipient types and displays the name and email address of both.
§ Click the contact name link to view the contact’s record.
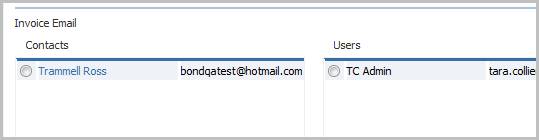
4) Modify the invoice email recipients with the workflow icons located below the list boxes.
§ Click the ![]() icon to open the Add Invoice Email Contact/User workflow.
icon to open the Add Invoice Email Contact/User workflow.
§ Select a record from the list box and click the ![]() icon to remove a recipient from the list.
icon to remove a recipient from the list.
5) Below the recipient list boxes is the last section of the segment where the record’s vital statistics are located.
