Add New Timecard
The timecard is used to record hours the candidate worked. If the back office is active these records are then parlayed into paychecks and invoices; if not active, the timecards are exported into files compatible for import into other accounting software systems.
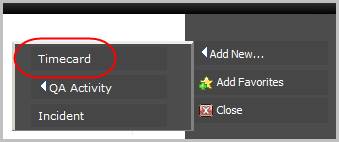
1) Select Timecard from the Add New menu in the workflow control panel.
§ Note: this is a jsp page that operates independent of the AdaptSuite; which allows navigation in AdaptSuite while updating the form.
§ If the candidate does not have a SSN or other valid Tax ID, a workflow window will open requesting a valid SSN/Tax ID prior to the Create Timecard workflow window. After entering the Tax ID the Candidate and the Assignment records are updated and the create timecard workflow opens.
§ If the back office license is active a timecard can also be created via the Timecard Batch’s Add Single or Group Transaction workflows. See the Financials section for additional details.
2) The Timecard Entry workflow will open in a new window.
§ Note: if the back office is not active select fields, relating to back office processes, are not visible in the timecard entry workflow.
Methods to update the form:
§ Click on the calendar icon to select dates.
§ Press tab to advance through sections.
§ Press enter to move through the time, expense and deduction grids.
§ Click into cells in Code columns to expose drop down menus with codes specific to that field.
3) The form is divided into sections of like criteria, scroll to update:
§ Note: the workflow title changes based on the time grid selected in the Time Details section.
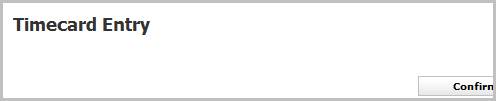
§ Control buttons are located at the top and bottom of the form:
Confirm – will save the timecard with an unapproved status, and close the workflow window. The default status of the timecard can be changed to Approved in System Settings.
Confirm and Next – will save the current timecard with an unapproved status, and open a new blank form for the next timecard.
Cancel – will abort the workflow and close the window.
Approve – will save the timecard with an approved status, and close the workflow window.
Note: closing the workflow view without using these control buttons can cause the batch/timecard to lock into an In Use status, preventing further editing.

§ Batch Name – a unique identifier that allows the user to locate the batch for later reference. If a batch name is not entered the system assigns one on confirm of the workflow.
Entering an existing batch name will link the timecard to that batch.
§ Batch Ref # - indicates which transaction from the batch is currently displayed. This assists the user when working with multiple timecards in the same batch.

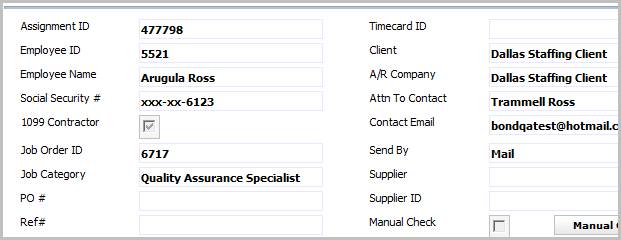
4) Assignment Details:
§ When the timecard workflow is launched from the contract assignment this section is automatically populated.
§ If the timecard workflow is launched from batch add single transaction: Enter the Assignment ID, Employee ID or Employee Name to populate the associated Job Order and Client details.
If using the Employee ID or Name a lookup window will open to select the Assignment for which the time details belong.
§ The Social Security # is masked in compliance with privacy regulations.
§ Manual Check is a back office workflow. Clicking the button to select the Manual Check option will open the create manual check workflow once the current view is confirmed.
5) Hours, Dates and Additional Options:
§ Total Hours / Units – enter the total hours/ units and tab out of the field to distribute time into the grid. If Standard Hours is populated on the assignment this field is filled when workflow view opens.
§ Period End – is filled with the current day’s date (if the timecard was created from the assignment) or the date you selected when creating the batch; if this is incorrect update the field accordingly. Once the end date is set the begin date will populate based on the selected Frequency.
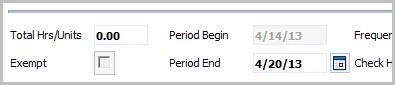
§ Frequency – refers to time span of the employee’s normal pay cycle; default is weekly.
§ Check Handling – advises how the check is delivered to the employee. If this is populated on the assignment, the field will fill with the employee’s preferred delivery method.

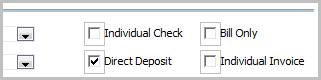
§ Individual Check (back office timecard only)– indicates the timecard will be processed separately by the payroll process to create its own check, independent of additional timecards for this employee that might exist in the same payroll process.
§ Direct Deposit (back office timecard only) –indicates the timecard will be selected during the Direct Deposit Payroll Process to create an employee advice and a deposit transmission record, rather than a physical check from the regular Payroll Process.
§ Bill Only (back office timecard only) –indicates the timecard will be considered only by the billing process, and will be bypassed during any payroll or direct deposit payroll processes. Useful when making corrections to billing transactions where no payroll adjustment is necessary.
§ Individual Invoice (back office timecard only) –indicates the timecard will be processed separately by the billing process to create its own invoice, independent of additional timecards for this employee that might exist in the same billing process.
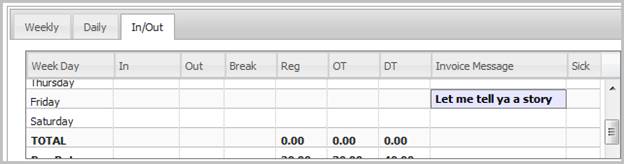
6) In the Time Details there are three grids and clicking the tabs will change the grid options:
§ Weekly – fills with the total hours/units under default PayBill codes and rates from the assignment. Used in non-shift type assignments.
§ Daily – fills from the total hours/units, default PayBill code and rates then allows user to indicate what days the hours were worked. The dispersal into the days of the week must match the total in order to complete the workflow.
§ In/Out – fields for in / out time and total break times are provided. Used in shift type assignments.
§ PayBill Code – standard identifiers (Regular, Bonus, Overtime) to use when allocating how to pay or bill hours/units.
§ Pay/Bill Hours / Units – indicator used to determine how many to pay; in other words 1 unit or 8 hours.
- Entering 0.3 into the in/out grid will convert the entry to three minutes.
- The hours/units will total and update the Total Hrs/Units field if different from the assignment standards.
§ Rate – is defaulted from the assignment and overtime and doubletime are calculated from the base rate. Rates are modifiable.
§ Invoice Message – free text field that adds a brief note next to that line on the invoice.
§ Sick – a flag to indicate that day should be paid as sick pay.
7) Below the time grid is the Expenses grid.
§ PayBill Code – identifier for the type of expense.
§ Pay (and Bill) Hrs/Units – enter the total units. Ex: if paying/billing for 150 miles enter 150 in the Hrs/Units fields.
§ Rates – enter the per unit rate on confirm of the workflow the total expense will calculate. Ex: in the mileage example if paying/billing $.50 per mile enter .50 and on confirm the total for the Mileage Expense will calculate to $75.00.
§ Invoice Message – free text field that allows a brief note next to that line on the invoice.

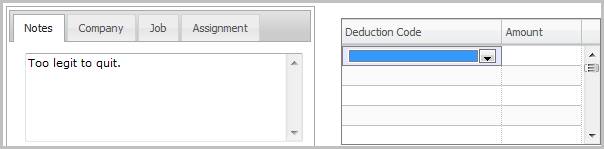
8) Below the expenses is a place to view timecard entry Notes and the Deduction grid.
§ The note entity tabs display information or staff instructions to be considered when entering timecards. The notes are stored in the following locations: Company-Billing Profile Special Requirements, Job Order-Job Notes and Assignment-Assignment Notes.
§ The deductions section is for the various codes that affect the amount of the check/invoice; normally decreasing.
- Manually entering a deduction into the grid will override an existing recurring deduction with the same name that is currently active on the employee record.
- Recurring deductions are created for the employee in the Employee Financial profile.
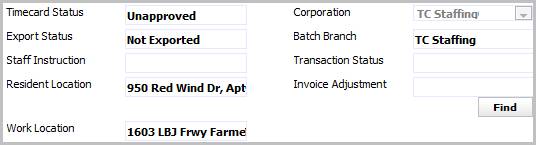
9) Additional fields available at the bottom of the timecard:
§ Timecard Status – defaults to unapproved and will be updated when timecard is approved.
§ Export Status – indicates if the timecard was exported from AdaptSuite into a file for import into another accounting system.
§ Staff Instruction – defaults from the Client’s Company Financial Profile is used in the billing process.
§ Resident Location – defaults from the Employee Profile Payroll Tax segment.
§ Work Location – defaults from the Assignment Worksite Tax location.
§ Corporation – defaults from the Assignment.
§ Batch Branch – defaults from the Assignment.
§ Transaction Status – read only field that provides the current status of timecard; populated on confirm of workflow.
§ Invoice Adjustment – associate this timecard with an existing client invoice.
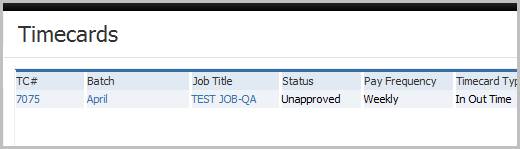
10) After the workflow is complete the timecard can be accessed through the Batch List Transactions Segment or the Contract Assignment’s Timecard Segment.
§ Accessing the record through the contract assignment will display a timecard summary. To view/modify the details use the Batch List Transactions method.