Add AR Payment Transaction
This workflow will create a transaction record for an accounts receivables payment. These transactions record payments received from a client and apply the payment to an invoice.
1) Select Add New Transaction from the workflow control panel.
2) The Add AR Payment workflow will open in a new window.
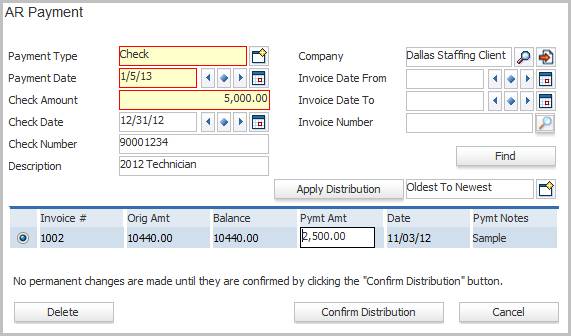
§ While updating the form, fields marked in red are required to complete the workflow. Click on the buttons to the right of certain fields to open a new window which will allow you to search and select options related to that specific field or choose a date.
§ Payment type is the form of payment: cash, check, electronic transfer, etc.
§ Payment Date is the date the payment is applied to the invoice.
§ Look up an invoice to apply the payment.
Search by AR Company or Client, Invoice Date From/To and/or Invoice Number.
The invoice records returned are for the corporation that matches the batch corporation.
The invoice records returned do not have zero balance.
Click Find to locate invoices matching criteria.
§ Apply Distribution will apply the payment amount to the invoices returned from the lookup.
Oldest to Newest and Newest to Oldest are the options.
If the payment amount will completely pay off the invoice, oldest or newest depending on distribution option selected, that invoice will be paid in full and the remaining payment balance applied to the next invoice in the line-up.
You can also type the payment amount directly into the Pymt Amt column on the Invoice grid if you want to manually apply the payment to individual invoices. However, the final payment amounts entered must equal the Check Amount.
§ The payment amount can be modified after the automatic dispersal is complete. To modify click into the Pymt Amt field. Add a note by clicking into the Pymt Notes field.
§ Select a record and click Delete to remove an invoice from the list box.
§ Payments are not applied until the Confirm Distribution button is clicked.
§ Cancel will abort the workflow.
3) After the workflow is complete, the transaction is accessed through the batch’s list transactions segment.
§ Select the record and click the View/Edit button to review and modify.
§ Select the record and click the Delete button to permanently delete.
4) After entering all transactions for the batch, run the Proof and then Post workflows to complete the payment application process.
§ View the company financial record’s invoices and payments segment to see the invoice and applied payment.