Recruitment Studio Dashboard
Use the Recruitment Studio Dashboard to quickly view your candidates and job orders. Select placement activities can be run without opening the records in Adapt.
1) Mouse over Adapt.Studio™ on the main navigation bar and select the Recruitment Studio link from the drop down menu.
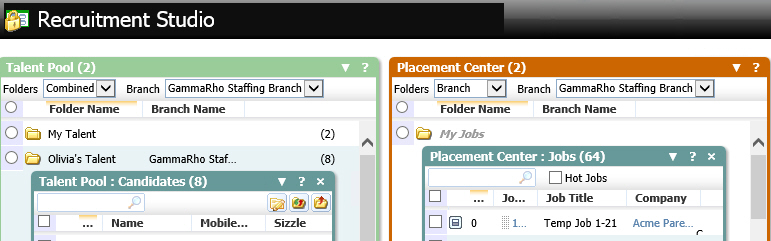
2) The screen will display the system created Recruitment Studio Dashboard.
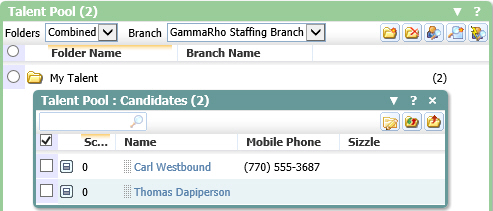
3) The left side of the segment displays the Talent Pool dashboard. The Talent Pool consists of folders you create to organize candidates. This is a fast way to view categorize and sort your people.
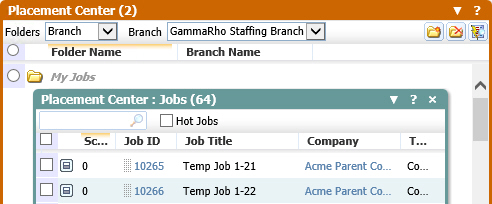
4) The right side of the segment displays the Placement Center dashboard. The Placement Center lists all of your active and partial filled job orders. This is a fast way to view and place your people in jobs.
Navigating the Recruitment Studio Dashboard
1) The Recruitment Studio is divided into two sections, the first for candidates and the second for job orders. The title bar of each segment identifies how many records are linked in parenthesis.
2) The options in the drop down menu located in the right hand corner of the title bar:
§ ![]() - Refresh; use this option to force a real time update.
- Refresh; use this option to force a real time update.
§ ![]() - Change Colors; use this option to change the border around the widget and the text color.
- Change Colors; use this option to change the border around the widget and the text color.
§ ![]() - Print; use this option to print your folders.
- Print; use this option to print your folders.
§ ![]() - Export to MS Excel; use this option to create an Excel file from the selected records in the widget.
- Export to MS Excel; use this option to create an Excel file from the selected records in the widget.
§ Reset Columns; use this option to reset the columns of the widget back to their original settings.
§ ![]() - Help tip; use this option to display the help tips available for the widget.
- Help tip; use this option to display the help tips available for the widget.
3) Below the Talent Pool widget title bar you will find icons that allow you to add and delete folders as well as search for candidates. NOTE: Placement Center has 3 widgets.

§ ![]() - Create New (Both); use this workflow to create a new folder in the Talent Pool or Placement Center widget.
- Create New (Both); use this workflow to create a new folder in the Talent Pool or Placement Center widget.
§ ![]() - Delete (Both); use this workflow to remove a selected Talent Pool or Placement Center folder.
- Delete (Both); use this workflow to remove a selected Talent Pool or Placement Center folder.
§ ![]() - Candidate Search (Talent Pool); use this option to launch the Advanced Candidate Search template.
- Candidate Search (Talent Pool); use this option to launch the Advanced Candidate Search template.
§ ![]() - Create Talent Pool Search Results (Talent Pool); after selecting candidates from the Talent Pool folders use this workflow to create a search result. Especially helpful when running batch activities.
- Create Talent Pool Search Results (Talent Pool); after selecting candidates from the Talent Pool folders use this workflow to create a search result. Especially helpful when running batch activities.
§ ![]() - Launch Candidate Fast Find (Talent Pool); opens a fast find to look up candidates by name or keyword, in the Placement Center widget.
- Launch Candidate Fast Find (Talent Pool); opens a fast find to look up candidates by name or keyword, in the Placement Center widget.
§  - Job Fast Find (Placement Center); use this option to look up jobs that you can add to folders.
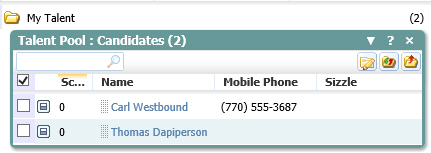
4) Click on the folder icon ![]() in the widgets to expand and display the candidates or jobs linked to the folders.
in the widgets to expand and display the candidates or jobs linked to the folders.
5) Use the text box to search, by keyword or name, and filter records in the folder.
6) Use the branch select icon  to change the branch associated with the folder (anyone who has access to the branch associated with a folder can see the folder).
7) After selecting records in the folder, use the keep icon ![]() to keep those records and delete the un-selected records.
to keep those records and delete the un-selected records.
8) After selecting records in the folder, use the delete icon ![]() to delete those records from the folder.
to delete those records from the folder.
9) Click on the column name to sort the records in the folder by that column. The default sort is the first column.
10) Click and grab the selection icon ![]() then drop the record into another folder, or if it is a candidate onto a job to link the candidate to the job.
then drop the record into another folder, or if it is a candidate onto a job to link the candidate to the job.
11) Click on the blue links to open the record directly.
12) Click on the preview icon to view brief details of the record in a preview pane at the bottom of the widget.
13) The preview pane has tabs to view brief information regarding the record as well as workflows that can be run against selected records. The screen shot below shows the tabs for the Talent Pool. The tabs for Placement Center are Summary, Submittal Tracking and Journal.

§ Click the tabs to view selected segments from the record. Each tab is a small slice of what can be seen on the full record. The journal tab will display the most recent 50 journal postings.
§ Click the candidate name or job order title to view the full record.
§ Click the MS Word icon ![]() on the candidate widget to view the default resume.
on the candidate widget to view the default resume.
§ Click on the telephone icon ![]() to view the contact activities workflow menu.
to view the contact activities workflow menu.
§ Click the dollar icon ![]() to view the placement activities workflow menu.
to view the placement activities workflow menu.
§ Click the magnifying glass icon ![]() on the job order widget to view the searches menu.
on the job order widget to view the searches menu.
§ Click the X icon ![]() to close the preview pane.
to close the preview pane.