Search Center
The search center segment is the location for searching using informal free text searching, formal advanced search templates and specialized quick searches. Searches will return a list of records that meet specified criteria and save those records under customizable list names for future reference. Searches differ from the Lookups in that they return and retain multiple records and lookups are used for locating single record.
1) Mouse over Searching on the main navigation bar and select the Search Center link from the drop down menu.
2) The Search Center segment will display the available searches in sections:
Free Text Search – this box will search on the three main Adapt entities: Candidates, Companies and Job Orders.
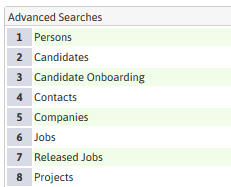
Advanced Searches – this is a list of formal search templates, separated by entity. These searches allow the user to look up records using criteria from fields within the entity record.
My Quick Searches – this is a list of specialized quick searches where the user who runs the search is an owner/part owner of the record; the user will be listed as the Recruiter or Account Manager(s). In order to make these searches easy and quick to use, the only searching criteria generally offered is a date range.
All Quick Searches – this is a list of specialized quick searches where the only searching criterion generally offered is a date range.
Note: the following screen slices are samples to illustrate the navigation of searches and saved search results and are not reflective of all the individual searches. To see details of a specific search please visit that topic.
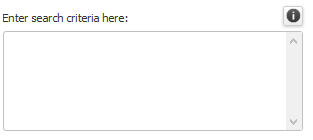
3) Text search boxes are available in the free text search and on selected advanced search templates.
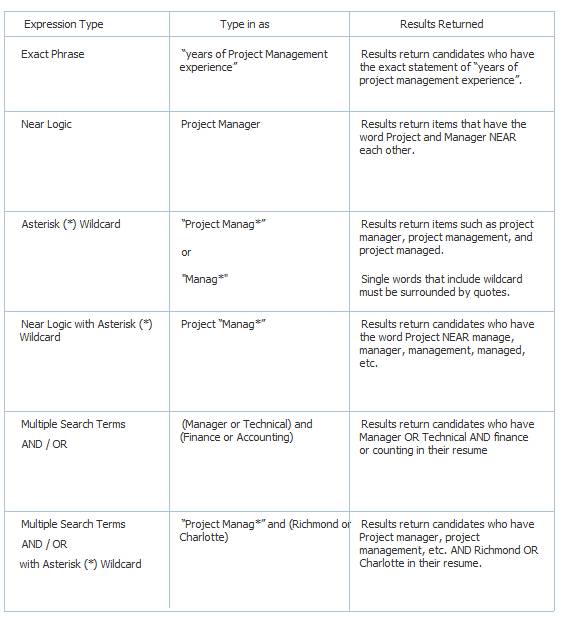
4) Use single or multiple terms (keyword(s)), as well as the asterisk (*) as a wildcard. Please note that the asterisk (*) wildcard can only be used at the end of the word or phrase. (ex: Project Manag*) Search terms may also be grouped by using brackets and the appropriate AND/OR logic.
5) Click the help tip  icons, located next to the text search boxes, to view the search expression tips in a separate window.
6) If using a formal search those are located at the bottom of the segment in listings separated by category Advanced My Quick Searches and All Quick Searches.

7) Locate the formal search or quick search to run and click on the name to open the workflow view in a new window.
8) The Advanced Searches have the template name listed at the top of the view along with the workflow control buttons and a customizable search name field.

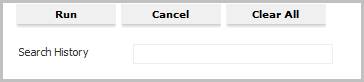
Run – will execute the search; if the button is clicked and no additional criterion is entered into the template, all records for that entity are returned.
Cancel – will close the template and abort the workflow.
Clear All – will remove all data entered into the template with the exception of the search name field. This is a quick way to reset the search and enter new criteria.
9) Rename the search if desired; this field is auto populated with the search template name and required to run the search. Note: special characters are not allowed in search name and will be removed when the search is executed. The search name can be up to 256 characters.

10) The search criteria is grouped together and separated by divider lines. Each template is separated into sections of like criteria. To see criteria details for a specific search please visit that topic.
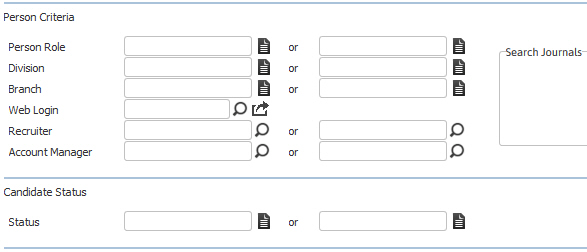
11) While updating the template click on the buttons to the right of certain fields to open a new window which will allow you to search and select options related to that specific field or choose a date.
§  – This is the code group picker; displays a list of options specific to the field.
§  – This is the lookup icon; opens a Lookup to select a specific record.
§  – These are date icons; the first three input the prior, current or next date and the calendar opens a traditional calendar.
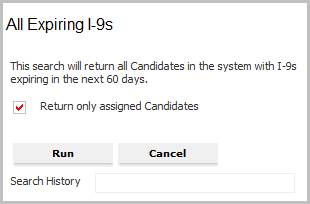
12) Quick Searches have fixed search parameters that are defined in the search description. Generally, the conditions are not modifiable but certain searches allow the user to refine the results by a single piece of criteria such as a date range or status.
13) When the search is completed, the Search History is populated with the current date and time of when the search was run. This information is used when re-fining or re-running the search. See Saved Searches > Refine Search or Re-run Search for more details.
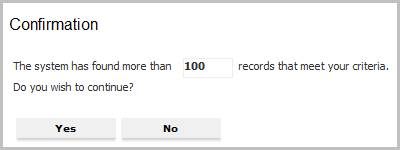
14) If more than a set limit of results are identified in the search, a confirmation box will display asking to continue with the compiling and saving of records. The default limit is set to 100 records; this limit is adjusted in the General Settings segment in the System Settings Profile. Further, by default, the maximum number of results is 5000 records. If this number is exceeded, you are asked to narrow your search. The maximum number of saved search results is 250. Each search that exceeds this number automatically removes the oldest search results in the list.
15) The results will display a list of records that match the criteria from the search. The information displayed can be customized via the Formatter Tool in the Search Results Settings menu.

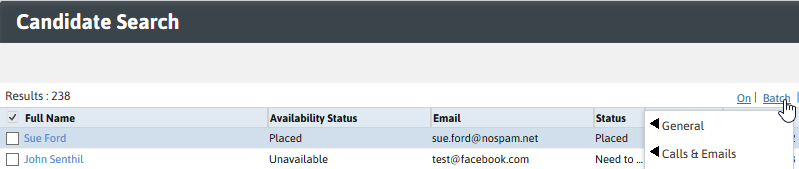
16) Select records and click on the Batch menu to run workflows against the selected records. Batch menu workflows will change in relation to the entity type displayed in the search result.
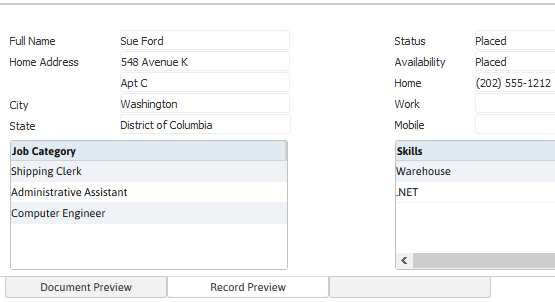
17) Select a line in the listing to pre-view the record in the Entity Preview pane and click on the entity link to open the record. In this example the entity link is the person’s full name.