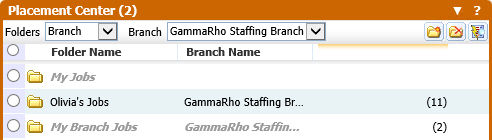
Placement Center
Use the Recruitment Studio’s Placement Center widget to view your active and partial filled job orders for quick access and placement activities.
1) Mouse over Adapt.Studio™ on the main navigation bar and select the Recruitment Studio link from the drop down menu.
2) The Placement Center widget is on the right side of the segment; the number of job folders will be noted in parenthesis in the title bar.
3) Icons located below the title bar:
§ ![]() - Create a job folder
- Create a job folder
§ ![]() - Delete a job folder
- Delete a job folder
§ ![]() - Launch job order fast find; this is a quick method for locating and adding job order to your placement center folders.
- Launch job order fast find; this is a quick method for locating and adding job order to your placement center folders.
4) When a folder its created, it can either be assigned to a user (so only the user can see it) or assigned to a branch (so everyone who has access to that branch can see it). The Folders droplist allows you to select whether you want to only view those folders assigned to yourself (User), to a branch (Branch) or both to yourself and to a branch (Combined). If you select Branch or Combined, use the Branch droplist to select the Branch you want to view.
5) Placement Center folders are expanded by clicking on the folder icon or renamed by clicking on the folder name.
![]()
6) Expanded folders will display all jobs linked to that folder.
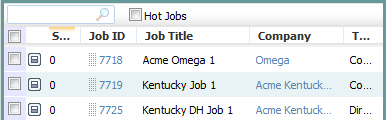
7) The job title, company, type and status are displayed; to view more details for that Job click  .
.
8) Click on the blue links to view the job order record or the client record.
9) Search and filter records in the folder by keyword or phrase. Searched words will be highlighted in results. Results will be sorted by score when search/filter is done on keyword.
![]()
10) The columns are sortable with the default sort by job id ![]() .
.
11) Add a job order to a folder by grabbing the ![]() icon and dragging it to the desired folder.
icon and dragging it to the desired folder.
12) The Placement Center has a system folder titled My Jobs. The folder displays Active and Partially Filled Jobs, both Contract and Direct, for which you are the Recruiter or Account Manager. Note: you cannot add or remove jobs from this folder, and it will not be included in the Placement Center print out or export.
13) Click on the Hot Jobs selection box to filter the list to display only job orders marked as hot. Click the Add a Note icon to add a note to the selected job.
You can add and remove columns from the widget by clicking  . This displays the following window:
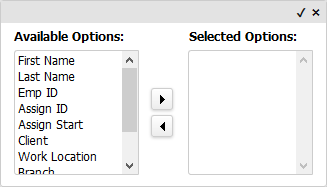
You can display all columns by either leaving the Selected Options area empty or by moving all column options to the Selected Options area. If only some columns are in the Selected Options area, those are the only options that will display in the widget. Columns display in the order in which they are listed in the Selected Options area. When the columns are in the places you want, click the small checkmark in the upper right corner (clicking the “x” closes the window without saving your column selections.
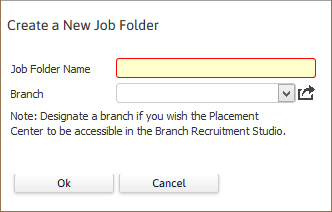
Create a Job Folder
1) Click on the create icon ![]() under the Placement Center widget title.
under the Placement Center widget title.
2) The Create a New Folder workflow will open in a new window.
3) Enter the folder name, there is a 64 character limit on the name field. If you would like all users with access to a specific branch to see the folder, use the droplist to select a Branch. If you do not want other users to see your folder, leave the Branch field blank. Click Ok to add the folder.
4) The segment will refresh to display the new folder.
§ Folders will resort alphabetically when a new folder is created or an existing folder’s name is changed.
§ There is a 50 folder limit in the talent pool; with a 250 Job limit per folder. Note: changing the folder limit is done by an administrator in the System Settings Profile.
Delete a Job Folder
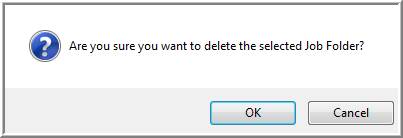
1) Select a folder and click the delete icon ![]() under the Placement Center widget title.
under the Placement Center widget title.
2) Click Ok on the confirmation window and the folder will be removed.
§ Links between your Jobs and that talent pool folder will be removed.
§ The remaining folders will resort alphabetically.
§ The Placement Center count will decrease with the removal of the folder.
Launch Job Order Fast Find
Use the Job Order fast find to locate and add records to your placement center folders.
1) Click the ![]() icon to launch the Job Order Fast Find in the Talent Pool widget.
icon to launch the Job Order Fast Find in the Talent Pool widget.

2) Click on the  icon to view the Help Tip specific to Job Fast Find.
3) Enter the search parameters (the examples in the tips below return Contacts but work on job titles and company names as well):
§ Enter all or the beginning of the first and/or last name of the person you wish to find, i.e. “J Smith”.
§ You can enter a single part of the name, which will return matches for the first and last name, i.e. “Smith” will return results such as “Smithson Jones” and “John Smith”.
§ If you search for "John Smith", it will also return "Paul John Smith Jones", regardless of how the name is split up in the record, since it looks at the full name when searching for the entire string.
§ If looking up a person with a hyphenated name putting the hyphen at the beginning or end of the search string will not bring back results.
§ Keywords can be a phrase or in quotes. To view the fields used in the keyword search please review the Job section of the Search Center document.
4) Click the Search icon next to the search field to start the lookup process.
5) Radius searching can be done by entering miles and postal code.
6) Select a search from the Adapt Searches drop down to display those results. These are previous searches you have run, from this widget or elsewhere in the system, which can be refined with keyword searching or radius searching.
7) The results of the search will display in the body of the widget.
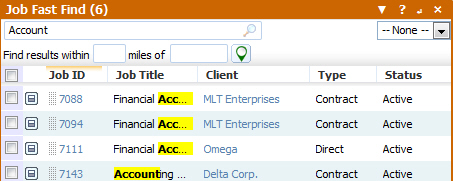
8) Keyword searching results are sorted by score. Scoring is done on match to keywords entered. Words used in search are highlighted in results.
9) If you leave the fast find widget and come back you will return to the exact place you left. The next time you launch fast find it will retain the last search words you ran.
10) Grab the ![]() icon and drag / drop the Job record to the Placement Center widget to add the record to a folder.
icon and drag / drop the Job record to the Placement Center widget to add the record to a folder.
11) Click to view details of the Job Order record or to run selected workflows.
12) Click the x icon to close the Fast Find widget and re-display the Talent Pool widget.
Add Job Orders to Placement Center Folders
1) From the fast find results add records to the job folders by either selecting multiple records or a single record and then grab and drag them to the desired folder.
2) You can click and drag a record from an existing folder and drop it into another folder; the record will then display in both folders.
3) Use the Add to Job Folders option from the workflow control panel from the Job’s record or from the batch activities menu in a Job search result.
Remove Jobs from Placement Center Folders
1) There are two methods for removing records from your job folders:
Select one or more records from the folder and click the keep icon ![]() . This will keep the records selected and remove the unselected records.
. This will keep the records selected and remove the unselected records.
Select one or more records from the folder and click the remove icon ![]() . This will remove all records selected.
. This will remove all records selected.
2) Click Ok from the confirmation window to complete the workflow.
3) The widget will refresh and the records will no longer be linked in the job folder.
Placement Center Preview Pane
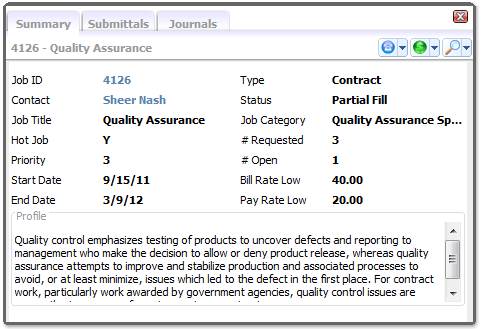
1) Click to view the job order record in the widget preview pane.
2) The first tab displayed in the preview pane is the Summary tab; this displays general information regarding the job order:
§ Job Order #, Contact, Job Title, Start and End Dates
§ Type, Status, #Requested, # Open, Bill and Pay Rates
§ Job Description
§ Click the job order number to access the job order’s full record.
3) Click on the Onboarding icon  to assign Compass Onboarding Job Requirements..
3) Click on the telephone icon to view the Contact Activities workflow menu.
Log a Contact Call
Schedule a Task
Add a Note
Copy Contract/Direct Job Order
Adaptalator
Schedule Internal Interview with Candidate
Email Job Details to Candidate(s)
4) Click on the dollar sign icon to view the Assignment / Placement Activities workflow menu.

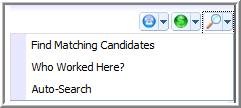
5) Click the magnifying glass icon to view the Job Searches menu.
6) Click the Submittals tab to view the Candidates submitted to the job order and their statuses. You can click to get a Candidate Preview where you can view various details about the Candidate and perform various activities. You can also view the Candidate's resume and journal entries from the Preview.
7) Click the Journal tab to view the 50 most recent entries.
8) Click the X icon to close the preview pane and re-display the Placement Center Folders.
Placement Center Notes
The following items are tips on using the Placement Center.
Prior to running Contact Activity or Assignment / Placement Activity workflows a candidate must be selected from the Submittals tab. Select a candidate by placing a check mark in the selection box ![]() , to the left of the candidate name.
, to the left of the candidate name.
o An exception to this tip is the Link Candidate(s) to Job workflow. This workflow does not work on candidates already linked to the job.
Candidates can be linked to the job order through click and drag. Grab a candidate from the talent pool widget and drop that candidate on to the job order. If the candidate is not already linked to this job order a submittal record will be created and the candidate will now reflect on the submittal tab.
The Placement Center widget will buffer the number of visible job orders to a list of 25 and pagination will be provided at the bottom of the widget.
Once a job order is closed or filled, it will no longer be visible in the Placement Center widget.
If you are not the Recruiter or Account Manager for the job order, you will not see it in the My Jobs folder in the Placement Center.
If you have notifications set up for New Direct Placement and yo place a candidate through the Submittals workflow, a notification email is created. NOTE: Notifications are set up in My Adapt > Administration. If you have selected to preview the notification email before sending, the email will display in Outlook and you can send it from there. Otherwise, the email is automatically sent to the appropriate recipients with all merged data displayed.