Download the Adapt Outlook Add-In
This workflow downloads and installs the Adapt Outlook Add-In.
Note: You need pc administrator rights to install the add-in but do not need the AdaptAdmin group access to use the Add-In after install.
These instructions are for Outlook 2010, Outlook 2013 and Outlook 2016.
Installing the AOA
Note: Depending on how your browser, network and operating system are set up, you may need to run your browser in Administrator mode to install the Adapt Outlook Add-in. If you do get an error when installing the Add-in, close Adapt. Right-click on your browser's icon or executable file and selectRun as Administratorfrom the menu. You can then restart Adapt and the Add-in should install without issue.
- Log into Adapt and click the
 icon on the top right corner of the screen.
 - Select the Installer droplist and then select Adapt Add-In for Outlook.
- The Welcome to the Adapt Outlook Add-In Setup Wizard screen displays. Click Next .
- At this point, the Add-in begins to install. When it is complete, you will see the Completed the Adapt Outlook Add-In Setup Wizard screen. Click Finish to end the installation.

Trusting the AOA
-
Once installed, the AOA should appear the next time you start Outlook. However, depending on your Outlook security settings it may not appear automatically. If this is the case, you need to activate the add-in.
- Open Outlook then click on the File menu.
- From there select Options.
- Then choose Add-Ins.
- In the Add-in Options area, click theAdd-in Options...button.
- Click the Adapt Outlook Add-In tab.
-
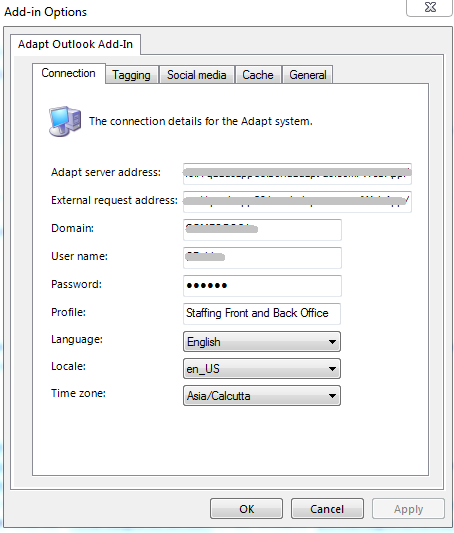
Update the Adapt Outlook Add-In settings.
Note: Your screen may look slightly different than the screenshot below.
- Adapt server address and External request address are the same address and should be the EXTERNAL URL to your Adapt system. An external URL typically uses a name for the server while an internal URL typically uses a set of numbers. To find the external URL, go to the site where you normally log in and copy and paste everything in the address bar before and including WebApp (e.g. https:demo.myserver.com/WebApp/).
- Username and password are the same credentials used for Adapt.
- Profile name ex: Staffing Front Office or Staffing Front and Back Office.
- There may be a slight delay as you click on the drop-down arrows of the Language, Locale and Time zone fields as their available options will be retrieved from the Server/Domain you selected in the fields above.

-
Click on the Tagging tab to view the options to tellthe add-in what to do with emails when received or sent. There are three standard options:
- Do nothing – user will have to manually tag an email to the record.
- Prompt to tag – a message is presented for user to determine if email should be tagged to record.
- Automatically tag – email is tagged to the record without user intervention.

-
Advanced Tagging Options that can be set:
- Checking the 'Tag unread items in the Inbox when the AOA starts' checkbox will collect all unread emails and prepare them for automatic tagging to records in Adapt, once AOA starts.
- Tag an email every 'x' seconds allows you to stagger the time for which the emails will be automatically tagged; thereby, reducing network traffic jams.

Social Media Connectors
-
Click on Social Media tab to enter and authenticate your social media ids.
- Click on the link that will take you to the social media website and enter your login information; the website will return a PIN code.
- Enter that PIN in the field and click the checkmark icon. Once the authentication is complete the PIN field and check mark will disappear.
- To remove the authentication click on the red x icon.
Connect Adapt Outlook Add-In
-
Once you have filled in all the options, click Apply and OK in the Adapt Outlook Add-In settings box. The AOA will attempt to connect to the server/domain you specified using the connection details you also supplied.
-
If the connection was unsuccessful you will see the following in the AOA:
- If the connection was successful, the AOA will query the Adapt system for the person whose email is currently selected in Outlook.
-
- If AOA does not activate when opening Outlook you may need to close and re-open Outlook.
AOA Configurables
Contact your account manager for information on:
- The AOA.xml file
- The <template>.xml files
- Overriding users tagging options
AOA FAQs
What versions of Outlook does the AOA work with?
- Adapt uses a 3rd party library to handle the various versions of Outlook for which these types of add-ins are developed; currently the AOA will work with Outlook 2010, Outlook 2013 and Outlook 2016.
What are the infrastructure requirements of the AOA?
- The AOA uses web services to connect to the Adapt. Depending on the size and user load of your staff using the AOA, you may require a dedicated web server – if not, you can use one of your existing Adapt applications servers.
What size load is placed on Adapt from the AOA?
- It depends very much on how the users use the AOA. The main load will come from the tagging functionality, so if they have set the AOA to automatically tag every email that they receive and send then this will place a high load on Adapt.
How do I find out which version of the AOA I am running?
- Click the
 button at the left bottom corner of the AOA screen.

Does the AOA require configuration before it will work?
- The business objects should not require configuration, and in fact they should not be modified as the AOA requires them to work in a very specific way. The XML files that describe the data that is shown in the AOA and the various workflows available to run are available from your account manager.
How can I get a user who is having problems to send me a copy of their AOA debug log file?
- Click the button to display the help-about screen:
- Clicking the down arrow on the Log button shows 2 options: View and Email.
- If you select View, it will load up the AOA_debug.txt in the relevant editor in Windows
- If you select Email, it will create an email in Outlook, add the AOA_debug.txt as an attachment and take you to the newly created email. You can then add your recipients and click Send to send it.
Common problems
The user is unable to connect the AOA to the Adapt system.
- Chances are they haven’t filled in the user settings for the AOA. To do this they should navigate to Options, Add-In Options and the Adapt Outlook Add-In, fill out the connection details and click OK.
No record details are displayed for records that you know has a corresponding email.
- Most likely Adapt does not have the business objects in place that the AOA calls to do the searching/retrieve the relevant data etc.
The AOA has been installed but does not appear in Outlook.
- It is possible that the AOA has been installed but has not been set to be a trusted add-in in Outlook. Navigate to the Trust Center in Outlook, and put a tick against the Adapt Outlook Add-In. It should then appear in Outlook. Close and re-open Outlook suggested.
- User Account Control (UAC) on Windows 8 -The User Account Control (UAC) should be set to the default level on Windows 8. This is necessary when you install a COM add-in for all users on the PC, that is, when the RegisterForAllUsers property of the add-in module is true. Note that when UAC is off, a per-user add-in (RegisterForAllUsers = false) installed by an administrator will not work. This is a restriction of systems with UAC. The AOA installer sets RegisterForAllUsers to False.
- It is possible the default value of the AlwaysInstallElevated key has been changed in the Windows registry. You can read more about this in the How to allow users who are not administrators to install MSI packages article at http://support.microsoft.com/kb/259459.