Timecard Import
The Timecard Import feature of the Import Studio allows you to import timecards entered via Adapt from a .csv file. It also allows you to import timecards exported via TempBuddy into Adapt.
You can use the Timecard Import Dashboard to edit the file before you import the timecards into either a new or existing timecard batch.
Note: The timecard import process does not import rates. Instead, the rates come from the associated Assignment.
You tell the system how to read the file by using Manage Data Mapping in the Administration area. (See Manage Data Mapping.)
Timecard Import File Format
The imported comma-delimited file (.csv) must be formatted in a specific manner for the Timecard Import functionality to accept it.
Note: The format of the Adapt Timecard Import .csv file differs with that of the TempBuddy TC Import .csv file. The Assignment available in the TempBuddy TC Import file is the TempBuddy assignment that needs to find the linked Adapt assignment in order to create the timecard.
There are 11 columns that must be included in the .csv file (both Adapt and TempBuddy import files):
- Timecard Week Ending Date (Column 1): The first column contains the work week ending date for the timecard. The format is Mm/Dd/YYYY. This is required.
-
Assignment Number (Column 2): The second column should contain the Assignment ID (ID# on the Assignment Summary segment). This ID should be numeric and no more than 15 characters in length. Either this, Employee ID (Column 4) or Social Security Number (Column 3) is required. If all three exist, this column is used for validation.
Note: If no assignment number exists AND either a Social Security Number or Employee ID does exist, then the system will verify there is ONLY one active contract assignment associated with the employee record. If more than one exists, the system will fail the imported transaction record.
-
Social Security Number (Column 3): The third column should contain all nine digits of the social security number.
Note: Only the last 4 digits display in the Import Studio.
This information is found on the Personal Information segment of the Candidate record. Either this, Employee ID (Column 4) or Assignment Number (Column 2) is required. If only an Employee ID and Social Security Number exist, the Social Security Number is used for validation.
- Employee ID (Column 4): The fourth column should contain the Employee ID. This information is found in the ID# field on the Candidate Summary segment. The maximum length of this column is 15. Either this, Assignment Number (Column 2) or Social Security Number (Column 3) is required.
- Employee First Name (Column 5): The fifth column should contain the Employee's first name. This information is found on the Candidate Summary segment. The first name must be entered exactly as it appears on the Candidate record. The maximum length of this column is 25. This is optional.
- Employee Last Name (Column 6): The sixth column should contain the Employee's last name. This information is found on the Candidate Summary segment. The last name must be entered exactly as it appears on the Candidate record. The maximum length of this column is 25. This is optional.
-
Collection Format (Column 7): This column tells the system how to interpret the time contained in the Total Hours Worked column (Column 9). This is required. There are three options:
- 1 (Partial Hours are Represented in Quarter Hour Increments): If an employee worked 7 hours and 45 minutes and the time in column 8 is entered as 7.75, then a "1" (without quotation marks) should be entered in this column.
- 2 (Partial Hours are Represented as Hundredths of Hours): If an employee worked 7 hours and 20 minutes and the time in column 8 is entered as 7.33, then a "2" (without quotation marks) should be entered in this column.
- 3 (Partial Hours are Represented in Minutes): If an employee worked 7 hours and 22 minutes and the time in column 8 is entered as 7.22, then a "3" (without quotation marks) should be entered in this column.
- Wage Code (Column 8): The eighth column indicates the type of time (e.g. regular, overtime, etc.) recorded. The maximum length is 15 characters. In order for Adapt to map the wage code entered here with the proper PayBill Code in Adapt, you must set up a data mapping using Manage Data Mapping in the Administration area. This is required.
- Total Hours Worked (Column 9): The ninth column indicates the total hours worked at the wage code in column 7. The data entered here is combined with the format entered in Column 6 to tell Adapt the number of hours and minutes worked. The format is xxxxx.xx. This is required.
- Pay Rate (Column 10): The tenth column contains the pay rate. The format is xxxxx.xx. This is optional. If a pay rate is included, this pay rate overrides the pay rate on the assignment. If not included, the rate from the assignment is used. If the pay rate is not available on either the file or the assignment, it is defaulted to 0.00. For Standard Paybill Codes which are not designated at the Assignment level, the system will default the Pay rate from the corresponding Default Paybill Code for that Paybill Code type.
-
Bill Rate (Column 11): The final column contains the bill rate. The format is xxxxx.xx. This is optional. If a bill rate is included, this bill rate overrides the bill rate on the assignment. If not included, the rate from the assignment is used. If the bill rate is not available on either the file or the assignment, it is defaulted to 0.00. For Standard Paybill Codes which are not designated at the Assignment level, the system will default the Bill rate from the corresponding Default Paybill Code for that Paybill Code type.
To view a sample .csv timecard import file, click here. You can also use this sample to create a timecard import file. However, you should remove all data (including the header row) currently entered on the sample before adding your own data based on the format above.
Uploading a Timecard File
-
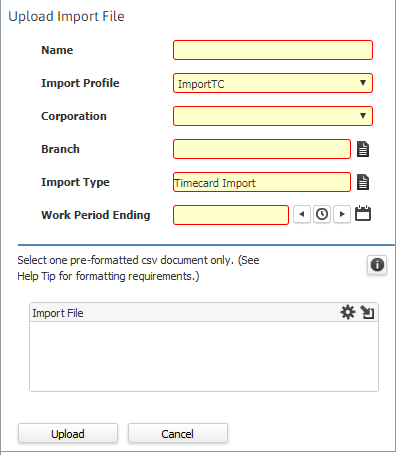
On the Import Dashboard, clickthe Upload Import File icon. This opens the Upload Import File screen.

- Type in a Name for the import file. The name is how you will refer to the file.
- Select an Import Profile from the droplist. Profiles are set up using Manage Data Mapping in the Administration area and basically tell the system how to read the file (for example, you can tell the profile that the word "Reg" in the file is equivalent to the "Regular"PayBill Code.
- Select a Corporation from the drop-list.
- Select a Branch using the look-up icon.
- Import Type defaults to "Timecard Import". If you are importing Timecards entered via TempBuddy, select TempBuddy TC Import.
-
Enter a Work Period Ending date.
Note: If the timecard import file has a work period ending date, it will override the work period ending date entered here.
- Use the Import File area to select the csv file you want to upload. The Help Tooltip provides format information about the file (or see above).
- Once you are satisfied with the data you have entered, click Upload. This uploads the file so that you can search for it.
Searching for an Import File
-
On the Import Dashboard, clickthe Search for Import File icon. This opens the Search for Import File screen.

- You can search by name, process ID, submitted by or submitted date. You can also leave all of the fields blank to search for all imported files.
- When you are satisfied with your search criteria, clickSearch.
- The grid is populated with uploaded files that match your search criteria.
- Click in the radio button of the row containing the file with which you want to search (a small dot will appear in the radio button of the row you select). You can only select one row.
- Click Select.
-
The Import Dashboard grid is populated with the contents of the file.
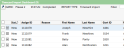

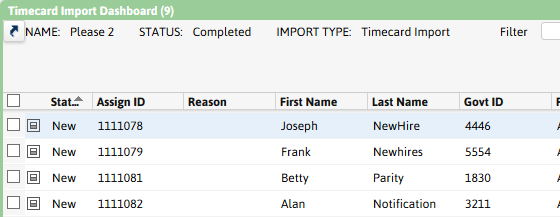
The Import Dashboard Grid
- Status: Failed indicates that the import record did not pass the parsing or timecard process (you can see the reason in the Reason column). New indicates that the import record was created successfully, but no timecard has been created from it yet. Modified indicates that one or more fields on the transaction have been manually modified. TC Batch indicates that a timecard has been successfully created from the transaction record.
- Assign ID: The assignment ID associated with the imported timecard.
- Reason: If the status is failed, this is the reason the record failed.
- First Name/Last Name/Govt Id: The first and last name of the employee associated with the imported record plus the last 4 digits of the employee's government ID.
- Paybill/Hours: The paybill code for the imported record and the number of hours associated with it.
- WE Dt: Week ending date of the imported record.
- Employee ID: The ID of the employee on the imported record. This is a link. Clicking on the listed ID to link to the Employee record.
- Format: There are three formats. Format 1 indicates that partial hours are represented in quartered hour increments (so 7 hours and 45 minutes displays as 7.75). Format 2 indicates that partial hours are represented in hundredths of hours (so 7 hours and 9 minutes displays as 7.15). Format 3 indicates that partial hours are represented in minutes (so 7 hours and 22 minutes displays as 7.22).
- Pay Frequency: The pay frequency for the batch.
-
You can click the preview icon to view a summary of a record. Once you are viewing the preview, you can clickthe iconto edit the record. You can edit the Assignment ID, Paybill Code, Format, Week Ending Date, Pay Rate, Hours, Employee ID, First Name, Last Name, Government ID, Bill rate, and Import Message. Once you have made your changes, click Confirm.
Note: If the Timecard is associated with the state of Pennsylvania and the Employee Payroll Tax Record is not coded to the School District level, a message will display reminding you to recode the Employee record and the timecard is not saved. To make changes, jump to the desired record keeping the Edit a Time Record window open, make the appropriate changes and return to the Edit a Time Record window and click Confirm.
- You can filter the list of imported records by using the Filter field and the drop-list next to it. You can filter by Assignment ID, Reason, Pay Frequency, Status, or Week Ending Date.
- You can click the upper left corner to view a summary of the imported file (including Import Name, Import Type, Submitted By, Process ID, Process Status, Process Name and Submitted Type). You can also double click on the Import File name to view the import file itself (useful if some records have a status of Failed).
- You can click the Time Import Hash Totals iconto view hash totals for the file (including Total Regular Hours, Total OT Hours, Grand Total of Hours, Total Records and the number of records that failed).
Revalidating Imported Records
- On the Import Dashboard, click the Revalidate Icon. The imported records are revalidated and the Status column is populated with the validation result. In case the validation fails, the Status is displayed as Fail.
Adding Imported Records to a Batch
- On the Import Dashboard, select the records from which you want to create timecards. You select records by placing a check in the box located in the first column. Clicking in the box toggles it between checked and unchecked.
- Once you have selected all the records you want to create timecards from, clickthe Import Menu iconand select whether you want to add the records to a new batch or existing batch. Make sure you select records of the same pay frequency to add to a batch. If found otherwise, the system presents a validation message.
- If you select a new batch, the standard Add Batch screen displays with the Batch Type, Corporation, Batch Branch, Pay Frequency, and Work Period defaults from the file contents. You can edit the Batch Name, Corporation, Batch Branch, and Work Period, if you like. Once you are satisfied with your selections, click Save. At this point, you can treat it as a normal timecard batch.
- If you select an existing batch, the Search Timecard Batch screen displays. Enter your search criteria and click Search. From the search results, select one of the batches and click Select. At this point, you can treat it as a normal timecard batch.
Note: In both cases, if a back office license is present, the system checks to make sure that all employees have valid addresses. If any do not, a message displays indicating that fact and listing all employees that failed the validation. All other timecards are processed normally.
Changing the Columns Displayed on the Dashboard
-
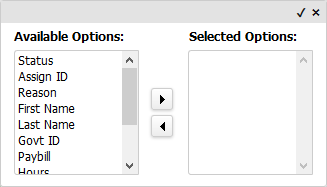
On the Import Dashboard, click the droplist in the upper right corner. The following screen displays:

- The Available Options field displays all columns available in the grid. The Selected Options field displays the columns you want to display in the grid. The only exception is if nothing is in the Selected Options field. If that is the case, all columns are displayed. To display only certain columns, select the column you want to display in the Available Options field and click
 . The column name moves to the Selected Options field. If you want to remove something from the Selected Options field, select the column and click
  . Once you are satisfied with the columns in the Selected Options field, click
  . The grid re-displays with only the selected columns.