Payroll Census Report
This exportable report provides a roster of employees who worked within the selected state during the specified date range. This report can be used to provide a list of eligible employees to the CalSavers and Illinois Secure Choice retirement programs. After each payroll, an employer must upload a report showing the amounts deducted for the retirement savings program for each of their employees.
Executable Formats
This report is intended to be exported to Excel.
Accessing the Report
Access Reporting > Reporting & Analytics > System Reports > Payroll.
-
In the Payroll folder, single-click on Payroll Census Report and, click on the Run Selected Report icon.
-
Select the Corporation for which you want to create a report. If you have only one active corporation, it defaults into this field.
-
Select the State.
-
Select the Start Date.
-
Select the End Date.
-
Click Okay to generate the report and then click Export Excel to generate the spreadsheet. Alternatively, you can right-click on Payroll Census Report and select Export As >Excel to export directly to Excel.
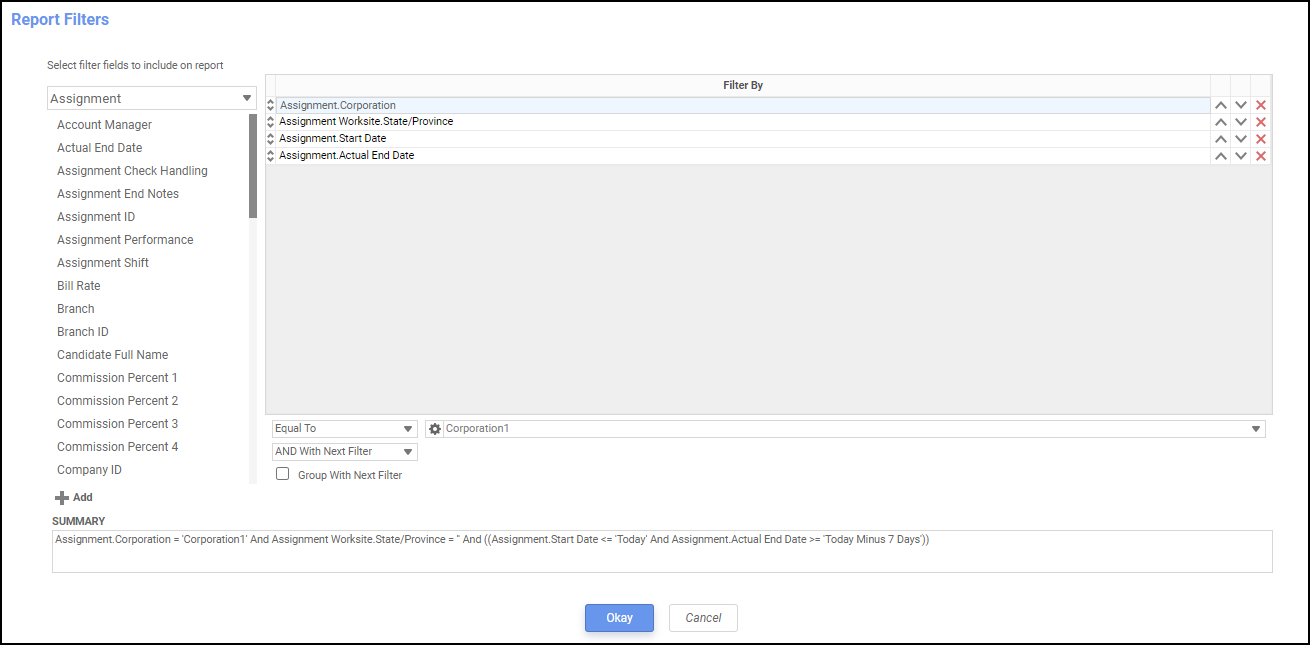
Filters
The Payroll Census Report has 4 filters:
-
Assignment Corporation: Corporation associated with the payroll process. This defaults to the Default Corporation of the logged-in User's Default Branch. While the filtering screen allows you to change the Condition, the report only accepts one corporation at a time.
-
Assignment State: The work state of the assignment.
-
Assignment Start Date:The starting date range for selecting active assignments.
-
Assignment End Date : The ending date range for selecting active assignments.

Filter Conditions
The following conditions are available:
-
Equal To (default for Corporation): Data must be equal to the Value. There is only 1 Value option.
-
Not Equal To: Data must not be equal to the Value. There is only 1 Value option.
-
Less Than: Data must be before the Value alphabetically. There is only 1 Value option.
-
Less Than or Equal To: Data must be before or equal to the Value alphabetically. There is only 1 Value option.
-
Greater Than: Data must be later than the Value alphabetically. There is only 1 Value option.
-
Greater Than or Equal To: Data must be later or equal to the Value alphabetically. There is only 1 Value option.
-
Starts With (does not apply to Sales Posting Date): Data must start with the Value. There is only 1 Value option.
-
Not Starts With (does not apply to Sales Posting Date): Data must not start with the Value. There is only 1 Value option.
-
Ends With (does not apply to Sales Posting Date): Data must end with the Value. There is only 1 Value option.
-
Does Not End With (does not apply to Sales Posting Date): Data must not end with the Value. There is only 1 Value option.
-
Contains (does not apply to Sales Posting Date): Data must contain the Value. There is only 1 Value option.
-
Does not Contain (does not apply to Sales Posting Date): Data must not contain the Value. There is only 1 Value option.
-
Is Between (Default for Sales Posting Date): Data/Date must be between the two selected Values alphabetically, numerically or date-wise (inclusive). There are two Value options.
-
Is Not Between: Data/Date must not be between the two selected Values alphabetically, numerically or date-wise (inclusive). There are two Value options.
-
Is One Of (Default for PayBill Type and Transaction Type): Data must match one of the selected Values. There are multiple Value options.
-
Is Not One of: Data must not match any of the selected Values. There are multiple Value options.
You have the following Value options:
-
Single Value: To select a single value, you can use the drop-list.
-
Double Values: To select two values, click the drop-list on each value.
-
Multiple Values: To select multiple values, click the drop-list on the top field to select a Value to add to the list. To see the items on the list, click the lower drop-list. To remove an item from the list, click the red X to the right of the item.
IMPORTANT! For performance purposes, the following should be noted when using the Values droplist:
-
In order to enhance performance, once a value is selected, the droplist only displays those items alphabetically/numerically AFTER the selected item. To see all items again, delete the value (select it and press Delete on your keyboard) and then use the droplist. All items will display.
-
In order to enhance performance, the droplist only displays a set number of records. If the list of possible values is longer than the displayed list, select the name at the bottom of the list as the value. When you next click the droplist, the rest of the items display.
Once filters have been chosen, select Okay to run.
The Payroll Census Report
The export shows data in the following columns:
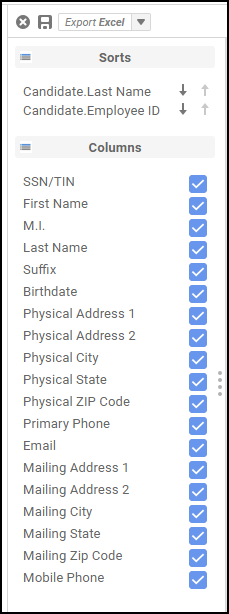
The data is sorted by Last Name
Full Report
