On the Import Dashboard, click
 . This opens
the Upload Import File screen.
. This opens
the Upload Import File screen.
Import Dashboard
The Import Studio (and Import Dashboard) allows you to import timecards from a .csv file. You can use the Import Dashboard to edit the file before you import the timecards into either a new or existing timecard batch.
You tell the system how to read the file by using Manage Data Mapping in the Administration area.
Uploading a Timecard File
On the Import Dashboard, click
. This opens
the Upload Import File screen.
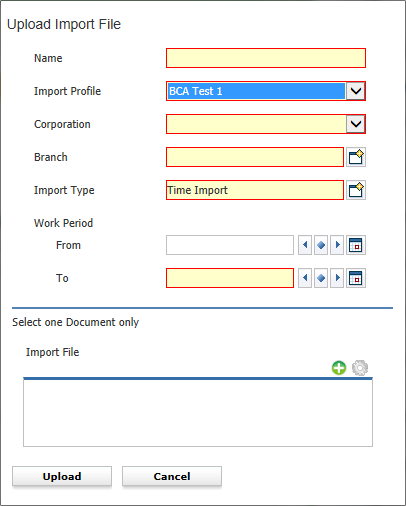
Type in a Name for the import file. The name is simply how you will refer to the file.
Select an Import Profile from the droplist. Profiles are set up using Manage Data Mapping in the Administration area and basically tell the system how to read the file (for example, you can tell the profile that the word "Reg" in the file is equivalent to the "Regular" PayBill Code.
Select a Corporation from the drop-list.
Select a Branch using the look-up icon.
Import Type defaults to "Time Import" and is currently the only option available.
Enter a Work Period To (Ending) date. You can also enter a Work Period From (Beginning) date, but this is optional.
Use the "+" (plus) icon to select your import file.
Once you are satisfied with the data you have entered, click Upload. This uploads the file so that you can search for it.
Searching for an Import File
On the Import Dashboard, click
.  This opens
the Search for Import File screen.
This opens
the Search for Import File screen.
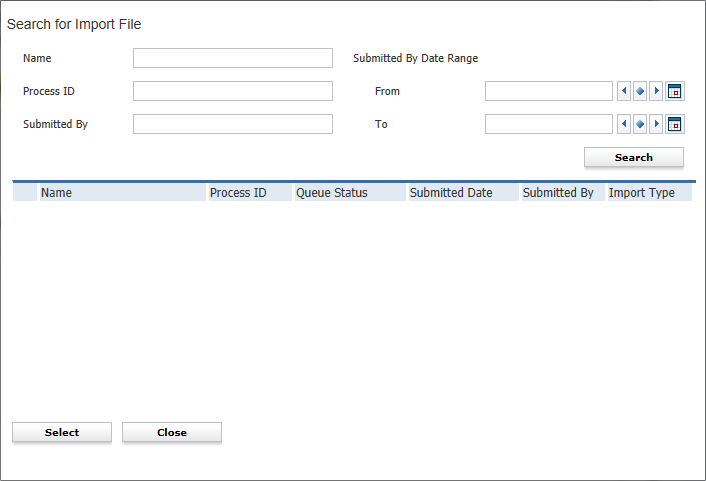
You can search by name, process ID, submitted by or submitted date. You can also leave all of the fields blank to search for all imported files.
When you are satisfied with your search criteria, click Search.
The grid is populated with uploaded files that match your search criteria.
Click in the radio button of the row containing the file with which you want to search (a small dot will appear in the radio button of the row you select). You can only select one row.
Click Select.
The Import Dashboard grid is populated with the contents of the file
The Import Dashboard Grid
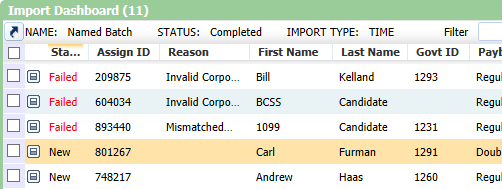
Status: Failed indicates that the import record did not pass the parsing or timecard process (you can see the reason in the Reason column). New indicates that the import record was created successfully, but no timecard has been created from it yet. Modified indicates that one or more fields on the transaction have been manually modified. TC Batch indicates that a timecard has been successfully created from the transaction record.
Assign ID: The assignment ID associated with the imported timecard.
Reason: If the status is failed, this is the reason the record failed.
First Name/Last Name/Govt Id: The first and last name of the employee associated with the imported record plus the last 4 digits of the employee's government ID.
Paybill/Hours: The paybill code for the imported record and the number of hours associated with it.
WE Dt: Week ending date of the imported record.
Employee ID: The ID of the employee on the imported record. This is a link. Clicking on the listed ID to link to the Employee record.
Format: There are three formats. Format 1 indicates that partial hours are represented in quartered hour increments (so 7 hours and 45 minutes displays as 7.75). Format 2 indicates that partial hours are represented in hundredths of hours (so 7 hours and 9 minutes displays as 7.15). Format 3 indicates that partial hours are represented in minutes (so 7 hours and 22 minutes displays as 7.22).
You can click  to view a summary of a record.
Once you are viewing the preview, you can click
to view a summary of a record.
Once you are viewing the preview, you can click  to
edit the record. You can edit the Assignment ID, Paybill Code, Format,
Week Ending Date, Hours, Employee ID, First Name, Last Name, Government
ID and Import Message. Once you have made your changes, click
Confirm.
to
edit the record. You can edit the Assignment ID, Paybill Code, Format,
Week Ending Date, Hours, Employee ID, First Name, Last Name, Government
ID and Import Message. Once you have made your changes, click
Confirm.
You can filter the list of imported records by using the Filter field and the drop-list next to it. You can filter by Assignment ID, Reason, Status or Week Ending Date.
You can click  (upper left corner) to view a summary
of the imported file (including Import Name, Import Type, Submitted
By, Process ID, Process Status, Process Name and Submitted Type).
You can also double click on the Import File name to view the import
file itself (useful if some records have a status of Failed).
(upper left corner) to view a summary
of the imported file (including Import Name, Import Type, Submitted
By, Process ID, Process Status, Process Name and Submitted Type).
You can also double click on the Import File name to view the import
file itself (useful if some records have a status of Failed).
You can click  to view hash totals for the file
(including Total Regular Hours, Total OT Hours, Grand Total of Hours,
Total Records and the number of records that failed).
to view hash totals for the file
(including Total Regular Hours, Total OT Hours, Grand Total of Hours,
Total Records and the number of records that failed).
Adding Imported Records to a Batch
On the Import Dashboard, select the records from which you want to create timecards. You select records by placing a check in the box located in the first column. Clicking in the box toggles it between checked and unchecked.
Once you have selected all the records
you want to create timecards from, click  and select whether you want to
add the records to a new batch or existing batch.
and select whether you want to
add the records to a new batch or existing batch.
If you select a new batch, the standard Add Batch screen displays with the Batch Type, Corporation, Batch Branch, Pay Frequency and Work Period defaults from the file contents. You can edit the Batch Name, Corporation, Batch Branch and Work Period, if you like. Once you are satisfied with your selections, click Save. At this point, you can treat it as a normal timecard batch.
If you select an existing batch, the Search Timecard Batch screen displays. Enter your search criteria and click Search. From the search results, select one of the batches and click Select. At this point, you can treat it as a normal timecard batch.