 displays a list of all merge fields that can be added to a template. It is helpful to have this list open on your workstation while you work on your templates. Click here to see the list of merge fields.
Custom Templates
Most of the options in AdaptSuite that allow you to send an email or letter also allow you to select a template.
The following email and letter workflows allow you to select a Template:
People > Summary segment > Email 1 and Email 2
People > Calls and Emails > Send an Email
People > Calls and Emails > Send a Letter
People > Candidate > Onboarding > Email
People > Candidate > Self Service > Generate Code
People > Candidate > Self Service > Reset Password
Job Orders (including Opportunities) > Send an Email > Candidate
Job Orders (including Opportunities) > Send an Email > Contact
Job Orders > Onboarding Requirements > Email
Assignments > Send an Email > Candidate
Assignments > Send an Email > Contact
Batch > Calls & Emails > Send an Email
Batch > Calls & Emails > Send a Letter
Onboarding Studio > Generate Code
The following email and letter workflows do not allow you to select a Template:
Email Job Details (from People, Job Order or Batch)
Market Candidate
When you select to send an email or letter, you are given an option of selecting a template.
Clicking displays a list of all merge fields that can be added to a template. It is helpful to have this list open on your workstation while you work on your templates. Click here to see the list of merge fields.
To access a Template, you can either select it from the droplist or click  . This displays the Template Picker:
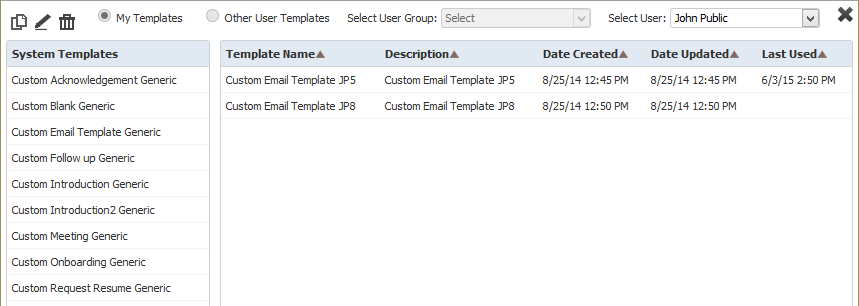
The top of the Template Picker has three icons. From left to right, they are:
Copy: Allows you to copy an existing template.
Edit: Allows you to edit an existing template.
Delete: Allows you to delete an existing template.
The Select User droplist allows you to look at your own templates (by default) or other user templates.
The main part of the window is divided into two areas. The left side displays a list of all system templates that can be selected. The right side shows a list of all templates from the selected User's library (in this case, it is showing the templates from John Public's library).
Selecting a Template
To select a template to use, simply double-click on the row with the template you want to use. This adds it to the Template field.
NOTE: You should only use letter templates with performing a Send a Letter action and only email templates when performing a Send Email action. Using the wrong type of template can cause issues with the merged document.
Copying a Template
Click on the template in the list. If you want to copy a system template, click a template on the left side. If you want to copy a template from the user library, click a template on the right side.
Click the Copy button. The following window displays (depending on your system, you might also get an intermediary window asking you to select a language):
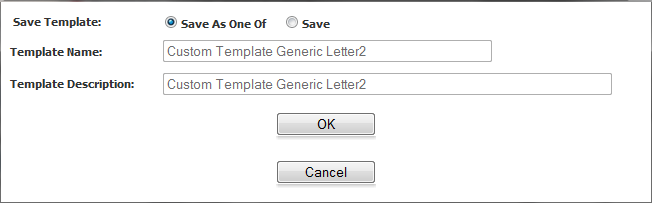
The option Save As One Of saves the document with the current template name, but for the current session only. In other words, the template is not permanently saved. This is useful if you want to make a small change to a template, but don't plan on using it again. The Save option saves the template permanently to the database. NOTE: If you select the name of an existing template, it will overwrite the template (but will warn you first). The Template Name and Template Description fields are only active if you select the Save option.
If you select Save, enter a new Name and Description (unless you want to overwrite the selected template). Bond encourages you to note the type of template in the Template Name (e.g. letter template vs email template). This allows you to easily differentiate the templates.
Once you are satisfied with your selections, click OK.
The Template Picker displays with the new (if you selected a new Name and Description) template listed.
Editing a Template
Click on the template in the list. If you want to edit a system template, click a template on the left side. If you want to copy a template from the user library, click a template on the right side.
Click the Edit button.
The Template displays in Microsoft Word. You may now edit the document as you see fit.
To add standard (non-merge field) text, simply type the text as you would for any other document.
To add a merge field, select an existing merge field on the template, copy it and paste it where you want your new merge field to appear in the document. Right-click on the merge field after it is pasted and select Edit Field.... The Field window displays. Enter the name of the merge field (from the Merge Template document) in the Field name field under Field Properties and then click OK. NOTE: Do not edit the field name directly on the document itself. While the name does change, the merged document displays the information from the copied merge field rather than the edited field.
To remove a merge field, select the merge field (including the double-angle brackets) and press Delete on your keyboard.
When you are satisfied with your changes, save the Word document and close it.
The Copy Template window displays allowing you to save your document. Remember: Save As One Of does not permanently save your changes. Save does permanently save your changes and will overwrite the existing template unless you change the Name.
When you are satisfied with your save selection, click OK.
Deleting a Template
Click on the template in the list. If you select a System Template (from the left side list), the Delete button inactivates. You may not delete a System Template. If you want to delete a template from the user library, click a template on the right side.
Click the Delete button.
A warning message displays asking if you are sure you want to delete the template. Click OK to delete the template.