
The Onboarding Studio Widget allows you to view onboarding progress of your employees by using various filters and search criteria. In addition, you can take various actions including sending emails/texts en masse, assigning onboarding items/packages and more.
To access the widget:
From the Main Navigation Bar, select adapt.studio.
From the adapt.studio menu, select My Studios.
Select the Onboarding Studio widget to display. Due to the wealth of filtering criteria and data displayed, Bond recommends using the single widget layout when displaying the Onboarding Studio widget.
The Onboarding Studio widget has filtering options across the top, search results in the middle and detailed record previews at the bottom.
You can filter on the following (unless otherwise noted, all filtering options use AND logic):
Corporation: The droplist displays all active corporations. You can also select None to show Candidates that do not have a Payroll Tax Record (typically, new Candidates) or All to show Candidates associated with any corporation.
Employee: If you want to filter by employee name, type all or a portion of the first or last name and click  .
.
Client: If you want to filter by client name, type all or a portion of the name and click . This displays Candidates with active assignments associated with the Client ID.
Job ID: If you want to filter by specific job, type all or a portion of a Job ID. This displays Candidate with active assignments associated with the Job ID.
Branch: The droplist contains all active branches to which the user has access. You can also select All to display all branches to which your user has access.
Input w/in and Starts w/in: If you want to search by a data range, use one of these options. Input w/in searches on the data the Candidate record was added to your database. Starts w/in searches for active assignments with a start date in the indicated range. The date fields default to the last 7 days, but you can use the calendar control to set any date range needed.
Package/Item: If you want to filter by onboarding package or item, type all or a portion of the name here and click . If this is the only filtering criteria for the package/item, then results display all candidates with this package/item on their record. However, you can also use this filter field with the following two filters to further filter your results.
w/Status: If you want to further filter the package/item results, you can use the droplist to select the status of the package/item. For example, you might want to see all Pre-Hire onboarding items with a Completed status. You can also search on the status without indicating a package/item by leaving the package/item field blank. In this case, the system returns candidates with at least one package/item completed on their record.
Due within: This filter can be used with the package/item filter or used on its own. If used with the package/item filter, results will show all candidates with the package/item on their record that is due between the dates selected. If not used with the package/item filter, then results display candidates with any package/item due between the dates indicated.
The grid itself has the following columns:
First Name (Default)
Last Name (Default)
Mobile: Mobile Phone Number (Default)
Onboarding Progress: Progress bar indicating the employee's progress in completing onboarding forms. (Default)
Onboarding %: Employee's progress in completing onboarding forms in percentage format.
Start Date: Candidate's start date (date of first assignment)
Company: Displays the company from the Candidate's most recent assignment..
Job Title: Title on most recent Job Order.
Candidate ID (Default)
Job ID: ID on most recent Job Order.
Assignment ID: Based on most recent Job Order.
Availability Status
Applicant Status
You can add and remove columns from the widget by clicking  . This displays the following window:
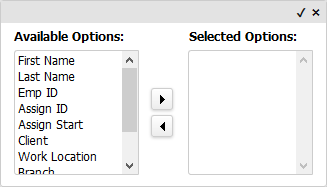
If the Selected Options area is empty, then the Default columns (see above) display. If only some columns are in the Selected Options area, those are the only options that will display in the widget. If you want to display all columns, move all Available Options to the Selected Options area. Columns display in the order in which they are listed in the Selected Options area. When the columns are in the places you want, click the small checkmark in the upper right corner (clicking the “x” closes the window without saving your column selections.
You can view a preview of the listed records on the widget by clicking  in the left column of the row of the record you want to preview. This causes an area at the bottom of the widget to pop up with three tabs:
Summary: Displays information from the Employee record (e.g. Name, Current Employer, Branch, Employee Type, Availability Status, etc.). Clicking on the Name takes you to the employee’s record. Clicking on the Current Employer takes you to the client record. Clicking on Email 1 creates an email with the employee’s address in the To: field. Clicking on the Social Networking takes you to the employee’s social networking page or opens the Update Social Networks window so you can add an address for the various social networks.
Onboarding: Displays any onboarding items currently on the Compass Onboarding grid of the Onboarding segment on the Candidate record..
Journal: Displays information from the employee's journal.
GENERAL ACTIVITIES
You can perform the following general activities by clicking  and then selecting the activity you want to perform.
Send Email
The Send Email workflow sends an email of your choosing to the selected Candidates. For example, you might filter the grid to show all onboarding items/packages due in the next few days and use the Send Email option to send a reminder letter to the resulting candidates.
Select the Candidates to which you want to send the email and then select the Send Email activity. The standard Send an Email window displays. Click here for more information on using the Send an Email window.
Send Text Message
The Send Text Message workflow sends a text message of your choosing to the selected Candidates. For example, you might filter the grid to show Candidates who have yet to complete a specific onboarding item and use the Send Text Message option to send a reminder to complete the item.
Select the Candidates to which you want to send the message and then select Send Text Message. The standard Send Text Message window displays. Click here for more information on using the Send Text Message window.
Generate Code
Codes are used to allow existing Candidates to log onto the Compass Portal. Upon accessing the Compass Portal, the Candidate can select an option to indicate that they have a code. At this point, the Candidate can set up their username and password and log on normally the next time they access the Compass Portal.
Select one or more Candidate(s) to whom you want to assign a Code and then select Generate Code. The Generate Onboarding Authorization Code window displays with the following fields:
Site ID: Indicates the Compass website for which the Candidate is being sent a code. If you have more than one site, you can use the droplist to select a different site, if needed.
Select Template: Use the droplist to select a template. You can also use the icon to open the Template Picker window. Click here for more information on using the Template Picker window. You can also click the information icon for a list of merge fields that can be included in the email or letter. If you are sending an email, select an email template. Otherwise, select a letter template.
When you satisfied with your selections, click Send Email to send an email to the Candidate or Print to print up a letter.
Change Availability Status
The Change Availability Status option allows you to change the Status and Availability of the selected Candidates.
Select the Candidate(s) for whom you want to change Availability and Status and then select Change Availability Status. The Change Status/Availability window displays. Use the Code Selection icons to select the new Status and Availability. You may also add a Note (optional). When you are satisfied with your selections, click Confirm.
Add a Note
The Add a Note option allows you to create a note that is posted to the Journal for each selected Candidate.
Select the Candidate(s) for whom you want to add a Note and then select Add a Note. The standard Add a Note window displays. Complete the fields and click Confirm.
Schedule a Task
The Schedule a Task option creates a task that is posted to each selected Candidate. A corresponding task is also generated for the user.
Select the Candidate(s) for whom you want to schedule a task and select Schedule a Task. Select the Post On date, Subject and Post To name. You may also select a Category, enter Notes and determine an alarm time (all optional). When you are satisfied with your entries, click Confirm.
All of the above activities can also be performed from the Preview area. In addition, the following actions can be performed only from the Preview area.
View Documents: Select the Onboarding Items (on the Onboarding tab) for which you want to view associated documents and select the View Documents option. You may select one or multiple Onboarding Item. A window opens to display the documents associated with the selected Onboarding Item(s).
Email Documents: Allows you to email documents associated with the selected Onboarding Item(s). Select the Onboarding Items (on the Onboarding tab) for which you want to email associated documents and select the Email Documents option. You may select one or multiple Onboarding Item.
ADD NEW
You can perform the following add activities by clicking  and then selecting the activity you want to perform.
Assign Onboarding Package
This workflow allows you to add onboarding packages to selected Candidates. For more information on Onboarding Packages, click here.
Select the Candidates to whom you want to assign the package(s) and then select Assign Onboarding Package. The Assign Onboarding Package window displays. You can use the standard lookup controls to find one or multiple packages. Place a check in the box(es) of the package(s) you want to assign and click Confirm.
Assign Onboarding Item
This workflow allows you to add onboarding items to selected Candidates. For more information on Onboarding Items, click here.
Select the Candidates to whom you want to assign the item(s) and then select Assign Onboarding Item. The Assign Onboarding Item window displays. You can use the standard lookup controls to find one or multiple items. Place a check in the box(es) of the item(s) you want to assign and click Confirm.
The above actions can also be performed from the Preview area. In addition, the following actions can only be taken from the Preview area.
Update: Select one Onboarding Item (on the Onboarding tab) and select Update. The Update Onboarding Item opens allowing you to change the Due Date and Status of the item. You can also include additional information about the update (optional). Once you are satisfied with your entries, click Confirm.
Remove: Select one or more Onboarding Items (on the Onboarding tab) and select Remove. A message displays asking you to confirm the removal of the selected record(s). Click Yes deletes the Onboarding Item from the selected Candidate's record. It does not remove the Onboarding Item from the Administration area.: