Generate QR Code
Home Ribbon > Actions Group > Generate QR Code
![]()
|
Generate QR Code Home Ribbon > Actions Group > Generate QR Code |
|
![]()
A QR Code (Quick Response Code) is similar to a bar code. When it is photographed on a mobile device (using a QR reader), it allows the user to access a web address, pick up a phone number or display text/images.
The QR Code functionality in StaffSuite allows you to generate QR Codes for URLs and Contact information.
NOTE: Due to the variety of QR Readers and Devices, it is typically better to put the minimal amount of information needed on the QR Code. Some devices and QR Readers will not read a QR Code with a lot of data on it.
Generating a QR Code
From the Home Ribbon, click Generate QR Code.
The QR Code Generator window displays.
The QR Code Generator Window
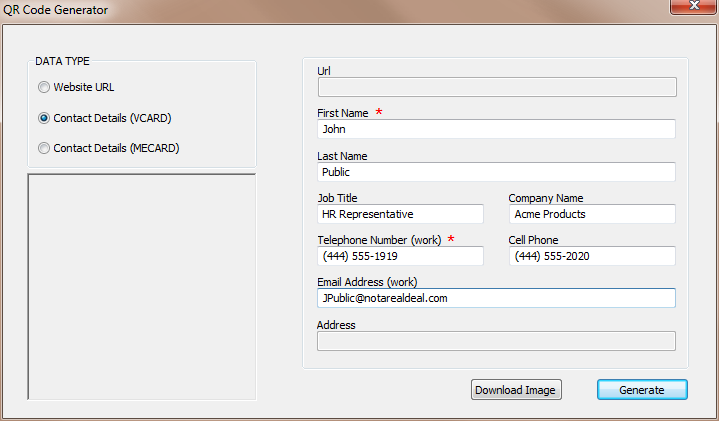
In the DATA TYPE area, select whether you want to create a Website URL, VCARD or MECARD QR Code. The active fields on the right side of the window change depending on your choice..
In the Url field, enter the website address that the user will download (only active if the Website URL Data Type is selected)..
In the First Name field, enter the First Name of the Contact for the QR Code (only active if you select one of the Contact Data Types).
In the Last Name field, enter the Last Name of the Contact for the QR Code (only active if you select one of the Contact Data Types).
In the Job Title field, enter the Job Title of the Contact for the QR Code (only active if you select the VCARD Data Type).
The Company Name field, enter the Company for which the Contact works (only active if you select the VCARD Data Type).
In the Telephone Number (work) field, enter the work telephone number of the Contact (only active if you select one of the Contact Data Types).
The Cell Phone field, enter the cell phone number of the Contact (only active if you select one of the Contact Data Types)
In the Email Address (work) field, enter the work email address of the Contact (only active if you select one of the Contact Data Types).
In the Address field, enter the physical work address of the Contact (only active if you select the MECARD Data Type).
Once you have entered all desired data, click the Generate button. This causes an image of the QR Code to appear in the QR Code Generator window. If you need to, you can edit the data entered and click Generate to re-generate the QR Code with the new data.
Once you are satisfied with your QR Code, click Download Image to save the QR Code to your PC or a network drive. A standard Save As window displays allowing to select the location and name of the file you want to save.
Once the QR Code is saved, it can be applied to web pages, documents, etc.
![]()