Saved Lists
Employee > Employees Grid and Ribbon
Company > Companies Grid and Ribbon
Company Rep > Company Reps Grid and Ribbon
Order > Orders Grid and Ribbon
Assignment > Assignments Grid and Ribbon
Position > Position Grid and Ribbon
![]()
|
Saved Lists Employee > Employees Grid and Ribbon Company > Companies Grid and Ribbon Company Rep > Company Reps Grid and Ribbon Order > Orders Grid and Ribbon Assignment > Assignments Grid and Ribbon Position > Position Grid and Ribbon |
|
![]()
Communication and Teamwork are essential to the successful operation of any business, but they are especially important to staffing services. The ability to work together to fill an order, evaluate potential employees and keep up with the ever changing needs of clients and employees is critical to surviving in any kind of business environment.
StaffSuite's Saved Lists functionality is designed to help you do just that. You can select the results of searches and save them as lists that can be shared with other users and/or re-accessed when needed. Think of a list as taking a snapshot of your data in the form of search results that you can then share with others (or they with you). Your team (those who share the data) can then work the information to efficiently and effectively fill your client company and employee needs.
For example, let's say a company rep calls in an important and time-sensitive order. You create a search result of potential employees. You then create a list of your search results and share them with some colleagues. As your team makes calls, you and they can add or remove employees from the list...or you can use color coding to indicate those that are available, not available, unreachable, etc. This is all possible with StaffSuite's List functionality.
Creating a List
Lists can be created from the Employees, Companies, Company Reps, Orders, Assignments and Position grids. Note: It doesn't matter how the grid was populated as long as there are records in the grid. Therefore, it is possible to create lists from search results or from the contents of an existing list.
From the grid, select the records you want to add to a new list. NOTE: You can also select rows that are grayed out although security access to the record's detail will continue to apply.
Right-click on the records in the grid and select Create New List.
The Create New List - xxxxx (where xxxxx represents the record's category) window displays.
In the Name field, enter a name for the list. The name can be up to 80 characters. You may not duplicate a name within the same access folder. For example, if there is already a list in Global called "Hot Jobs" then you cannot add another list called "Hot Jobs" to the Global folder. However, the same name can be used in different folders or where accessed differently. For example, if you were adding your list to a Branch folder, you could still call in "Hot Jobs". In addition, lists can have the same name if they are assigned to different branches or different users even though they are in the same "folder".
In the Notes field, enter additional information about the list. This is optional, but is useful for providing information like the purpose or intent of the list.
In the Saved List Folders, select where you want the list to reside.
If you want the folder to only be accessible by your user, click on the User folder.
If you want to assign the list to a specific branch, click on the Branch folder to display a list of available branches and then click on one. This restricts list access to only those users with access to the selected branch.
If you want to assign the list to a service line for categorizing purposes, click on the Service Line folder to display a list of available service lines and then click on one. The list is treated like a global list, in that every user is able to access the report.
If you want to allow everyone access to the list, click the Global folder.
When you are satisfied with your selections, click the OK button.
Adding New Records to an Existing List
Instead of creating a new list, you can simply add records from the grid to an existing list. Of course, you can only add records from one category's list to a list created in that category. For example, you can only add records from the Employees grid to an Employee list. However, you can add records from one Employee list to another Employee list.
From the grid, select the records you want to add to an existing list. NOTE: You can also select rows that are grayed out although security access to the record's detail will continue to apply.
Right-click on the records in the grid and select Add to List.
In the Saved Lists area, click the folder where the existing list resides. Clicking on the Branch or Service Line folder will expand the folder allowing you to select a specific Branch or Service Line.
Once a folder is selected, the contents of the window underneath the Saved Lists area displays all existing lists that reside in the folder. For example, if you select AAA Branch in the Saved Lists area, the area below it displays all lists that reside in the AAA Branch folder. Click on the list for which you want to add records.
The fields on the right hand side of the window (List Name, List Owner, Created On, Last Updated, Updated By, Total Records and Notes) populate with information about the selected list. All fields are read-only.
If this is the list you want to add records to, click OK. You will receive a confirmation message telling you how many records were added and, if any, the number of duplicates found. This also updates the Updated On and Updated By fields for the list.
The next time you display the list, the records you added will be in the list.
Accessing an Existing List
You can access existing lists via the Saved Lists icon on the ribbon of the category you want to view. In other words, if you want to view an existing Employee list, click the Saved Lists icon on the Employee ribbon. This opens the List Maintenance window.
In the Saved Lists area, click the folder where the existing list resides. Clicking on the Branch or Service Line folder will expand the folder allowing you to select a specific Branch or Service Line.
Once a folder is selected, the contents of the window underneath the Saved Lists area displays all existing lists that reside in the folder. For example, if you select AAA Branch in the Saved Lists area, the area below it displays all lists that reside in the AAA Branch folder. Click on the list that you want to access.
The fields on the right hand side of the window (List Name, List Owner, Created On, Last Updated, Updated By, Total Records and Notes) populate with information about the selected list. All fields are read-only except List Name and Notes, which can be edited if needed. You can either edit the Notes directly in the Notes area or click on the icon to the lower right of the Notes area to access a larger Notes field...complete with Spell Checker. If you do change either of these fields, click the Save icon to save your changes.
Here are the fields listed:
List Name: Name of the list. This field is editable.
List Owner: The user that created the list.
Created On: Date and time the list was created.
Last Updated: Date and time the list was last changed.
Updated By: User who last updated the list.
Total Records: Number of records in the list.
Notes: Additional information about the list. This field is editable.
To view the records in the list, click the Display button. The applicable grid populates with the records on the list. In other words, if you are viewing an Employee list, the records display in the Employees grid. In addition, the Grid title changes to the Title of the list being displayed.
Removing Records from a List
Access a list (using the instructions above).
Select the record you want to remove on the grid via clicking, Shift-clicking or CTRL-clicking.
Right-click on any selected record and choose Remove from List on the menu that displays.
The record is removed. NOTE: The Total Records field on the List Maintenance window does not update until it is refreshed.
Using the Grid to Mark Records
You can use the grid controls to mark records in the list.
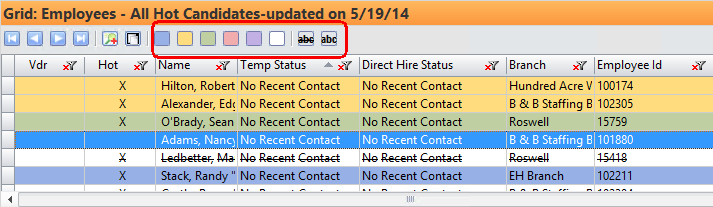
To mark records in the grid:
Select the row(s) in the grid you would like to mark.
Click on one of the grid controls to mark the record. If you want the record's row to become a certain color, click on one of the color buttons (select the White button to remove coloring from a row). If you want to strikethrough a row, click on the strikethrough button (click the button to the right of it to remove the strikethrough).
Changes that you make to the list can be seen by all others users with access to the list. This allows you to work together on the contents of a list.
![]()