AdaptSuite Outlook Add-In
The AdaptSuite Outlook Add-In (AOA) is designed specifically for users who manage candidate/contact relationships and vacancy activities. It allows the user to view a candidate or contact profile, notes, scheduled tasks and journal in Adapt from Outlook by simply selecting an email. The user can also run selective workflows such as tagging emails, logging calls and submitting candidates for vacancies.
You do not have to be logged in to AdaptSuite to use AOA. However, certain actions taken in AOA (performing workflows, opening records) will require you to log in to complete the action.
For information on installing the Outlook Add-in, click here.
Launching AdaptSuite Outlook Add-In
Once installed, the AOA launches automatically the next time you start Outlook. You can tell AOA is running as there will be an Adapt ribbon added to Outlook. Note: to use AdaptSuite independent of AOA, login to AdaptSuite prior to launching Outlook.
If AOA does not activate when opening Outlook 2010, 2013 or 2016, you may need to manually start the add-in.
Go to File > Options > Add-Ins.
Select the Go button next to Manage: COM Add-ins, make sure the Adapt Outlook Add-in is checked and click OK.
Return to the Add-ins screen and click Add-in Options. Make sure the information is correct and click OK.
If the Adapt Add-in Panel displays but not the Adapt tab, close out of Outlook and then restart Outlook.
If the AOA still does not launch see the Download the AdaptSuite Outlook Add-In topic. This topic will give you setup and troubleshooting information.
Navigating the AOA
The AOA has three distinct areas where actions can be performed:
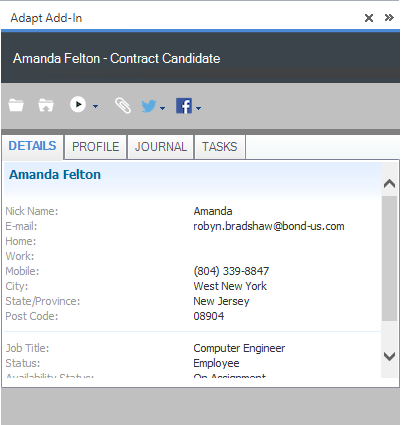
Adapt Add-In Panel: The Adapt Add-In panel shows various information from AdaptSuite about the record associated with the email address of the email selected on the Outlook main page. You can also open the record in AdaptSuite, tag the email, run workflows and search social media.
Ribbon: Clicking on the Adapt tab on the Outlook main page displays the Adapt ribbon. From here, you can tag emails, create candidates, change settings, view/email logging information and check the version number.
Right-Click: Right-clicking on an email (or multiple emails) in the Outlook main page (Outlook Explorer) allows you to tag emails or create candidates
Each of these areas is explained below.
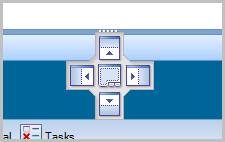
Docking the Adapt Add-In Panel
The Adapt Add-In panel can be located (docked) in several areas of Outlook. To change the location of the panel, click the title bar of the panel and drag it to the centre of the screen. The dock points that it can be moved to will highlight on the screen. Drop the cursor in one of the dock points to dock it to that part of Outlook.
Minimizing / Resizing the Adapt Add-In Panel
The Adapt Add-In panel can be minimized or resized by clicking the chevron ![]() to collapse and reopen the pane. Grabbing the borders of the Adapt Add-In panel allows you to change the width and height of it.
to collapse and reopen the pane. Grabbing the borders of the Adapt Add-In panel allows you to change the width and height of it.
Whenever an email is selected (highlighted) in the Outlook Explorer that is associated with an email address that matches a Candidate or Contact record in AdaptSuite, the Adapt Add-In panel displays the person's name in the Header and whether they are a Candidate or Contact.

If the email address is associated with more than one record in AdaptSuite, arrows will appear to the right of the heading. Clicking on the arrows cycle between the records.

Underneath the heading is the Detail area. This shows information on the Candidate's or Contact's record within AdaptSuite.
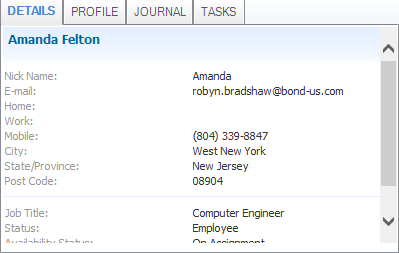
The tabs at the top of the data table select the various pages of content for that record. If you increase the width of the Adapt Add-in panel you will see more of the tabs. If you dock the Adapt Add-in panel vertically, clicking on the right arrows on the tab bar lists all available tabs. Clicking on a tab displays the information for that tab. The tabs are:
DETAILS – displays data from the summary segment of the record.
PROFILE – displays the person’s profile from the summary segment.
ACTIVE JOBS – Contacts only - displays open and partially filled job orders for the contact.
RELEASED JOBS – Supplier Contacts only - displays released job orders for the contact.
JOURNAL – displays the journal segment of the record.
TASKS – displays the task segment of the record.
The buttons above the Details area perform selected operations:
 - will open the currently displayed record in AdaptSuite. If you are not logged into AdaptSuite it will take you through the login process and then show you the record. Note: To use AdaptSuite independent of AOA, login to AdaptSuite prior to launching Outlook.
 - will tag the selected email(s) in Outlook to the Journal of the record currently displayed in the Adapt Add-In panel. Note: You can also tag an email by using the Ribbon or a right-click (see below for more details).
 - displays a menu listing workflows that can be run against the record currently displayed in the Adapt Add-In panel. Clicking one of the items on the menu will activate AdaptSuite; take you to the record currently displayed in the Adapt Add-In panel and open the associated work flow. Available workflows:
Log a Call
Add a Note
Schedule a Meeting
Schedule a Task
 - collates all attachments in an email and presents a window where you can attach them to the Document Library of the AdaptSuite record. See below for more information.
 - launches the Twitter social media connector page. You can search for Twitter accounts that match the selected record in the Adapt Add-In panel. If the AdaptSuite record is populated with a social media profile, you can link to that page. See below for more details.
 - launches the Facebook social media connector page. You can search for Facebook accounts that match the selected record in the Adapt Add-In panel. If the AdaptSuite record is populated with a social media profile, you can link to that page. See below for more details.
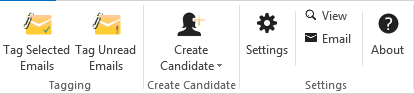
The following options are on the Ribbon:
Tag Selected Email: Will tag the selected email(s) in Outlook to the Journal of the record currently displayed in the Adapt Add-In panel. Note: You can also tag an email by using the Adapt Add-In panel or a right-click (see below for more details).
Tag Unread Emails: Will tag any unread email(s) in Outlook to the Journal of the record currently displayed in the Adapt Add-In panel. Note: You can also tag unread emails by using the right-click (see below for more details).
Create Candidate: Uses the resume attached to the selected email to create a new candidate record via Resume Import. Note: You can also Create Candidate by using the right-click. See below for more details.
Settings: Opens the Adapt Add-in Settings window allowing you to set server settings, tagging options and social media connectors. This is the same window that can be accessed within Outlook via File > Options > Add-Ins > Add-in Options. See below for more information on the Settings.
View/Email: Clicking on View opens a Debug window that displays each action taken by the AOA. This is useful for troubleshooting purposes. Clicking Email creates an Outlook email with the Debug information included in the form of an attachment. If Bond Support personnel should ask for the AOA Debug file, this is the easiest way to send it.
About: Displays the version number of AOA and the working folder. As above, this is useful for troubleshooting purposes.
Right-clicking on an email in the Outlook Explorer displays Outlook's context-sensitive menu. When AOA is installed and working, this menu has an Adapt option on it. By hovering over the Adapt option, a flyout menu displays the following options:
Tagging: Hovering over the Tagging option causes a second flyout menu to display the following options:
Tag selected email: Will tag the selected email(s) in Outlook to the Journal of the record currently displayed in the Adapt Add-In panel. Note: You can also tag an email by using the Adapt Add-In panel or the Ribbon (see below for more details).
Tag unread emails: Will tag any unread email(s) in Outlook to the Journal of the record currently displayed in the Adapt Add-In panel. Note: You can also tag unread emails by using the Ribbon (see below for more details).
Create Candidate: Hovering over the Create Candidate option will open a second flyout menu displaying any resume attachments on the selected email. Clicking on the resume allows you to create a new Candidate in AdaptSuite via Resume Import. Note: You can also Create Candidate by using the Ribbon. See below for more details.
The AOA allows you to tag emails into Adapt either manually or automatically. Tagging options are set up in Outlook's Add-in Options page. You can set any of the three options below for received and sent email.
Do nothing – will not tag any emails you send/receive.
Automatically Tag – will tag emails as they are received or sent to the record(s) found in AdaptSuite.
Prompt to tag – as emails are sent/received, AdaptSuite is queried to see whether the associated record exists. If it does, the tagging dialog appears:
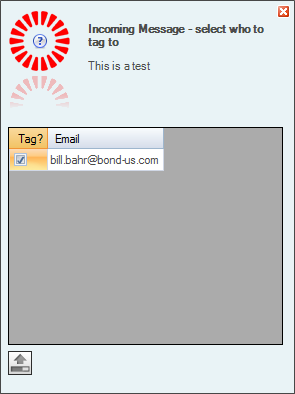
You can take the following actions on the Tag Email dialog:
Click ![]() (located inside the Bond logo) to see the email text of the email you are about to tag.
(located inside the Bond logo) to see the email text of the email you are about to tag.
Place a check in the Tag? column if you want the listed email address to be tagged in AdaptSuite with the email. If more than one email address is listed, you can hover over the email address and a small pop-up will display the full name and type (Contact or Candidate) for the record. When you are satisfied with your selections click  to tag the email. The Tag Email dialog will close as the tagging operation happens in the background. Once the operation is completed, you will receive a message in the bottom right corner of the screen.
Click the X in the upper right corner to close the dialog without taking any action.
If you have selected Automatically tag, the process is the same as for Prompt to tag except that there is no user intervention. Any entity that exists in the AdaptSuite system whose email matches one of the recipients of the email will have that email tagged to their Journal.
You can also manually tag an email (or multiple emails) by selecting the emails in the Outlook Explorer and either 1) right-clicking on one of the emails and selecting Adapt > Tagging and then one of two options or 2) clicking on the Tagging option in the Ribbon. Whether you select to Tag Selected Emails or Tag Unread Emails, the following screen displays:
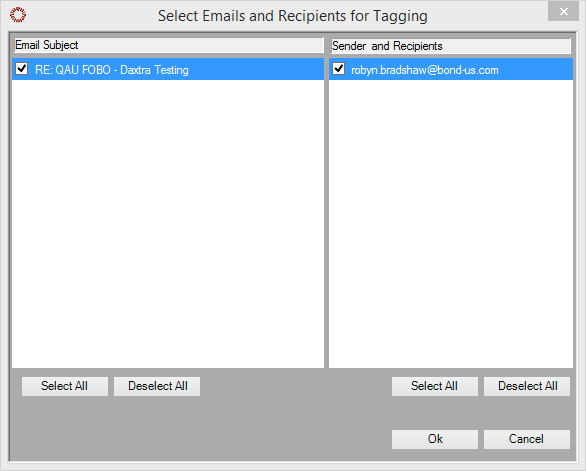
The left panel displays the subject of the select email(s). The right panel displays senders and recipients of the selected email(s). You can choose which emails you want to tag and which records you want to tag it to by placing a check in the box beside the email subject or record name. A check beside the subject means that this email will be tagged. A check beside a record name means that record will receive the tagged email. You can also use the Select All and Deselect All buttons to quickly select/deselect records. When you are satisfied with your selections, click OK.
You can quickly determine which emails have been tagged by adding the user-defined column "Tagged" to the Outlook Explorer. If the email has been tagged, the word "Yes" will appear in the column. If the AOA attempted to tag an email and could not find any associated record in AdaptSuite, the words "No matches" will display in the column.
If you attempt to tag an email that has already been tagged, the AOA will display a warning message, but allow you to tag it again, if needed.
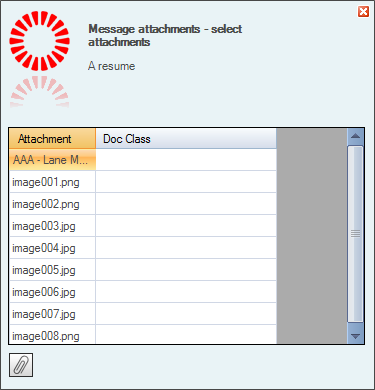
The document tagging workflow will take email attachments and import them into the document library of the selected AdaptSuite record.
Select an email to load the candidate or contact in the Adapt Add-In panel; then select the document icon ().
The Document Collator opens on the right side of the screen.
Select the Doc Class, or Document Category, for each document listed (by clicking in the Doc Class column) and click  to complete the workflow.
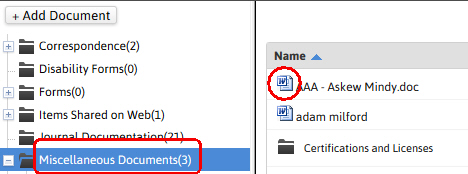
Once the document is successfully tagged to the document segment of the record selected, a user notification displays in the lower right corner of the screen.
The documents are then accessible in the record’s documents segment.
When an email has a resume attached that resume can be downloaded and imported into AdaptSuite via Resume Import.
Select an email with a resume attached from the email application.
Either right-click on the email, locate and hover over Adapt in the menu, select Create Candidate and then select the document name OR click Create Candidate from the Adapt Ribbon.
The resume will download from the email application into the Resume Import segment and automatically parse.
Follow the Resume Import workflow steps to complete the candidate create process.
The AOA acts as a bridge between AdaptSuite and social media sites (Twitter, Facebook). It allows you, from within the AOA, to select social media profiles and save them in the AdaptSuite record. It also allows you to browse data from the social media sites and select the various profiles that are correct for the current record displayed in the AOA.
Select an email to load the candidate or contact in the Adapt Add-In panel; then select the social media icon: (Twitter) or (Facebook). At this point, two options display in a pop-up menu: Search and Link. If you want to search for the Twitter or Facebook profile, click Search. If you want to view an existing profile, click Link (only available if the Candidate or Contact already has Twitter or Facebook profile information in their AdaptSuite record).
The associated Social Media Connector landing page opens.
The Candidate's or Contact's name displays. If you want to search for their profile, click Search. If the email already has a profile link, a message displays alerting you to that fact. To access the profile, click Go. The profile displays.
You can access Adapt Add-in Settings in two ways:
From the Adapt Ribbon, select Settings.
Within Outlook, select File > Options > Add-Ins > Add-in Options
The Settings window is divided into three areas:
Server Settings
Tagging Options
Social Media Connectors
Server Settings
Web services server: This should contain the URL of the server housing web services.
Adapt app Server: This should contain the URL of the application server.
Domain: The name of the domain with which you want AOA to connect.
Username: Your username in AdaptSuite.
Password: Your password in AdaptSuite.
Profile: The profile set up in System Administration for AdaptSuite.
Language: Should be set to English.
Locale: Should be en_US.
Time zone: Use the droplist to select your local timezone.
Tagging Options
To select tagging options, click the Tagging options button.
With received email: This tells AOA what to do with emails you receive. Use the droplist to select either Do Nothing (emails you receive are not tagged), Prompt to tag (AOA will prompt you as to whether an email you receive should be tagged) or Automatically tag (emails you receive are automatically tagged to the record(s) found in AdaptSuite).
With sent email: This tells AOA what to do with emails you send. Use the droplist to select either Do Nothing (emails you send are not tagged), Prompt to tag (AOA will prompt you as to whether an email you send should be tagged) or Automatically tag (emails you send are automatically tagged to the record(s) found in AdaptSuite).
Auto tag unread emails in Inbox when Outlook starts: This causes AOA to tag any unread emails when Outlook is initiated and send them to record(s) found in AdaptSuite.
Submit one email for tagging every x seconds: This determines the speed at which unread emails are tagged. This option is only available if the Auto tag unread emails in Inbox when Outlook starts is checked. This number should be a balance between speed and resources. The higher the number, the faster the tagging, but also the greater the resources required to perform the task.
Social media connectors
You have two options in this section. Click P to set proxy login details, if needed. Click Social media options to authorize and configure the Adapt Outlook Add-In with various social media sites.
If you select P, the AdaptSuite Outlook Add-in prompts you for your User Name, Password and Domain. This is only needed if you are using a proxy login.
If you select Social media options, AdaptSuite prompts for your Twitter and Facebook Account information to authorize AOA's use with those social media websites.
Do nothing – will not tag any emails you send/receive.
Automatically Tag – will tag emails as they are received or sent to the record(s) found in AdaptSuite.
Prompt to tag – as emails are sent/received, AdaptSuite is queried to see whether the associated record exists.