Add/Edit CareerBuilder Account
System Administration > Partner Integration > CareerBuilder > Add Button
System Administration > Partner Integration > CareerBuilder > Edit Button
![]()
![]()
|
Add/Edit CareerBuilder Account System Administration > Partner Integration > CareerBuilder > Add Button System Administration > Partner Integration > CareerBuilder > Edit Button |
|
![]()
StaffSuite allows you to publish jobs directly to CareerBuilder. In order to do that, StaffSuite needs to know the Vendor ID provided to you by CareerBuilder.
In addition, you may have CareerBuilder accounts for each of your branches, a collection of branches...or simply one account for all of your branches.
This window allows you to add new accounts or edit existing accounts.
Note: Before taking this step, you must configure each StaffSuite Server instance that will use CareerBuilder. Instructions for this step will be given during implementation.
Adding/Editing CareerBuilder Accounts
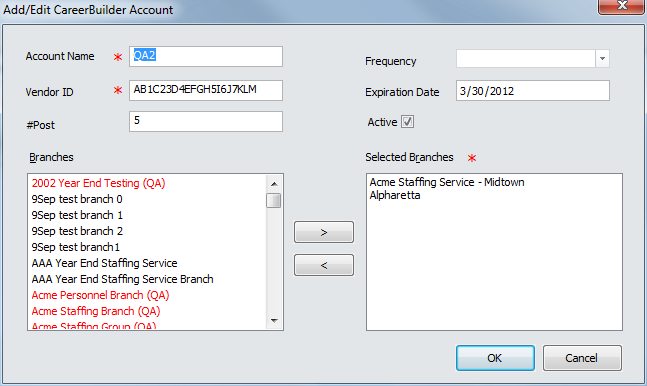
Enter an Account Name. This can be anything you like and is used to identify the account. Bond suggests using a name that helps differentiate the account. For example, if the account is used by all Chicago branches, you might want to call it "Chicago". This field is required.
Enter the Vendor ID supplied to you by CareerBuilder. This field is required.
The #Post and Frequency fields work together to identify the number of posts allowed on a daily, weekly, monthly or yearly basis. Use the Frequency field to select daily, weekly, monthly or annually and the #Post field to select the number of posts allowed during that time period. These fields are for informational purpose only and have no impact on the actual posting of assignments and positions. These fields are optional.
Enter the Expiration Date of your agreement/contract with CareerBuilder. This field is for informational purpose only and has no impact on the actual posting of assignments and positions. This field is optional.
Place a check in the Active box to make the account active. You can only post using an active account. Clicking on the field toggles it between checked (Active) and unchecked (Not Active).
The Branches box displays the active branches in your database. Branches in red have already been assigned to a CareerBuilder account and cannot be added to the displayed account (any single branch can only be associated with one account). To apply this account to a branch, select the branch in the Branches box and then click >. This adds the branch to the Selected Branches box. To remove a branch from the account, select the branch in the Selected Branches box and click <. At least one branch must be selected for the account.
When you are satisfied with the data you have entered, click OK.
![]()
.