E-mail Summary
System Administration > E-mail > Viewer > Assignment Summary
System Administration > E-mail > Viewer > Position Summary
![]()
|
E-mail Summary System Administration > E-mail > Viewer > Assignment Summary System Administration > E-mail > Viewer > Position Summary |
|
![]()
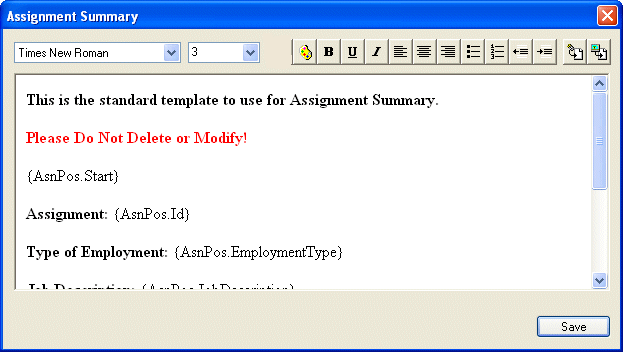
Assignment Summary and Position Summary allows you to determine the content and format of information when an assignment or position summary is attached to an email.
Adding an Assignment/Position Summary
|
Font Face Font Size
|
The Font Face drop list contains all the fonts that can be applied to the selected text within the Memo. This will depend on the fonts loaded on your client system. Use The Font Size drop list contains all font sizes that may be applied to the selected text within the Memo. Since the Memo contains HTML, there are only 7 font sizes available, numbered 1 through 7 (with 1 being the smallest and 7 being the largest). NOTE: The numbers 1 through 7 do not denote point size, but simply indicate whether a font is larger or smaller than another. The Face and Size information will reflect the currently selected text (or the text wherein the cursor is situated). Changing either the Size or Face will change the selected text. |
|
|
|
|
|
Clicking this button opens a standard Windows Color dialog allowing you to choose a color to be applied to the selected text within the Memo. For more information on using the Color dialog, please see the documentation that came with your Windows Operating System. |
|
|
|
|
|
Clicking the B applies a bold face to the selected text within the Memo. Clicking the U applies an underline to the selected text within the Memo. Clicking I applies an italicized face to the selected text within the Memo. |
|
|
|
|
|
These buttons affect how the text is justified. The first button (left justified) lines up selected text on the left side of the Memo. The second button (center justified) centers selected text in the Memo. The third button (right justified) lines up selected text on the right side of the Memo. |
|
|
|
|
|
The first button converts the selected text within the Memo to a bulleted list:
The second button converts the selected text within the Memo to a numbered list:
|
|
|
|
|
|
These buttons affect the indentation of the text. The first button indents the selected text to the left (also called an "outdent"). For example: This text becomes... This text. The second button indents the selected text to the right. For example: This text becomes... This text. |
|
|
|
|
|
This button inserts a data field at the current cursor position within the Memo. A popup menu allows you to select a data field. Two special data fields (Start Template and End Template) allow you to indicate where the template starts and ends. This allows you to add comments at the beginning before the Start Template tag or at the end after the End Template tag. NOTE: Don't forget to add spaces where necessary. For example, Order{AsnPos.Order.ID} will end up displaying as Order1234 (assuming 1234 is the eventual order number). Instead, put a space between your text and the tag (e.g., Order {AsnPos.Order.ID}). NOTE: The actual text displayed in the Memo does not reflect the data field. In other words, Special Instructions will not show any actual instructions on this window. Instead, it is a pneumonic tag that will be replaced by data corresponding to the assignment and/or position that is attached to the email. Therefore, when the actual email is send, it will show the actual instructions for the assignment/position. |
|
|
|
|
|
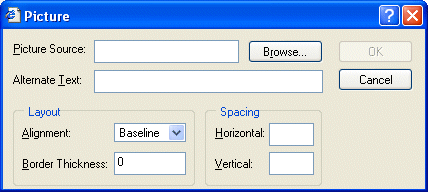
Allows you to insert a picture at the current cursor position within the Memo. The following window displays:
The Picture Source field is where you enter the URL address of the graphic you are inserting into the memo OR the location of the file on a networked drive. NOTE: There are actually three different ways to insert a picture into your memo. If you are sending an E-mail "in-house", you can simply insert a picture housed on a network drive (by using the Browse button). However, if you are sending an E-mail to someone outside of your network, the picture will need to be publicly accessible. You can do this three ways. The easiest way is to simply type the URL address of the picture into the Picture Source field (for example, http:\\www.acme.com\pics\logo.gif). Another easy way is to go to the URL page that contains the picture, right click on it and select Properties. Copy the information in the Address field (on the Properties window) and paste it into the Picture Source field (in the Picture window). This causes the graphic to display in your memo. The other option is simply to go to the URL page that contains the picture, click on the picture, press CTRL-C (to copy), put the cursor in your Memo where you want the picture to appear, and press CTRL-V (to paste). This puts the address of the picture in your memo (rather than the picture itself). Keep in mind that if you delete the URL page for some reason, the picture will no longer show up on the E-mail. Information in the Alternate Text field will display only if the E-mail cannot display the graphic (for example, if you deleted the originating URL page). The Layout and Spacing areas allows you to determine where and how the picture will display. You will need to experiment with each field as these settings are Microsoft, rather than StaffSuite defined. However, for the most part, the larger the number in the Border Thickness field, the larger the border around the picture. The larger the Horizontal Spacing, the more the picture will move to the right. The larger the Vertical Spacing, the more the picture will move down. Once you are satisfied with your settings, click the OK button. |
|
|
|
|
Save |
Clicking this button saves your changes. |
|
|
|
![]()
Related Topics:
|
|
|
|
|
|