Manage Template
Home Ribbon > Activities Group > Manage Template
|
Manage Template Home Ribbon > Activities Group > Manage Template |
![]()
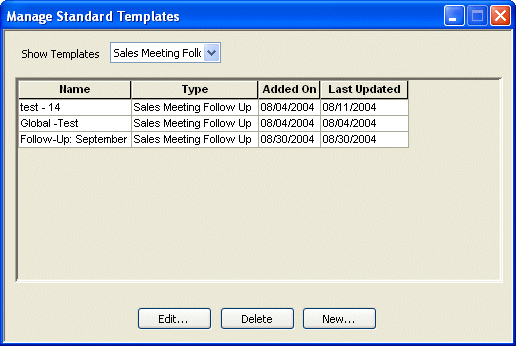
Manage Template allows you to add, view, edit, and delete standard templates for various types of e-mails. A template defines standard email content. This saves you time from constantly re-entering the same information into various e-mails. For example, if you always use the same basic formatting (but with different data) for follow-ups to sales meetings, instead of typing the same information into each follow-up E-mail, you can simply set up a template with the information you need, and re-use it as necessary.
Using the Manage Standard Templates Window

In the Show Templates field, use ![]() to select the types of templates you want to display in the grid. You can show all template types, only Assignment Direction templates, only Job Offer templates, or only Sales Meeting Follow Up templates. The contents of the grid will change based on your selection in this field.
to select the types of templates you want to display in the grid. You can show all template types, only Assignment Direction templates, only Job Offer templates, or only Sales Meeting Follow Up templates. The contents of the grid will change based on your selection in this field.
The grid will display all templates that match the criteria you entered in the Show Templates field. NOTE: You will only see your own templates or those that have been Global or Branch (as long as you have access to that branch) security. You will NOT be able to see templates with a Private security that were entered by another user.
The grid shows the following information:
Name: Name of the template.
Type: Indicates whether the template is an Assignment Direction, Job Offer, or Sales Meeting Follow Up type. This column can be blank if no type was assigned when the template was created.
Added On: Indicates the date that the template was created.
Last Updated: Indicates the date that the template was last edited.
Your next step depends on what you want to do:
If you want to create a new template, click New. The Manage Standard Template window displays. Click here for more information on adding a template.
If you want to edit an existing template, select the template you want to edit (by clicking on its row in the grid) and click Edit. The Manage Standard Template window displays. Click here for more information on editing a template.
If you want to remove an existing template, select the template (by clicking on its row in the grid) and click Delete.
![]()
Related Topics:
|
|
|