TempBuddy
System Administration > Partner Integration > TempBuddy
![]()
TempBuddy System Administration > Partner Integration > TempBuddy |
|
![]()
StaffSuite integrates with TempBuddy, an award-winning temporary recruitment software that provides contingency recruiters a cloud based real-time workforce management platform.
In order to integrate with TempBuddy, steps need to be taken within both StaffSuite and TempBuddy to ensure that the two are able to communicate with each other. This step sets up TempBuddy Account information and integration required fields.
Other steps in the process include (click on the link to get more information on each step):
The TempBuddy Account Setup
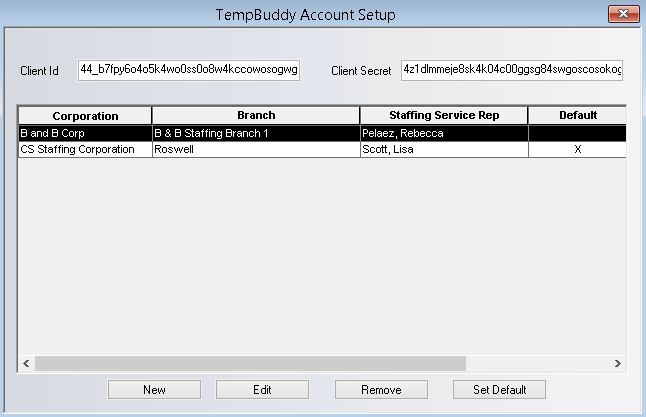
The Client Id and Client Secret from TempBuddy are displayed above the grid. The grid displays information about the branches you have set up to integrate with TempBuddy.
The following columns are included on the grid:
Corporation: The Corporation used with the Employee Tax and Assignment information.
Branch: The branch that will be integrated with TempBuddy.
Staffing Service Rep: The Staffing Service Rep that will be the default used to determine default values for all activities that are sent from TempBuddy to StaffSuite. They will also be the default owner.
Default: Indicates if the account is set as default (with an 'X'). Employees and Companies created in TempBuddy will be imported into StaffSuite in the default Branch.
Adding an Account
If you are adding a new
account, click  .
.
The New TempBuddy Account window displays.
In the Corporation field, use the droplist to select the Corporation that will be used with the Employee Tax and Assignment information. NOTE: You can always change the corporation on an individual assignment up to the point that a timesheet is linked to the assignment.
In the Branch field, use the droplist to select the branch that will be linked to a TempBuddy agency.
In the Default Rep field, use the lookup to select the Staffing Service Rep that will be the default used to determine default values for all activities that are sent from TempBuddy to StaffSuite. They will also be the default owner. NOTE: The rep’s home branch must be the one selected in the Branch field.
Once you are satisfied with your entries, click Test. This checks to make sure that a connection can be made with the TempBuddy Agency and also if the required branch fields have been set on the Branch basic screen. If everything checks out, the message “Successful Connection” displays. If the connection fails, a message indicating the cause of the failure displays. Check the entered information to make sure they are correct. Once you have made changes, click Test to try again.
Click OK to save your changes and close the window. Click Apply to save your changes and leave the window open to enter another TempBuddy account.
Editing an Account
If you are editing an existing
account, select the account in the grid by clicking on its row and
then click ![]() .
.
The Edit TempBuddy Credentials window displays. All fields default with existing information.
Edit any of the fields on the window. When you are satisfied with the information edited, click Test to make sure that the message “Successful Connection” displays.
Click OK to save your changes and close the window.
Removing an Account
Select the account you want to remove by clicking on the row in the grid to highlight it.
Click Remove.
When the dialog asks if you are sure you want to remove the item, click Yes.
Setting an Account as Default
Select the account you want to set as default by clicking on the row in the grid to highlight it.
Click Set Default. An 'X' in the Default column in the grid indicates that the account is set as default.
Closing the Account Setup Window
Click the "X" in the upper right corner of the window..
![]()