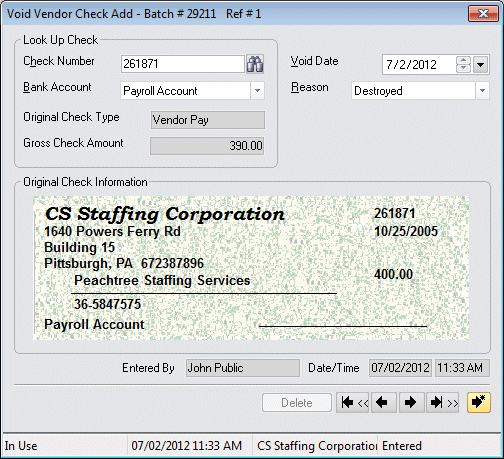
Add Void Vendor Check Screen
|
Add Void Vendor Check Screen |
![]()

Click here to return to the Add Void Vendor Check main topic page.
|
Check Number
|
Enter the check number that you would like to void or click the Note: If the check number entered occurs in more than one bank account, the Vendor Check Look Up window will display allowing you to specify the exact check to void. Click here for more information on using the Vendor Check Look Up window. |
|
|
|
|
Bank Account Original Check Type Gross Check Amount |
Bank Account: Use Original Check Type: Manner in which the original check was generated (Vendor Pay). This field defaults from the check number and may not be edited. Gross Check Amount: Gross dollar amount of the original check before sales tax. This defaults from the check number and may not be edited. |
|
|
|
|
Void Date |
Calendar date of the void check transaction. This defaults to today's date, but you can use the Click here for more information about StaffSuite's calendar. |
|
|
|
|
Reason |
Use The options in the drop down list are created using the edit list functionality in the System Administration division of StaffSuite. |
|
|
|
|
Original Check Information |
This area of the screen is designed to look like a vendor check. On the left hand side, it contains the corporation name, corporation address, vendor name, vendor TIN, and bank account. On the right hand side, it contains the check number, check date, and net amount (after inclusion of sales tax). This field is for informational use only and may not be edited. |
|
|
|
|
Entered By Date/Time |
The name of the Staffing Service Rep who entered this void check transaction (the current logged in user) and the date and time that this void check transaction was entered. |
|
|
|
|
Delete |
This button is initially disabled when adding a Void Vendor Check transaction. However, if you return to edit the transaction, you can use this button to delete it. |
|
|
|
|
Movement Buttons |
|
|
|
|
|
Status Area |
This area displays basic status information, including (from left to right): Batch Status: Displays the current batch status. Possible Batch Statuses are:
Modified Date/Time: Displays the last date and time that the void check transaction was modified. Corporation: Displays the corporation associated with this void vendor check batch. Posting Status: Displays the current posting status of the batch. |
|
|
|
![]()
Related Topics:
|
|
|