Activity Workflow Builder Screen
![]()
![]()
|
Activity Workflow Builder Screen |
|
![]()
Click here to return to the Activity Workflow Builder main topic page.
|
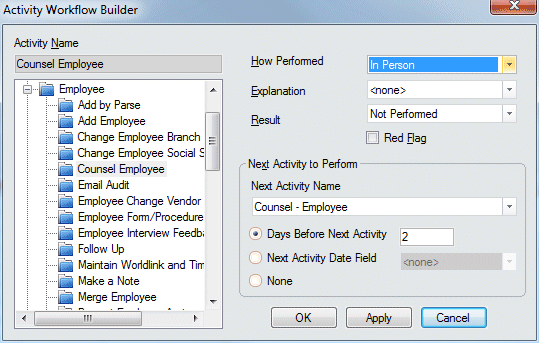
Activity Name |
Indicates the activity that "kicks off" the workflow. In other words, when the activity selected here is performed, the system will suggest that the next activity to perform is the activity listed in the Next Activity Name field. Select it by first double-clicking on the category wherein the activity resides and then clicking on the actual activity. NOTE: If you are adding a workflow, this is a REQUIRED field. If you are editing a workflow, this field is inaccessible. |
|
|
|
|
How Performed Explanation Result |
The How Performed, Explanation, and Result fields may or may not become active (based on whether each field is applicable to the activity selected in the Activity Name field). This allows you to set up different workflows based on the values in these fields. For example, you could program StaffSuite to suggest another sales call if you had to leave a message, but something totally different if you were able to reach the person. Use Whether you are adding or editing a workflow, each active field is REQUIRED. |
|
|
|
|
Red Flag |
The Red Flag checkbox is reserved for future development and is not currently used by the StaffSuite software. |
|
|
|
|
Next Activity to Perform |
This section allows you to determine the activity that StaffSuite will suggest as the next activity to perform and the date on which it will suggest the activity be performed. In the Next Activity Name field, use StaffSuite gives you the option of setting the next activity to occur in a specific number of days or based on a date elsewhere in the system:
|
|
|
|
|
OK/Apply/Cancel |
Click OK to save your new workflow or your edits and close the window. Click Apply to save your new workflow but leave the window open, allowing you to add more workflows. Click Cancel to close the window WITHOUT saving your new workflow or your edits. |
|
|
|
![]()
Related Topics:
|
|
|