|
Add a Document
Operations > Documents Associated With XXXXXXXX Window > Add Documents (where XXXXXXX is an Employee, Company, Company Rep, Order, Assignment or Position)
Operations > Home Ribbon > Actions Group > Add Document
Operations > Employee Ribbon > Actions Group > Add Document
|

|

Add a Document allows you to add a file from a networked drive to the Document Management System (DMS) and associate it with a record in the system.
A resume is a special document that can be used to add an employee record into the system by parsing employee information from the resume, presenting it for verification and editing in a staging area, and adding much of that information into the new employee's record without data entry. An existing employee's record can also be updated by parsing an updated resume. Click here for more information on parsing a resume.
Accessing Add a Document
If you access Add Document from the Home ribbon, the Add a Document screen displays immediately.
If you access Documents from a category's (Employee, Order, etc.) navigator, a window displays all documents currently associated with the selected record. To add a document, click the Add Document button.
Adding a Document
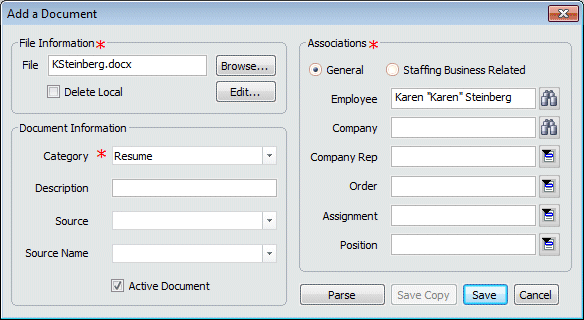
If you are adding an electronic document into StaffSuite, you can associate it with various records that already exist in the system. For example, the document displayed here will be associated with an employee in the system by default since there was an employee in currency, and this screen was opened from the Employee Navigator. Documents can be opened from the Company, Company Rep, Order, Assignment or Position navigators and be associated with those types of records. When this screen is opened from the Document Management Navigator, no associations appear by default, but they can be selected in the Associations area.
Tip: Many staffing services use the Staffing Business Related Associations feature to build a library of resumes. When a job request comes in from an account, they can search through their "library" of resumes for the skills they need. If they find a likely prospect, they can parse the resume to add that employee record at that time. See Adding Files to Access Later below for more details.
-
Click Browse... and select your document from the standard Windows Open dialog. Files up to a maximum size of 4 MB can be added.
NOTE: You can select multiple files (using standard Windows multi-select procedures) to add several documents at the same time.
Once selected, the document name or, if you select multiple documents, the word <multiple documents> appears in the File field You may change the name of the document, if you wish. This only changes the name of the document as it is used by DMS. It does NOT change the name of the document on your networked drive.
If you wish, you can edit the document by clicking Edit.... For example, you might want to make a blinded resume.
Finally, if you want to delete the file on your networked drive, place a check in the Delete Local checkbox. If you selected multiple documents, all of the selected documents will be deleted from your networked drive.
NOTE: If you select multiple documents, each document will be added with the same Category, Description, Associations, etc. Therefore, whatever you select in the fields below will apply to all documents.
-
In the Category field, use  to select the type of file. This determines how the file is handled (as Resume files are handled somewhat differently than other files). The options in the drop-list are user-defined (except for the OFCCP values) and can be changed using StaffSuite's Edit List functionality. This field is REQUIRED. Note: If a Category you have added using the Edit List functionality does not display as an option, it is possible that you have not yet added security to the Category. Security can be added using the Edit Document Security functionality.
-
In the Description field, enter a general description of the file. This is optional.
-
In the Source Category field, use to select a general description of the source of the document. The options in the drop-list are user-defined and can be changed by using StaffSuite's Edit List functionality. This field is optional.
-
In the Source Name field, use to select a more detailed description of the source of the document. The options in the drop-list are user-defined and can be changed by using StaffSuite's Edit List functionality. This field is optional.
-
The Active Document checkbox indicates whether or not the document is considered active. An inactive document may be searched on (if part of your search criteria looks for inactive documents), but will not show up in any list by default. For example, if you change a document associated with an employee from active to inactive, it will no longer show up in the Employee's Documents Associated grid. A check indicates that the document is active (this is the default). Clicking on the box toggles it between checked and unchecked.
NOTE: An Active Resume is a special document that has the word "resume" in the Category name and is specified as an Active Document in this screen. Users looking at this employee's Employee Basic screen will see an Active Resume button that can be clicked (by users with "View" Document Security) to open the resume document.
-
The Associations area allows you to associate the document with specific business entities by clicking on the lookup wizard button following each association field. Depending on where you originate Add a Document, various associations will default:
-
If selected from Employee, the Employee in currency defaults.
-
If selected from Company, the Company in currency defaults.
-
If selected from Company Rep, the Company Rep and the company rep's home Company default.
-
If selected from Order, the Order and Company owning the order default.
-
If selected from Assignment, the Assignment, the Order associated with the assignment, the Company serviced on the assignment, and the Employee filled on the assignment (if filled) default.
-
If selected from Position, the Position, the Order associated with the position, the Company serviced on the position, and the Employee placed on the assignment (if placed) default.
-
If selected from Document Management, no associations default.
You must associate a document with at least one or more business entities. You may associate any document with as many business entities as needed. Once associations are set up, they may be added, edited, and removed later, if needed.
-
To associate a document with an Employee, Company, Company Rep, Order, Assignment, and/or Position, click the General radio button. The following associations are available:
-
Company: Allows you to associate a document with a company. Click  to select the company. You must have access to the branch servicing the company in order to associate the document to the company.
-
Company Rep: Allows you to associate a document with a company rep. Click  to select the company rep. You must have access to the branch servicing the company rep's home company in order to associate the document to the company rep.
-
Order: Allows you to associate a document with an order. Click to select the order. You must have access to the branch servicing the order to associate the document to the order.
-
Assignment: Allows you to associate a document with an assignment. Click to select the assignment. You must have access to the branch servicing the order associated with the assignment in order to associate the document to the assignment.
-
Position: Allows you to associate a document with a position. Click to select the position. You must have access to the branch servicing the order associated with the position in order to associate the document to the position.
-
To save the document to DMS, click Save. To close the window without saving the document, click Cancel.
Adding Files to Access Later
Some staffing services have occasions when they wish to save electronic documents without associating them to specific records. They can then do keyword searches within those documents and associate an individual document when they need it.
-
In the Document Information fields, enter any of the information you wish to save about this file.
-
To associate a document with a Corporation, Staffing Service, Branch, and/or Staffing Rep, click the Staffing Business Related radio button.
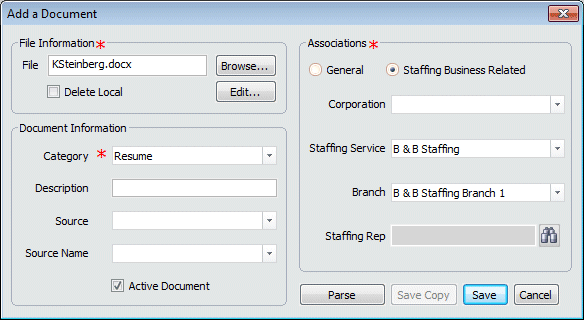
The following associations are available:
-
Corporation: Allows you to associate a document with a corporation. Click to select the corporation. You must have access to a branch associated with the corporation in order to associate the document to the corporation.
-
Staffing Service: Allows you to associate a document with a staffing service component. Click to select the staffing service. You must have access to a branch that has the staffing service as its structural parent in order to associate the document to the staffing service.
-
Branch: Allows you to associate a document with a staffing service branch. Click to select the branch. You must have access to the branch in order to associate the document to the branch.
-
Staffing Rep: Allows you to associate a document with a staffing service rep. Click to open a Look Up Staffing Service Rep dialog and find the correct rep.
-
To save the document to DMS, click Save. To close the window without saving the document, click Cancel.
Note: Notice that the Parse button is enabled in this screenshot. If you only wish to add this resume as a file to be accessed later, click the Save button. If you wish to parse the resume to add this employee record into the system, click the Parse button.
Adding an Employee by Parse Resume
If you are adding a resume into StaffSuite for an employee that does not have a record in the system, you can add the resume document, and parse the information in it, to automatically create an employee record with all the required information. The parsing process will extract contact information, work history, skills and education and build an employee record that contains as much of this information as you choose to include.
Click here for more information on parsing a resume.
Related Topics: