Edit Document Security
System Administration > Security > Actions > Edit Document Security
Edit Document Security System Administration > Security > Actions > Edit Document Security |
![]()
Edit Document Security allows you to determine what rights each role has to the different document categories in StaffSuite's Document Management System (DMS).
Note: You will not be able to use a Category in DMS until you set up its security on this window.
You can set up security based on the document category and/or the security title.
For a more thorough explanation of security, click here.
Editing Document Security

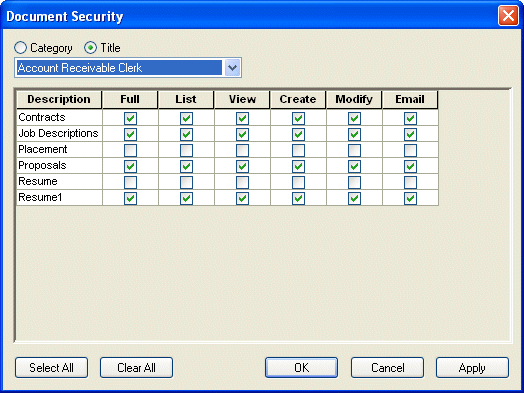
Select whether you want to edit document security by document category or security title by selecting either Category or Title. Your selection here determines what appears in the drop-list, as well as the layout of the grid.
Use ![]() to select either the document category or security title that you
want to edit. The options in the document category drop-list are user-defined
and can be changed using StaffSuite's
Edit List functionality. The options in the security title drop-list
are user-defined and can be changed using StaffSuite's
Edit Title Security functionality.
to select either the document category or security title that you
want to edit. The options in the document category drop-list are user-defined
and can be changed using StaffSuite's
Edit List functionality. The options in the security title drop-list
are user-defined and can be changed using StaffSuite's
Edit Title Security functionality.
The grid changes based on your selections in the prior two steps. If you select a document category, the various security titles in your database display in the left hand column. Thus, you are starting with a security title and editing the access that title has to the various document categories. If you select a security title, the various document categories in your database display in the left hand column. Thus, you are starting with a document category and editing the access that each security title has to that category.
In either case, the other columns are the same. They include the following:
Full: Gives total access to the document (listing, viewing, creating, modifying, emailing). Checking this column causes all the other columns on that row to be checked automatically. Unchecking this column causes all the other columns on that row to be unchecked automatically.
List: Allows the user to access a listing of documents from a search. If ONLY List access is given, the user would know that a document fulfilling the search criteria exists, but would not be able to view, modify, or email it.
View: Allows the user to view the content of a document. If ONLY View access is given, the user would be able to see from a search that the document exists and be able to view its contents, but would not be able to modify or email it, or add a new document.
Create: Allows the user to add a new document to the Document Management System. If ONLY Create access is given, the user would be able to see from a search that the document exists, view its contents, and add a brand new document, but would not be able to modify or email an existing document.
Modify: Allows the user to edit or delete an existing document. If ONLY Modify access is given, the user would be able to see from a search that the document exists, view its contents, edit those contents, and delete the document, but would not be able to email it or create a new document.
Email: Allows the user to email a document. If ONLY Email access is given, the user would be able to see from a search that the document exists, views its contents, and email it, but would not be able to edit the document, delete it, or create a new one.
A check in the box indicates that access is given. An empty box indicates no access is given. For example, in the screen shot above, anyone with a security title of Account Receivable Clerk has full access to those documents in the Contract, Job Descriptions, Proposals, or Resume1 categories. However, they would not have any access to those documents in the Placement or Resume categories.
You can make quick wide-ranging changes by using the buttons below the grid. To check all the boxes in the grid, click Select All. To uncheck all boxes in the grid, click Clear All. Clicking on the individual box in the grid toggles it between checked and unchecked.
When you have made the proper adjustments to document security, click OK to save your changes and close the window. Click Apply to save your changes, but leave the window open so you can make additional adjustments. Click Cancel to close the window WITHOUT saving your changes.
![]()
Related Topics:
|
|