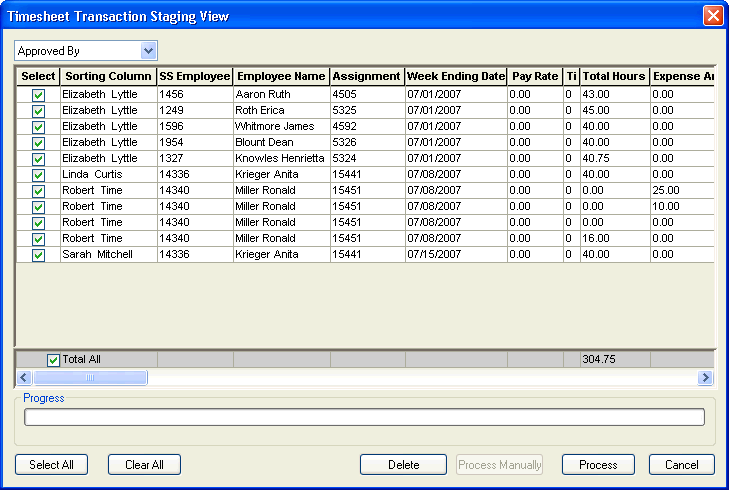
Transaction Management Screen

How to Use OnLine Help


Click here to return to the Transaction Management main topic page.

Sorting Selection Field

Use to select which column's contents will provide the sorting the grid. The criteria you select in the box determines the contents of the first column of the grid (labeled Sorting Column) and this column remains visible as you scroll across all the columns.

Note: You can still sort the other columns by right-clicking on the column and selecting your sorting preference. This allows you to sort on any column and still see the contents of the first column.


Grid

The Grid displays the transactions that have been imported but have not yet been processed into a timesheet. Each row of the grid represents a wage code entered in the timesheet, for example, Regular time has a row that shows Total Hours Worked of regular time for the week, and then is detailed by day in Total Monday Hours, Total Tuesday Hours, etc. Overtime has another row in the grid. Expenses such as Parking and Per Diem each have a row in the grid to reflect the values entered in the timesheet for each expense. The grid will only show those wage codes for which values were entered in the timesheet, for example, if an employee did not work any overtime on an assignment, there will not be a row in the grid for Overtime for that transaction. As a result, a timesheet transaction may have one row in the grid, or several.

NOTE: Depending on the vendor who supplies the import file, some of the columns may not contain data. For transactions from the TimeKeeper module, blank columns may indicate that the information is stored in StaffSuite, but not sent to, or retrieved from, TimeKeeper.

The following columns appear on the grid:

  • Select: The checkbox in the Select column indicates whether the transaction will be marked for timesheet creation. A checked box indicates that the transaction is selected for timesheet creation. An unchecked box indicates that the transaction is not selected for timesheet creation. You can select/deselect checks by clicking on the checkbox in the Select column. You can also select transactions to be totalled using the

  • Sorting Column: The contents of this column changes based on your selection in the Sorting Box (see above), but the column remain visible even as you scroll across all the columns.

  • Social Security Number - the employee's social security number.

  • SS Employee ID - the employee id of the employee in StaffSuite.

  • Employee Name - the employee's name that was used to create the timesheet.

  • Assignment Number - The id number for the job assignment.

  • Week Ending Date - The last day of the week for which this timesheet is recording time or expenses.

  • Pay Rate - This column will display pay rates for third party timesheets that contain the pay rate as well as the hours. Records imported from the TimeKeeper module will be blank since the pay rate stored in StaffSuite will be used to calculate payroll.

  • Timesheet Branch - The staffing service branch that provided the employee for this job.

  • Total Hours Worked - This is the sum of total hours from the daily hours shown in Total Monday Hours, Total Tuesday Hours, etc. for the paybill codes of Regular, Overtime, or Doubletime.

  • Expense Amount - Total amount of expenses.

  • Expense Units - Total number of expenses.

  • Pay Bill Code - The Wage Code for time and expenses. For those timesheet formats that support multiple paybill codes, there may be a separate row in the grid for each one. For example, there may be lines for paybill codes of Regular, Overtime and Doubletime for hours worked, and there may be rows for Mileage, Parking, Per Diem, Housing or Other for expenses.

  • Total Monday Hours - Shows hours worked by the employee on this day with a separate row in the grid for each paybill code of Regular, Overtime or Doubletime, if applicable. Note: Not all paybill codes are used for each timesheet format; the timesheets that only track hours will show all the hours worked as a sum.

  • Total Tuesday Hours - Shows hours worked by the employee on this day with a separate row in the grid for each paybill code of Regular, Overtime or Doubletime, if applicable. Note: Not all paybill codes are used for each timesheet format; the timesheets that only track hours will show all the hours worked as a sum.

  • Total Wednesday Hours - Shows hours worked by the employee on this day with a separate row in the grid for each paybill code of Regular, Overtime or Doubletime, if applicable. Note: Not all paybill codes are used for each timesheet format; the timesheets that only track hours will show all the hours worked as a sum.

  • Total Thursday Hours - Shows hours worked by the employee on this day with a separate row in the grid for each paybill code of Regular, Overtime or Doubletime, if applicable. Note: Not all paybill codes are used for each timesheet format; the timesheets that only track hours will show all the hours worked as a sum.

  • Total Friday Hours - Shows hours worked by the employee on this day with a separate row in the grid for each paybill code of Regular, Overtime or Doubletime, if applicable. Note: Not all paybill codes are used for each timesheet format; the timesheets that only track hours will show all the hours worked as a sum.

  • Total Saturday Hours - Shows hours worked by the employee on this day with a separate row in the grid for each paybill code of Regular, Overtime or Doubletime, if applicable. Note: Not all paybill codes are used for each timesheet format; the timesheets that only track hours will show all the hours worked as a sum.

  • Total Sunday Hours - Shows hours worked by the employee on this day with a separate row in the grid for each paybill code of Regular, Overtime or Doubletime, if applicable. Note: Not all paybill codes are used for each timesheet format; the timesheets that only track hours will show all the hours worked as a sum.

  • Approval Status - The status of the timesheet from the timesheet entry system. TimeKeeper timesheets will always be "Approved".

  • Approved By - The Company Rep who approved this employee's timesheet at the assignment.

  • Import Process ID (this is the ID created during the import process)

  • Status (New, Failed, Created, or Manual Create)

  • Reason Code (if the transaction failed to create a timesheet)


Total All

The columns in the grid that display numeric values are totalled at the bottom of the grid. Place a checkmark in the Total All checkbox to total all the rows in the grid. Remove the checkmark to total only the rows that are selected in the Select column. Click to toggle the checkbox on and off.


Progress

Displays the system's progress in creating timesheets automatically from the selected transactions. When this equals 100%, the timesheet(s) have been created.


Select All

Click this button to put a checkmark in each box in the Select column. This selects all transactions for timesheet creation.


Clear All

Click this button to uncheck each box in the Select column. This deselects all transactions for timesheet creation.


Delete

Click this button to delete all selected transactions from the staging view window. This delete function is used when incorrect timesheet transactions are imported into StaffSuite, or when you attempt to add transactions to a batch and they fail. A transaction which has been deleted from the staging view window cannot be added to a batch, or processed for payroll, but must be importing again before processing.


Process Manually

Click this button to manually create a timesheet for a selected transaction. You may only select one transaction for manual timesheet creation. The Timesheet Add screen allows you to enter the information you know to be correct, even if the information displayed here is incorrect.


Process

Click this button to automatically create timesheets for all selected transactions.


Cancel

Click this button to close the window without creating timesheets.


Related Topics: