|
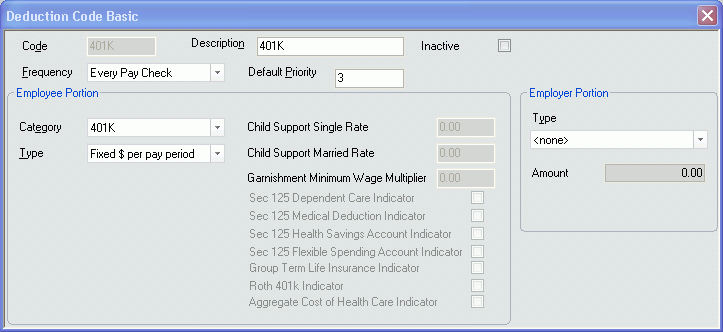
Code
Description
|
Code: Displays the user-defined code to identify this deduction. Whenever you are able to select a Deduction Code from a list of options, the information you enter in this field will display in the drop list. This field is non-editable.
Description: Displays a description that will be associated with the previously entered Code. In many cases, this will simply be a repeat of the information entered in the Code field. However, if you entered an abbreviation in the Interface Code field (like GARN%), this field should contain a fuller description of the Deduction Code.
|
|
|
|
|
Category
|
Displays the deduction category.
Your selection here affects some of the other fields on this window. For example, if you select Child Support, the Child Support Single Rate and Child Support Married Rate fields become active. It also determines the contents that will display in the Type drop-down list.
Options are:
-
125 Cash (125 pre-tax cafeteria plan with cash)
-
125 No Cash (125 pre-tax cafeteria plan with no cash)
-
401K
-
Child Support
-
Employer
-
Garnishment
-
Levy (refers only to federal levies - state levies should use the garnishment category)
-
Regular.
|
|
|
|
|
Type
|
Displays the deduction type. Use  to select from a list of types. to select from a list of types.
This list is filtered based on the category you entered in the previous field.
Options are:
-
Advanced Pay or Loan (if the category is Regular): Use to set up a deduction to repay an advance or loan.
-
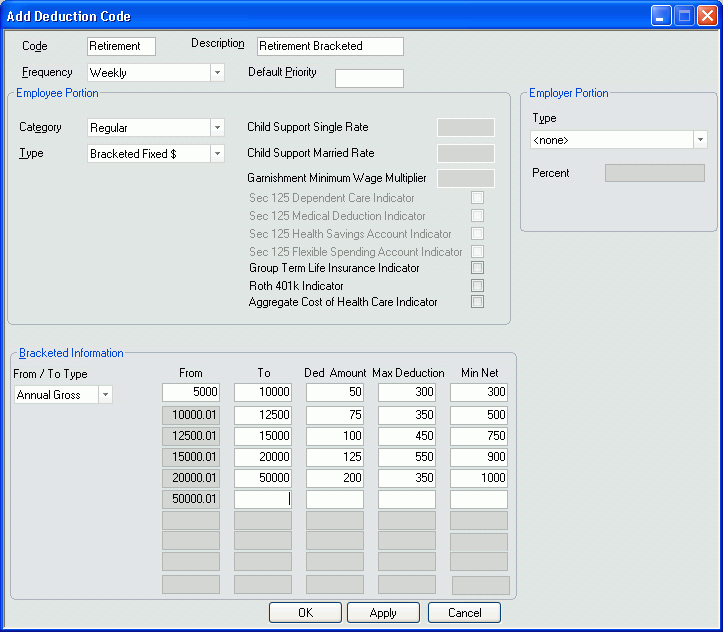
Bracketed Fixed $ (if the category is Regular): Allows you to set up a deduction, which takes a fixed dollar amount based on the bracket type (for example, if gross pay is between x and y amounts, then deduct 10.00)
-
Bracketed Pct (if the category is Regular): Allows you to set up a deduction, which takes a percentage of the pay based on the bracket type (for example, if gross pay is between x and y amounts, then deduct 10%).
-
Counter Fixed $ (if the category is Regular): Used to set up a deduction that takes a fixed dollar amount a specific number of times (for example, take $5.00 out of the next 15 pay checks).
-
Counter Pct (if the category is Regular): Used to set up a deduction that takes a percentage of the pay a specific number of times (for example, take 5% out of the next 15 pay checks).
-
Declining Balance (if the category is Regular): Used to set up a deduction that remains active until a specific amount is paid off (for example, take $5 out of each paycheck until a $60 uniform charge is paid off).
-
Fixed $ per pay period: Takes a fixed dollar amount each pay period.
-
Fixed Pct per pay period: Takes a percentage amount each pay period.
-
Fixed $ Declining Balance (if the category is Garnishment): Used to set up a deduction that remains active until a specific amount is paid off. This option removes a specific amount from the employee's paycheck.
-
Fixed Pct Declining Balance (if the category is Garnishment): Used to set up a deduction that remains active until a specific amount is paid off. This option removes a specific percentage from the employee's paycheck.
-
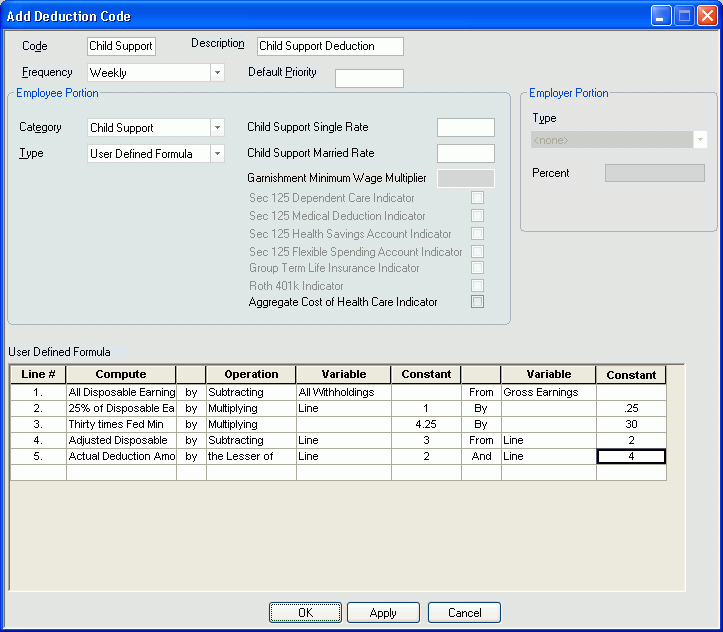
User Defined Formula (if the category is Garnishment or Child Support): Allows you to set up a deduction formula if StaffSuite's standard garnishment and child support formula is not applicable. Why would I want to use a user-defined formula?
Your selection in this field may cause additional fields to appear on the window.
|
|
|
|
|
Frequency
|
Indicates how often this code type should be deducted. Use to select a frequency.
Options are:
-
Annually: Once a year.
-
Bi-Weekly: Every 2 weeks.
-
Daily: Every day.
-
Every Pay Check: Each time a pay check is produced for a pay period, this deduction will be taken. (If multiple pay periods are included in a single paycheck, the deduction will be taken multiple times - once for each pay period included in the paycheck.)
-
Monthly: Once a month.
-
Quarterly: Once per quarter.
-
Semi-Annually: Twice yearly.
-
Semi-Monthly: Twice monthly.
-
Weekly: Once per week.
|
|
|
|
|
Default Priority
|
Identifies the priority for this deduction (the lower the number, the higher the priority).
For example, priority 01 deductions are taken out of a paycheck before priority 02 deductions.
If your Category is Employer, this field is inactive (since Employer Deductions are always set at the lowest priority).
NOTE: Numbers 1-9 should be entered as 01-09.
|
|
|
|
|
Category Specific Information
|
The fields in the Category Specific Information sections are active/inactive based on your selection in the Category field. For example, if the Category is Child Support, then the Child Support fields (Child Support Single Rate and Child Support Married Rate) will be active.
-
Child Support Single Rate: Enter the maximum garnishment percentage rate allowed to be taken for single status child support. This field is only active if the Category is Child Support.
-
Child Support Married Rate: Enter the maximum garnishment percentage rate allowed to be taken for married status child support. This field is only active if the Category is Child Support.
-
Garnishment Minimum Wage Multiplier: Enter the Garnishment Wage Multiplier, if applicable. The system multiplies this number by the federal minimum wage stored in the corporation record to determine the minimum net pay to which an employee is entitled. This field is only active if the Category is Garnishment.
-
Sec 125 Dependent Care Indicator: Check this box if this deduction is separated out and listed on the W2 in box 10 (Dependent Care Withholding). Clicking in the box toggles it between checked and unchecked. This field is only active if the Category is 125 Cash or 125 No Cash.
-
Sec 125 Medical Deduction Indicator: Check this box if this deduction should reduce taxable gross. This field is only active if the Category is 125 Cash or 125 No Cash.
-
Sec 125 Health Savings Account Indicator: Check this box if this deduction should reduce taxable gross and be listed on the W2 in box 12. Clicking in the box toggles it between checked and unchecked. This field is only active if the Category is 125 Cash or 125 No Cash. NOTE: This deduction has maximum limits. StaffSuite does not track amounts deducted against those limits. You will need to manually track total amount deducted to insure you do not deduct over the maximum amount allowed.
-
Sec 125 Flexible Spending Account Indicator: Check this box if this deduction should reduce taxable gross. This field is only active if the Category is 125 Cash or 125 No Cash. If it is selected, all other indicator flags will be grayed out except for Aggregate Cost of Health Care Indicator.
-
Group Term Life Insurance Indicator: Check this box if this deduction should be separated out and listed on the W2 in box 12. Clicking in the box toggles it between checked and unchecked. This field is only active if the Category is 125 No Cash or Regular.
-
Roth 401k Indicator: Check this box if this deduction should be separated out and listed on the W2 in box 12. Clicking in the box toggles it between checked and unchecked. This field is only active if the Category is Regular. NOTE: This deduction has maximum limits. StaffSuite does not track amounts deducted against those limits. You will need to manually track total amount deducted to insure you do not deduct over the maximum amount allowed.
-
Aggregate Cost of Health Care Indicator: Beginning in 2012, any employer with over 250 employees must report the aggregate cost of Health Care Benefits on the employee W2s. If this box is checked, all employee and employer deduction amounts associated with the deduction code will be summarized (during the W2 Summary process) for reporting on the employee W2. This box is only active if the Deduction Category is 125 Cash, 125 No Cash or Regular.
|
|
|
|
|
Inactive
|
If the Deduction Code is inactive, place a check in the Inactive field. This code will no longer be available for selection, although it will still appear in existing records where it was previously selected.
|
|
|
|
|
Employer Portion
|
The Employer Portion frame offers the option of selecting a Type of contribution that an employer will make to an employee deduction. Based on which employer contribution type is selected, there will be a Percent or an Amount field to allow entry of the contribution.
For more information about Employer Shared Deductions, click here.
|
|
|
|
|
Bracketed Information
|
If the Type field is Bracketed Fixed $ or Bracketed Pct, a Bracketed Information area displays. You can access the following fields to edit your bracketed deduction:
-
From/To Type: Use to select the type of information you will be entering. Options are Annual Gross, Annual Net, Gross Amount (per frequency), Hours (per frequency), and Net Amount (per frequency). For example, if you select Annual Gross, then the information in the rest of the fields should reflect annual gross amount totals.
-
From: Enter the lower limit of the bracketed range. If no amount is specified, zero is assumed.
-
To: Enter the upper limit of the bracketed range. If no amount is specified, zero is assumed.
-
Ded Amount: Enter the deduction amount (if Bracketed Fixed $) or percentage amount (if Bracketed Pct) for the range in the From and To fields.
-
Max Deduction: Enter the maximum amount to deduct per frequency. This must be a dollar amount and is only used if the deduction is a percentage.
-
Min Net: Enter the minimum net amount that must be available before the deduction will be taken. For example, let's suppose that the Min Net is set at $200.00, the Deduction Amount is 20%, and the Max Deduction is $100.00. If the Net Pay on the check is $600, the initial deduction calculation will come to $120 (600 x 20%). However, the deduction will actually end up being $100 (the Max Deduction amount). On the other hand, if the Net Pay had been $195, no deduction would have been taken (since it is below the Min Net amount).
|
|
|
|
|
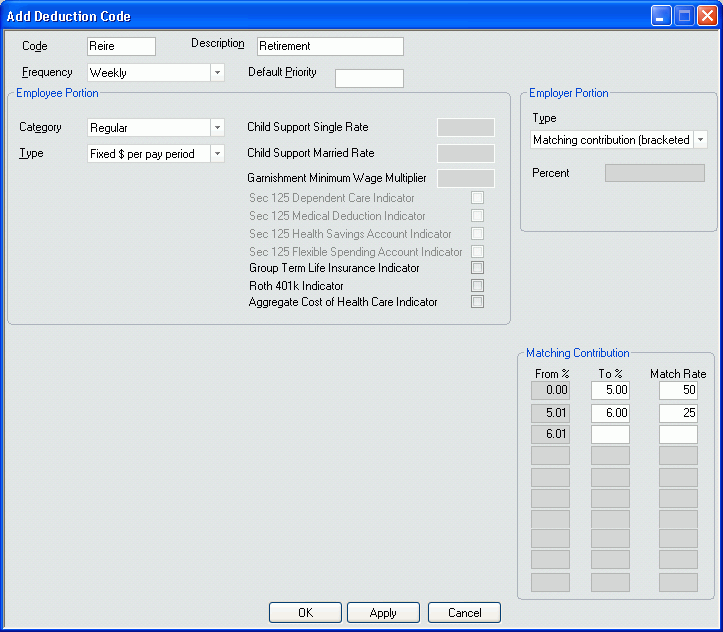
Matching Contribution
|
The Matching Contribution section of the additional bracketed frame of the window only appears when Matching contribution (bracketed) is selected as the Type in the Employer Portion section of the window. This deduction is typically used in a deduction such as 401K where an employer agrees to match a percentage of the contribution made by the employee up to a designated percentage.
In the From% column, enter the lowest percentage the employee can contribute to generate an employer match. In the To% column, enter the highest percentage of the employee's contribution that will initiate this matching contribution from the employer. In the Match Rate column, enter the percentage of the employee's contribution that the employer will contribute.
Subsequent rows in the table are used to further define the limits of this employer contribution.
|
|
|
|
|
User Defined Formula
|
If the Type field is User Defined Formula (available only if the Category is Child Support or Garnishment), a User Defined Formula Grid displays. You can access the following fields to edit your user defined formula:
Note: The data you need to enter into the User Defined Grid is normally provided by the taxing authority requesting the Child Support or Garnishment deduction.
-
Compute: Type the name of the information you are computing for that line. While there are no rules for entering information into this field, we suggest using terminology that would be understandable and sensible for the information being entered. For example, you may be calculating All Disposable Earning on a line. Therefore, you would enter All Disposable Earnings in the Compute column.
-
Operation: When you click this column, a drop list displays from which you select the type of operation you are performing. Options are adding, subtracting, multiplying, dividing, the lesser of, and the greater of.
-
Variable: When you click this column, a large drop list displays from which you select the variable upon which your selection in the Operation column must act. Options included All Withholding, Gross Earnings, SDI, and much more. There are two variable fields you can use.
For an explanation of the values in the Variable drop list, click here.
-
Constant: If needed, enter a number that acts as a constant upon which your selection in the Operation column must act or a line number to which it must refer. For example, if you wanted the formula to multiply line 1 by some amount, you would enter Line in the Variable column and 1 in the Constant column. There are two constant fields you can use.
For some examples of User Defined Formulas, click here.
|
|
|
|