Orientation
Operations > Assignment > Information > Orientation
Operations > Position > Information > Orientation
![]()
|
Orientation Operations > Assignment > Information > Orientation Operations > Position > Information > Orientation |
|
![]()
Orientation allows you to maintain practical information the employee needs to know before going on the assignment/position.
For more information about assignment, click here.
For more information about position, click here.
Viewing and Editing Orientation Information
NOTE: The screen shot below shows the Assignment Orientation window. The Position Orientation window is identical except for the title bar (which shows the position number instead of the assignment number) and the exclusion of the Work For field.
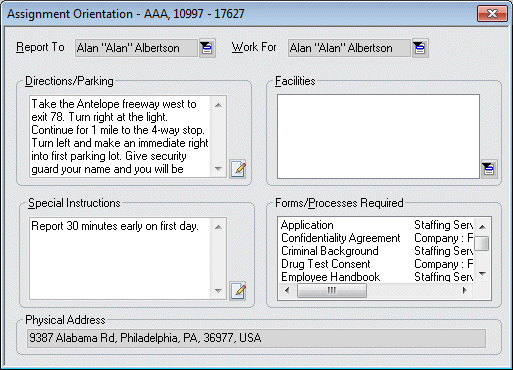
In the Report To field, select the company rep that the employee will report to upon starting the assignment/position. This defaults from the name entered when the order was created, but can be changed by clicking ![]() and selecting a new company rep. NOTE: Only company reps associated with the company placing the order are displayed in the look up list.
and selecting a new company rep. NOTE: Only company reps associated with the company placing the order are displayed in the look up list.
In the Work For (Assignment Orientation window only) field, select the company rep that the employee will work for during the assignment. This defaults from the name entered when the order was created, but can be changed by clicking ![]() and selecting a new company rep. NOTE: Only company reps associated with the company placing the order are displayed in the look up list.
and selecting a new company rep. NOTE: Only company reps associated with the company placing the order are displayed in the look up list.
In the Directions/Parking field, type basic directions to and parking information for the company associated with the assignment/position. This defaults from the Company General Information window (if any information was entered there), but can be edited on this window. Click the  icon to expand the field in a re-sizable dialog where you can enter and view all your text and use spell checking. Click here for more information about the re-sizable dialog and spell checking.
In the Facilities field, use ![]() to select the types of facilities available at the assignment's/position's location. This defaults from the Company General Information window (if any information was entered there), but can be edited on this window.
to select the types of facilities available at the assignment's/position's location. This defaults from the Company General Information window (if any information was entered there), but can be edited on this window.
For details on using the Facilities window, click here.
In the Special Instructions field, type any special instructions that the employee would need to know for the assignment/position. For example, he/she might need to check in at a security desk or bring something with them. This defaults from the Company General Information window (if any information was entered there), but can be edited on this window. Click the icon to expand the field in a re-sizable dialog where you can enter and view all your text and use spell checking. Click here for more information about the re-sizable dialog and spell checking.
The Forms/Processes Required field displays the forms that the employee will be expected to complete and/or the processes that the employee will be expected to go through upon starting the assignment/position. This defaults from the Order Forms/Procedures List window (which combines forms and procedures required at the associated staffing service branch, company and order) and cannot be edited here..
The Physical Address information defaults from the Company Basic window (Physical Address location) and may not be edited on this window.
When you have entered/edited the information on the window, click the Save button on the StaffSuite toolbar.
![]()