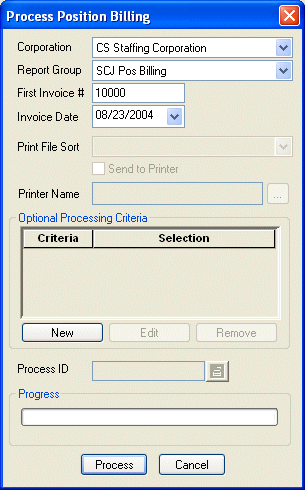
Process Position Billing Screen
|
Process Position Billing Screen |
![]()

Click here to return to the Process Position Billing main topic page.
|
Corporation |
Use |
|
|
|
|
Report Group |
Use If the report group does not have an invoice report associated with it, the system will warn you of this fact. Select another report group or select <none>, Report groups are set up in the System Administration division of StaffSuite. |
|
|
|
|
First Invoice # |
Enter the first invoice number used for this billing process. If you have selected a report group, the next form number defaults into this field. You may edit this field if needed. StaffSuite performs a quick diagnostic to check if the number entered has already been used. If so, a warning message is displayed. Enter a different number in the field to proceed. |
|
|
|
|
Invoice Date |
Use Click here for more information on using StaffSuite's calendar. |
|
|
|
|
Print File Sort Send to Printer Printer Name |
If you selected a master report group (set up in System Administration and further defined in Company), use NOTE: If you sort by branch name or branch number, you should NOT use any type of pre-numbered invoice forms since the system number may not match the pre-printed form number. If you selected a master report group, put a check in the Send to Printer box to print invoices directly to a networked printer. If you place a check in the box, the Printer Name field becomes active. Click the drop-list to select the printer to which you want to send the invoices. If the Send to Printer checkbox is empty, the system will create a print file in Crystal Enterprises that can be printed later. NOTE: The Send to Printer option is only available if your configuration file has been set to allow printing to a local printer. By default, this option is off. To turn on this option, call Bond Support at 1-800-925-1519. Additionally, The options in the Printer Name drop list are also set up in your server configuration file. To add/edit/remove a printer, call Bond Support at 1-800-925-1519. Clicking on the box toggles it between checked and unchecked. |
|
|
|
|
Optional Processing Criteria |
The grid shows all optional processing criteria selected for this billing process. Optional processing criteria allows you to further group the way the system processes billing. For example, you can process only a specific batch ID or bill group or service line. You have the following options on the Process Timesheet Billing window:
Click here for more information on Optional Processing Criteria. |
|
|
|
|
Process ID |
Unique number identifying the billing process. StaffSuite automatically assigns a processing ID once processing begins. This allows you to identify the process in the system through the updating procedure. |
|
|
|
|
Progress |
This bar shows the progress of the billing process. |
|
|
|
|
Process |
Click this button to begin the billing process based on the criteria entered. |
|
|
|
|
Cancel |
Click this button to close the window without processing billing. |
|
|
|
![]()
Related Topics:
|
|