Change Vendor Association
Operations > Employee Basic Window > Vendor Name Icon
Operations > Assignment Basic Window > Vendor Name Icon
|
Change Vendor Association Operations > Employee Basic Window > Vendor Name Icon Operations > Assignment Basic Window > Vendor Name Icon |
![]()
Change Vendor Association allows you to perform any of these actions:
Change an Employee from Secondary Source to Regular (from Employee Basic)
Change the vendor associated with a Secondary Source Employee (from Employee Basic)
Change an Employee from Regular to Secondary Source (from Employee Basic)
Change an Assignment from Regular to Secondary Source (from Assignment Basic)
Change the vendor associated with a Secondary Source Assignment (from Assignment Basic)
NOTE: This activity can only be performed in Employee if the employee is NOT filled on an assignment (in the case of Employee Basic) AND the Assignment status is Open or Filled and has no associated timesheets (in the case of Assignment Basic).
NOTE2: The New Vendor Name cannot be populated with a Vendor with the status of Inactive.
Changing Vendor Association

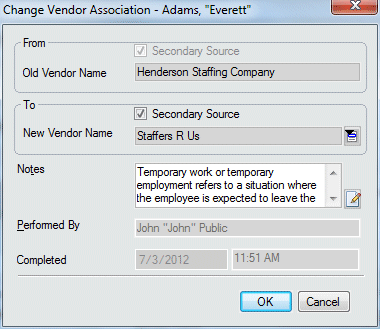
The From fields indicate the current standing of the employee or assignment (whether he/she/it is a secondary source employee/assignment and the associated vendor, if any). These fields are read-only and the information defaults from the Employee Basic or Assignment Basic window.
In the To fields, use the Secondary Source box to indicate whether the employee should be considered a secondary source employee or not (if this is done from Assignment, the box is automatically checked). A check in the field indicates that the employee/assignment will become (or will stay) a secondary source employee/assignment upon completion of the activity. An unchecked box indicates that the employee will become a regular employee upon completion of the activity (note: This box can not be unchecked for assignment. If the Secondary Source box is checked, the New Vendor Name field becomes active. Use ![]() to select the vendor with which you want the employee\assignment associated. You must select a Vendor that has a TIN entered in their record. For more information on using the Vendor Look Up, click here.
to select the vendor with which you want the employee\assignment associated. You must select a Vendor that has a TIN entered in their record. For more information on using the Vendor Look Up, click here.
In the Notes field, enter any information specific to this association change (optional). Click the  icon to expand the field in a re-sizable dialog where you can enter and view all your text and use spell checking. Click here for more information about the re-sizable dialog and spell checking.
In the Performed By and Completed fields default to the currently logged-in user and current date and time. These fields are read-only and may not be changed.
Click OK to complete the activity.
![]()