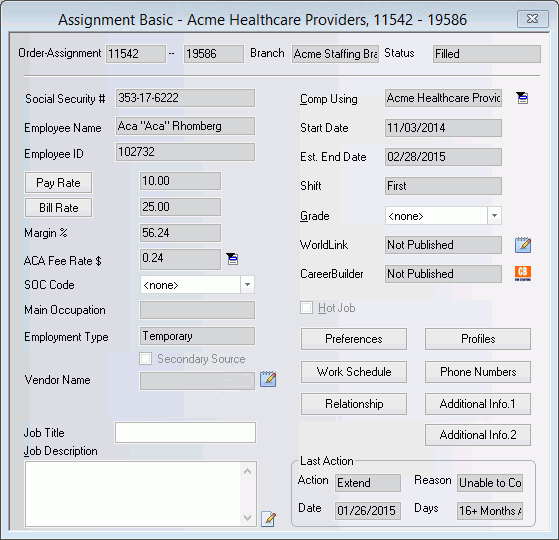
Assignment Basic Screen
![]()
![]()
|
Assignment Basic Screen |
|
![]()
Click here to return to the Assignment Basic main topic page.
|
Order-Assignment Branch Status |
These fields are all read-only and are designed to give you information about the assignment, but are not to be edited on this window. Order-Assignment displays the order number (automatically assigned once an Order is added) and the Assignment number (automatically assigned once an Assignment is added). This combination of numbers is unique to this assignment. If the assignment is currently linked with TempBuddy, an icon ( Job Orders and Assignments that will be filled through TempBuddy must be entered into TempBuddy. Orders entered into StaffSuite will not be sent to TempBuddy. Job Orders added to TempBuddy will be sent to StaffSuite and then you can update the orders from either system. Job Orders and Assignments in TempBuddy are pushed to StaffSuite every 12 hours by the Scheduler. However, you can use PayBill > Payroll > Sync TempBuddy to manually synchronize the two. Since all orders created within TempBuddy should be filled within TempBuddy, if you want to fill an order partially through TempBuddy and partially through StaffSuite, Bond recommends create two separate orders. One, created in TempBuddy, will be filled within TempBuddy. The other, created in StaffSuite, will be filled within StaffSuite. The following is a list of Assignment fields that are synced between StaffSuite and TempBuddy:
Branch displays the staffing service branch that services this assignment. Status displays the current status of the assignment. The following are possible assignment statuses:
|
|
|
|
|
Social Security #
Employee Name Employee ID |
Identifies the employee that has filled this assignment. If the assignment is not yet filled, these fields will be blank. The upper field contains the social security number or contractor ID number of the employee/contractor. NOTE: Permission to view social security numbers is set up in the Staffing Service Rep Basic screen. A staffing service rep that does not have permission to view social security numbers will see the numbers masked with only the last four digits revealed. The middle field contains the employee/contractor's name, and the lower field contains the Employee ID number for the employee on this assignment. While you may not edit the field here, you can perform a Fill Assignment activity to put an employee on this assignment. |
|
|
|
|
SOC Code |
Effective with fourth quarter 2015, employers are required to report the Standard Occupational Classification (SOC) for Louisiana Quarterly SUI reporting. Use the droplist to select the SOC Code, if needed. The field defaults to <none>. |
|
|
|
|
Pay Rate Bill Rate Margin % |
Identifies the amount that is being, will be, or has been paid and billed on this assignment. The Margin % is calculated based on the pay and bill rate. Clicking on the Pay Rate or Bill Rate button displays the Advanced Profit Measures window or Profit Measures window (depending on security permissions) where you edit various information about the pay and bill rate. The Margin % displayed could also be Margin $ or Markup % if that default was set up in the Staffing Services Defaults window in System Administration. If the company associated with the assignment has a national account number (see the Company Billing Information window), the pay and bill rates are locked down and only a staffing service rep with National Account Manager status (see the Staffing Service Rep Basic window) can edit them. |
|
|
|
|
ACA Fee Rate $/% |
This indicates the ACA Cost Recapture Fee that will be changed on this assignment. If the field label reads "ACA Fee Rate $" then the amount listed is a dollar amount fee per billing unit (e.g. hour). If the field label reads "ACA Fee Rate %" then the amount listed is a percentage of the billed amount. You can change the ACA Fee Rate by clicking the icon to the right of the field. This displays the following screen:
When you are satisfied with your selections click OK. The ACA Fee Rate field on Assignment Basic updates based on the information saved. NOTE: A change to the ACA Fee rates on an Assignment creates a Rate Change activity automatically. For more information on the Activity Base window, click here. |
|
|
|
|
Main Occupation Employment Type |
Identifies the main occupation of the assignment, as well as the type of employment required. Neither of these fields can be edited on this window. However, both fields can be changed by using the Assignment Preferences window. |
|
|
|
|
Secondary Source Vendor Name Vendor Employee Rate |
The Secondary Source checkbox identifies whether this assignment is associated with a secondary source vendor. If the box is check, the assignment is considered a secondary source assignment. If the box is unchecked, the assignment is not a secondary source assignment. This box can be checked for two reasons: 1) When the assignment was created, it was marked as a secondary source assignment and 2) While the assignment was created as a regular assignment (not a secondary source one), a secondary source employee was filled on the assignment. Vendor Name indicates the Vendor that is associated with the assignment (if it is a secondary source assignment). IMPORTANT: If the assignment was added as a secondary source assignment and filled with an employee from a different vendor than was originally associated with the assignment, the original vendor does not change. For example, if you originally associated the assignment with Acme Vendor and the employee that filled the assignment was associated with Beta Vendor, the Vendor field will continue to show Acme Vendor (though you will be warned that the vendors are different when you fill the assignment). If the vendor is not updated, you could end up sending payment to the wrong vendor. Both the Secondary Source checkbox and the Vendor Name field are read-only. You can update these fields by clicking Vendor Employee Rate displays the amount that the vendor will pay the employee. This is optional and used for informational purposes only. This field only displays if this is a secondary source assignment. |
|
|
|
|
Job Title Job Description |
These fields contain the Job Title and a free-form Description of the Assignment. Neither field is required. Click the |
|
|
|
|
Comp Using |
Indicates the company component that ordered this assignment. This defaults from the A/R Company on the Order Billing Information window, but can be edited by clicking |
|
|
|
|
Start Date Est. End Date Shift |
Identifies the date that the assignment starts and the date it is estimated to end. Shift is also identified. While you may not change these fields on this window, they can be edited by using the Assignment Work Schedule window. |
|
|
|
|
Grade |
While this field is normally used to give a rating to the work that the employee did on the assignment, it can be used for various purposes depending on the needs of your staffing service. For example, it can be used to rate the assignment itself. The items in the drop-list are user-defined and can be changed by using StaffSuite's Edit List functionality. |
|
|
|
|
WorldLink |
Identifies the assignment's WorldLink status. Possible statuses are:
You can publish an assignment or edit the information on a currently published assignment by clicking |
|
|
|
|
CareerBuilder |
Identifies the assignment's CareerBuilder posting status. Possible statuses are:
You can publish an assignment, edit the information on a currently published assignment or remove a published assignment by clicking |
|
|
|
|
Hot Job |
Hot Job is a read-only checkbox indicating whether the order from which this assignment was created was flagged as a "hot job" that requires special consideration. Your staffing service will define what "hot job" means to you, and you can choose to include this indicator in Quick Assignment Lookup results, or in searches. |
|
|
|
|
Profiles Work Schedule Phone Numbers Relationship Additional Info.1 Additional Info.2 |
These buttons take you to various other windows allowing you to view, add, edit, and remove information about the assignment. Click Preferences to view, add, edit, and remove preference information like salary, schedule, location, etc. Click Profiles to view, add, edit, and remove profile information like occupation, skill, personal characteristics, etc. Click Work Schedule to view and edit information about the assignment's work schedule. Click Phone Numbers to view and edit phone numbers associated with the assignment. Click Relationship to view and edit the relationship manager. Click Additional Info.1 to view/edit any Assignment UDFs assigned to the Additional Info.1 screen. Click Additional Info.2 to view/edit any Assignment UDFs assigned to the Additional Info.2 screen. |
|
|
|
|
Last Action |
Identifies the last action taken on the assignment, as well as the reason that the activity was performed, if applicable. It also lists the date the activity occurred and the number of days that have passed since the activity was performed. These fields are updated automatically by the system and cannot be edited. |
|
|
|
![]()
Related Topics:
|
|

 . This opens the
  icon to expand the Job Description field in a re-sizable dialog where you can enter and view all your text and use spell checking.
  . This opens the