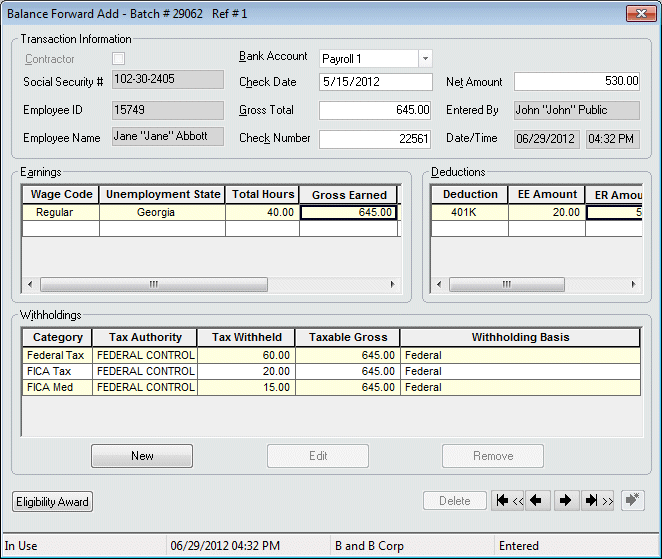
Add Payroll Balance Forward Screen
![]()
![]()
|
Add Payroll Balance Forward Screen |
|
![]()
Click here to return to the Add Payroll Balance Forward main topic page.
|
Contractor |
Check box indicating whether this balance forward transaction is for a contract employee. A check indicates that the employee is a contractor. An empty box indicates that the employee is not a contractor. |
|
|
|
|
Social Security # |
The Social Security number of the employee associated with this balance forward transaction. Enter the social security number in order to begin the balance forward process. NOTE: Permission to view social security numbers is set up in the Staffing Service Rep Basic screen. A staffing service rep that does not have permission to view social security numbers will be able to enter a social security number but, as soon as results are displayed, the numbers will be masked with only the last four digits revealed. If you do not know the employee's SSN, you cannot use that field to add a balance forward. |
|
|
|
|
Employee Name |
The name of the employee for whom this Payroll Balance Forward was created. This defaults to the employee name associated with the social security number and may not be changed on this screen. |
|
|
|
|
Employee ID |
The employee's ID number for this balance forward. This defaults to the employee ID number associated with the social security number. |
|
|
|
|
Bank Account |
Use |
|
|
|
|
Check Date |
Use Click here for more information on using StaffSuite's calendar. |
|
|
|
|
Gross Total |
Enter the gross amount paid to the employee over the period covered by the balance forward (for example, if this balance forward covers a quarter, enter the gross amount paid to the employee for the quarter. Gross amount is the amount of the check before any deductions or withholdings. |
|
|
|
|
Check Number |
Type the check number of the actual check (if this balance forward covers a single check) or an audit number for tracking purposes (if this balance forward covers a series of checks of a time period). Note: If you allow the system to assign a check number (by leaving this field blank), it assigns the next check number is sequence. For those of you using pre-numbered checks, this could result in your checks being mis-numbered during your next check run. Therefore, when creating a Balance Forward transaction to make a correction to a check generated within StaffSuite, manually enter a check number that will not interfere with your current check stock. |
|
|
|
|
Net Amount |
Type the amount paid to the employee (after deductions and withholdings) for the period covered by this balance forward (for example, if this balance forward covers a month, enter the total net amount paid to the employee for that month). |
|
|
|
|
Entered By |
Displays the name of the Staffing Service Rep that entered the Payroll Balance Forward information. You may not edit this field. |
|
|
|
|
Date/Time |
Displays the date and time that this Payroll Balance Forward information was added. You may not edit this field. |
|
|
|
|
Earnings Grid |
Use this grid to enter all paybill codes paid during the period covered by the balance forward. The grid has the following columns:
NOTE: The sum of the Gross Earned amounts for all paybill codes must equal the amount listed in the Gross Total field. |
|
|
|
|
Deductions Grid |
Use this grid to enter all deduction codes used during the period covered by the balance forward. The grid has the following columns:
NOTE: The system will check to make sure that the total gross earned minus total deductions minus total tax withheld (except for EIC withholdings, which are added) equals the amount listed in the Net Amount field. |
|
|
|
|
Withholdings Grid |
Use this grid to enter all withholding categories used during the period covered by the balance forward. The grid has the following columns:
There are three options available on the withholdings grid:
Click here for more information on the Withholding Add window.
NOTE: The system will check to make sure that the total gross earned minus total deductions minus total tax withheld (except for EIC withholdings, which are added) equals the amount listed in the Net Amount field. NOTE: The system also checks blank amounts to make sure the employee is exempt. For example, if an employee payroll tax record does not indicated exempt from FICA MED, the withholding category of FICA MED on the balance transaction may not be left blank. |
|
|
|
|
Eligibility Award |
Clicking this button displays the Eligibility Participation window which allows you to associate eligibility programs to this transaction. Eligibility programs are added through System Administration, employees are added to a program through Operations and eligibility is calculated here on the PayBill side of StaffSuite. IMPORTANT: In order for eligibility calculations to be affected, the wage code must be added through the Eligibility Award button. Just adding the wage code to the transaction will not associate it to eligibility calculations. Click here for more information about associating eligibility programs to a balance forward. |
|
|
|
|
Delete |
This button is inactive during the Add process. However, if you come back and edit the transaction, you can use this button to delete the transaction. |
|
|
|
|
|
First Button: Moves you to the first balance forward record in the batch. |
|
|
|
|
|
Previous Button: Moves you to the previous balance forward record in the batch. |
|
|
|
|
|
Next Button: Moves you to the next balance forward record in the batch. |
|
|
|
|
|
Last Button: Moves you to the last balance forward record in the batch. |
|
|
|
|
|
Create New Button: Saves (or creates) the current record and displays a blank balance forward for entry of a new transaction. |
|
|
|
|
Batch Status |
Displays the current batch status. Possible Batch Statuses are:
|
|
|
|
|
Modified Date/Time |
Displays the last date and time that the balance forward was modified. |
|
|
|
|
Corporation |
Displays the corporation associated with this balance forward batch. |
|
|
|
|
Posting Status |
Displays the current posting status of the batch. |
|
|
|
![]()
Related Topics:
|
|
|