Add Position Billing Screen
![]()
![]()
![]()
|
Add Position Billing Screen |
|
![]()
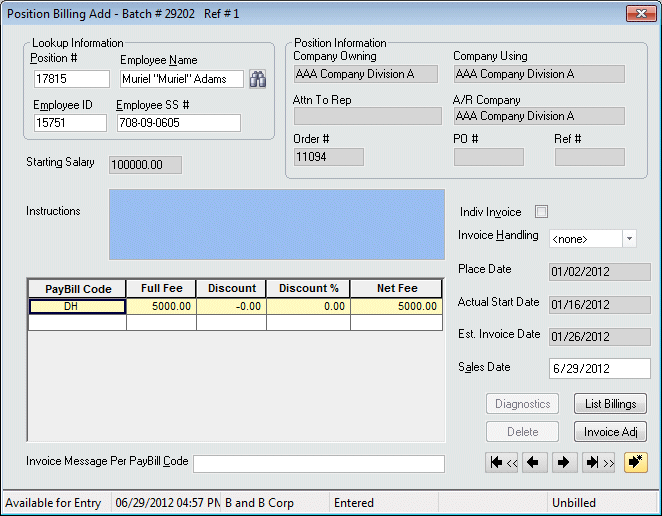
Click here to return to the Add Position Billing main topic page.
|
Lookup Information |
Use these fields to find the position to associate with this position billing. There are five ways to do this: Entering a Position number In the Position # field, type the specific position number and press <Tab>. A position must have a status of Placed or Fall Off to be eligible for a position billing. In addition, the position billing corporation must match the corporation of the current batch. You can either enter the position number directly or use the Employee Name, Employee ID, or Employee SS # field to find the position number. Entering a Social Security number In the Employee SS # field, type the employee's Social Security Number and press <Tab>. During the Add process, entering a social security number in this field causes the system to make two checks:
Based on the information gathered from these two checks, the system will reply in one of the following ways:
NOTE: Permission to view social security numbers is set up in the Staffing Service Rep Basic screen. A staffing service rep that does not have permission to view social security numbers will be able to enter a social security number but, as soon as results are displayed, the numbers will be masked with only the last four digits revealed. Entering an Employee ID In the Employee ID field, type the employee's ID number and press <Tab>. During the Add process, entering an ID number in this field causes the system to make two checks:
Based on the information gathered from these two checks, the system will reply in one of the following ways:
Entering an Employee Name In the Employee Name field, type the employee's name and press <Tab>. During the Add process, entering a nickname and a last name (e.g., John Doe) or simply a last name causes the system to check if the name is valid. This leads to three possible results:
Based on the information gathered from these three checks, the system will reply in one of the following ways:
Performing an Employee Look-Up Click the |
|
|
|
|
Position Information
|
Various information that defaults from the order and position. These fields are for information purposes and may not be edited. The fields in this section include:
|
|
|
|
|
Starting Salary |
The starting salary for the position. This information defaults from the Position and may not be edited. |
|
|
|
|
Instructions |
Any special instructions associated with the position. This information defaults from the Position and may not be edited. |
|
|
|
|
PayBill Grid |
The grid that shows the billing amounts that will go onto the invoice for this position. The PayBill Grid automatically defaults paybill codes, full fee, discount, discount percent, and net fee information. This information defaults from the position. You can take the following actions on the PayBill Grid:
|
|
|
|
|
Invoice Message Per PayBill Code |
Free form notes field to enter any message(s) which apply to specific paybill codes. Paybill code messages appear on the invoice and may be entered for each paybill code on the timesheet transaction. To activate this field, simply click on the paybill code you want to associate to the message in the paybill code grid. NOTE: This field cannot be edited once the position billing has been posted. |
|
|
|
|
Indiv Invoice |
Use the checkbox to select whether this position billing transaction should appear on its own individual invoice (rather than grouped with other position billings for the same company. Clicking the box toggles it between selected and deselected. A check in the box indicates that an individual invoice will be created. A unchecked box indicates that an individual invoice will not be created. |
|
|
|
|
Invoice Handling |
This displays the invoice handling option selected for this position billing. It defaults from the Company file, but can be changed here. Click |
|
|
|
|
Place Date |
The date that the Place position activity was performed on the position. This defaults from the order/position and may not be edited. |
|
|
|
|
Actual Start Date |
The actual start date of the position (entered during the Place Position activity) This defaults from the order/position and may not be edited. |
|
|
|
|
Est. Invoice Date |
The estimated invoiced date for the position. This defaults from the billing information associated with the order/position and may not be edited. |
|
|
|
|
Sales Date |
Use Click here for information about using StaffSuite's calendar. |
|
|
|
|
Diagnostics |
Clicking this button displays a grid warning you of any potential problems with a timesheet. When you save a timesheet, the system performs a number of diagnostics to advise you of missing information, inconsistencies, failures, etc. NOTE: The diagnostic report does not activate until after the timesheet has been saved. Thus, in order to view the Diagnostic report for a timesheet, you click the Create New button and then click the Previous button (to return to the timesheet). Once you have returned to the timesheet, the Diagnostic button will show you the diagnostic grid. |
|
|
|
|
Delete |
This button is inactive during the Add process. However, if you return and edit the transaction, you can use the Delete button to delete the transaction. |
|
|
|
|
List Billings |
Clicking this button lists any unposted position billings for the same position. This helps insure that you don't accidentally enter the same position billing twice. |
|
|
|
|
Invoice Adj |
Clicking this button displays a window allowing you to make an adjustment to an existing position billing invoice. Click here for more information about Invoice Sales Adjustments. |
|
|
|
|
|
First Button: Moves you to the first position billing record in the batch. |
|
|
|
|
|
Previous Button: Moves you to the previous position billing record in the batch. |
|
|
|
|
|
Next Button: Moves you to the next position billing record in the batch. |
|
|
|
|
|
Last Button: Moves you to the last position billing record in the batch. |
|
|
|
|
|
Create New Button: Saves (or creates) the current record and displays a blank position billing for entry of a new transaction. |
|
|
|
|
Batch Status |
Displays the current batch status. Possible Batch Statuses are:
|
|
|
|
|
Modified Date/Time |
Displays the last date and time that the position billing was modified. |
|
|
|
|
Corporation |
Displays the corporation associated with this position billing batch. |
|
|
|
|
Posting Status |
Displays the current posting status of the batch. |
|
|
|
|
Billing Status |
Displays the current billing status of the position billing (Billed or Unbilled). |
|
|
|
![]()
Related Topics:
|
|
|
