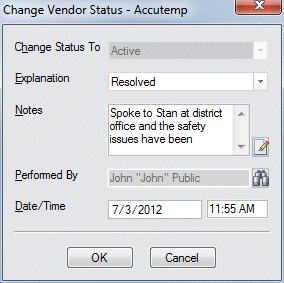
Change Vendor Status
Operations > Vendor Basic Window > Status Icon
|
Change Vendor Status Operations > Vendor Basic Window > Status Icon |
![]()
Change Vendor Status allows you to change the current status of a vendor. The following are valid statuses for the vendor:
None: This is the default when a vendor is added and indicates that the vendor does not have any associated assignments.
Active: The vendor has at least one open, filled or closed assignment.
Inactive: The vendor is no longer approved for use and the vendor has no filled or open assignments.
Note: You cannot change a status to None or from None using this activity. The vendor status is automatically changed from None to Active when you associate this vendor with a filled assignment. After that, the status toggles between Active and Inactive in a read-only field that does not allow any other choices.
Changing Vendor Status

In the Change Status To field, the new Vendor Status is displayed. The only options are Active or Inactive; if the current status is Active, the Inactive status is displayed and if the current status is Inactive, the Active status is offered as the only option.
In the Explanation field, use ![]() to record the reason that you are changing the Vendor Status. The options on the list were added during the Management Planning Session for your staffing service and can only be edited by Bond-US Customer Support.
to record the reason that you are changing the Vendor Status. The options on the list were added during the Management Planning Session for your staffing service and can only be edited by Bond-US Customer Support.
If you want to add any comments to the activity, enter them in the Notes field (optional). Click the  icon to expand the field in a re-sizable dialog where you can enter and view all your text and use spell checking. Click here for more information about the re-sizable dialog and spell checking.
The Performed By and Date/Time fields default to the current user and current date/time once the required fields are completed, but can be changed. The Performed By field indicates the staffing service rep that completed the activity. To change the field, click ![]() to open a Look Up Staffing Service Rep dialog and find a different staffing service rep for the Performed By field. The Date/Time field indicates the date/time of the activity. You can change this field (in case you are recording the activity several days after the actual completion) by clicking
to open a Look Up Staffing Service Rep dialog and find a different staffing service rep for the Performed By field. The Date/Time field indicates the date/time of the activity. You can change this field (in case you are recording the activity several days after the actual completion) by clicking ![]() and selecting a new date. For more information on using StaffSuite's calendar, click here.
and selecting a new date. For more information on using StaffSuite's calendar, click here.
Click OK to complete the activity.
![]()
Related Topics: