Send to StaffSuite Outlook Add-in
Microsoft Outlook®
|
Send to StaffSuite Outlook Add-in Microsoft Outlook® |
![]()
The Send to StaffSuite Outlook Add-in allows you to easily pull received Outlook emails into StaffSuite. You can associate the email with a record in StaffSuite and the email will show up as an activity on that record. You can also parse an attached resume to create a new employee.
What is the Send to StaffSuite Outlook Add-in?
What's new on the Outlook Explorer window?
What's new on the Outlook Inspector window?
How do I send an Outlook Email to StaffSuite?
What is the Send to StaffSuite Outlook Add-in?
It is an add-in for Microsoft Outlook. It is installed as part of the StaffSuite Client installation (optional).
The Add-in requires Microsoft Outlook 2013 or 2016 Professional.
What's new on the Outlook Explorer window?
You will see three new items on your Outlook Explorer window.
First, you will see the Send to StaffSuite Outlook Explorer toolbar:
![]()
Note: In Outlook 2013 and 2016, you need to click on the Add-Ins tab to see the toolbar.
For more information on the Explorer Toolbar, click here.
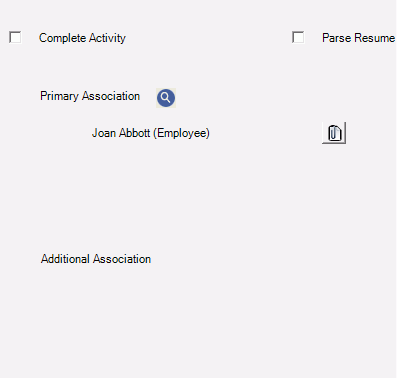
Second, you will see the Send to StaffSuite Form Fields located on the right side of your Reading Pane.
NOTE: If you do not use the Reading Pane, you will not see the Form Fields.

For more information on the Form Fields, click here.
Third, you have the option of adding a new column called "StaffSuite Status" to your Explorer window.
For instructions on adding the new column, click here.
What's new on the Outlook Inspector window?
Besides the Form Fields (see above) on the right side of the window, you will also see the Send to StaffSuite Outlook Inspector toolbar:

For more information on the Send to StaffSuite Outlook Inspector toolbar, click here.
How do I send an Outlook Email to StaffSuite?
Select the Email you want to send to StaffSuite on the Outlook Explorer window (or open the Inspector window).
Click the Link button on the toolbar.
If you clicked the Link button on the Explorer window, the Inspector window will automatically open.
If the Add-in recognizes that the email address is associated with a single record (Employee, Company, Company Rep or Vendor Rep) in your StaffSuite database, it will default that record as the Primary Association (in the Form Fields). If the email address is not associated with a record in your database or if it is associated with multiple records in your database, no primary association defaults.
Whether a primary association defaults or not, you can click the lookup button on the Primary Association form field, to select one or more records to associate to the email. NOTE: You can only associate multiples of the same category. In other words, you can associate multiple Employees as Primary Associations, but you can't associate an Employee and a Company.
Depending on your primary association, additional associations automatically default (for example, if you select a Company Rep as the Primary Association, the Company defaults as an Additional Association).
If the email has any attachments, you can use the Form Fields to determine which attachments are associated with which Primary Association.
You may either save the email in StaffSuite as a completed or incomplete activity. To save it as a completed activity, check the Completed box (click in it) in the Form Fields. To save it as an incomplete activity, make sure the Completed box is empty.
Once you are satisfied with your selections in the Form Fields, click the Send to StaffSuite button on the Inspector toolbar.
That's it. The email is now saved in StaffSuite as a Received Email activity and associated with all the Primary and Additional associations.
Select the Email containing the attachment you would like to parse.
Click the Link button on the toolbar.
If you clicked the Link button on the Explorer window, the Inspector window will automatically open.
If the Add-in recognizes that the email address is associated with a single Employee record in your StaffSuite database, it will default that record as the Primary Association (in the Form Fields). If the email address is not associated with a record in your database or if it associated with multiple records in your database, no primary association defaults.
Whether a primary association defaults or not, you can click the lookup button on the Primary Association form field to select one record to associate with the email.
If the employee does not exist in your StaffSuite database, you do not need to complete the Primary Association field.
Check the Parse Resume checkbox and the Send to StaffSuite button will become enabled.
Click the Send to StaffSuite button and return to your open instance of StaffSuite. The Add a Document workflow will launch and you can continue with the parse.
![]()
Related Topics: