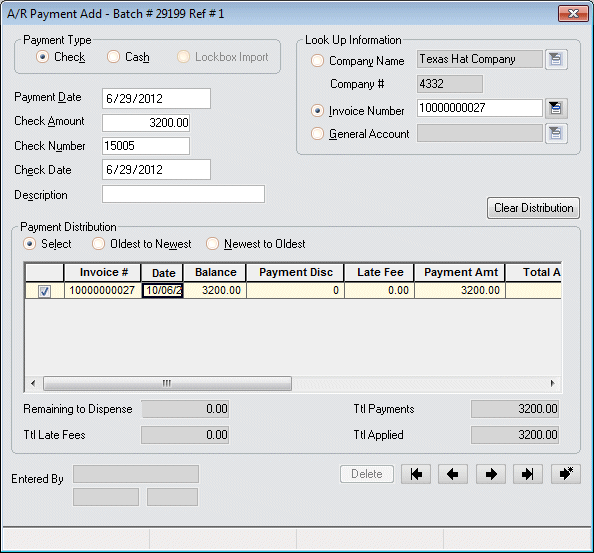
Add A/R Payment Screen
![]()
![]()
|
Add A/R Payment Screen |
|
![]()
Click here to return to the Add A/R Payment main topic page.
|
Look Up Information
|
Use the radio buttons to decide whether you want to apply this payment to a company in general, to a specific invoice, or to a general account:
Fields enable/disable depending on the option you choose:
Click here for more information on the Look Up Company window. Click here for more information on the Invoice Number Look Up window. Click here for more information on the General Account Look Up window. |
||||||||||||||||||||||||
|
|
|
||||||||||||||||||||||||
|
Payment Type |
Use the radio buttons to select a payment type between check and cash. While Lockbox Import is not selectable here, it will automatically be selected if this payment is a result of a payment import. Lockbox Import allows you to import a file from your bank containing information about invoice payments received by the bank. These payments are then automatically applied to the appropriate account. If the payment you are viewing resulted from an import file, the Lockbox Import option will be selected automatically. |
||||||||||||||||||||||||
|
|
|
||||||||||||||||||||||||
|
Payment Date |
Use Click here for more information about StaffSuite's calendar control. |
||||||||||||||||||||||||
|
|
|
||||||||||||||||||||||||
|
Check/Cash Amount |
Total amount of the check/cash payment. |
||||||||||||||||||||||||
|
|
|
||||||||||||||||||||||||
|
Check Number |
Check number on the payment check. If you selected Cash as the payment type, this field will be grayed out and may not be edited. |
||||||||||||||||||||||||
|
|
|
||||||||||||||||||||||||
|
Check Date |
Use |
||||||||||||||||||||||||
|
|
|
||||||||||||||||||||||||
|
Description |
Free-form allowing you to put a short note concerning the payment and/or distribution. |
||||||||||||||||||||||||
|
|
|
||||||||||||||||||||||||
|
Payment Distribution Grid |
This area shows all selected invoices (or general accounts) based on the criteria entered in the Look Up Information area. There are three distribution options. Use the radio buttons to select a method of applying the payment:
For example, if you had the following 5 invoices, this is how the system would distribute a $1000 payment based on the above options.
You can edit the Payment Amt (Amount) and Payment Disc (Discount) fields on the grid if you want to edit the amounts dispersed by the system. You can also select/deselect individual invoices (general accounts). The system will warn you if you try to save the A/R Payment with a negative or positive Amount to Disperse. Click here for more information on the Payment Distribution grid. |
||||||||||||||||||||||||
|
|
|
||||||||||||||||||||||||
|
Remaining to Disperse |
Displays the amount remaining to be dispersed. This amount must be 0.00 before you can save the A/R Payment by clicking the Create New button. This total changes automatically as you edit the Payment Amt column. |
||||||||||||||||||||||||
|
|
|
||||||||||||||||||||||||
|
Ttl Payments |
Displays the total amount applied to payments. In order for the Remaining to Disperse amount to equal 0.00, this field should equal the figure in the Check Amount (or Cash Amount) field. |
||||||||||||||||||||||||
|
|
|
||||||||||||||||||||||||
|
Ttl Late Fees |
All late fees totalled from the entries in the Late Fee column. these fees are added to the Total Applied amount. This field cannot be edited. |
||||||||||||||||||||||||
|
|
|
||||||||||||||||||||||||
|
Ttl Applied |
Displays the total amount applied to the invoices (or general accounts) listed. The Total Applied equals the Total Payments plus the Total Discounts (which is the sum of the amounts listed in the Payment Disc column. This total would include any applicable late fees. |
||||||||||||||||||||||||
|
|
|
||||||||||||||||||||||||
|
Clear Distribution |
Click this button to reset all distribution amounts back to zero. This is useful for "starting over" when distributing amounts. This only clears distributions for the current A/R Payment. |
||||||||||||||||||||||||
|
|
|
||||||||||||||||||||||||
|
Entered By |
Displays the Staffing Service Rep name who entered this A/R Payment. It also shows the time and date that the payment was entered. |
||||||||||||||||||||||||
|
|
|
||||||||||||||||||||||||
|
Delete |
This button is inactive during the Add process. However, if you come back and edit the transaction, you can use this button to delete the transaction. |
||||||||||||||||||||||||
|
|
|
||||||||||||||||||||||||
|
|
First Button: Moves you to the first A/R Payment record in the batch. |
||||||||||||||||||||||||
|
|
|
||||||||||||||||||||||||
|
|
Previous Button: Moves you to the previous A/R Payment record in the batch. |
||||||||||||||||||||||||
|
|
|
||||||||||||||||||||||||
|
|
Next Button: Moves you to the next A/R Payment record in the batch. |
||||||||||||||||||||||||
|
|
|
||||||||||||||||||||||||
|
|
Last Button: Moves you to the last A/R Payment record in the batch. |
||||||||||||||||||||||||
|
|
|
||||||||||||||||||||||||
|
|
Create New Button: Saves (or creates) the current record and displays a blank A/R Payment window for entry of a new transaction. |
||||||||||||||||||||||||
|
|
|
||||||||||||||||||||||||
|
Batch Status |
Displays the current batch status. Possible Batch Statuses are:
|
||||||||||||||||||||||||
|
|
|
||||||||||||||||||||||||
|
Modified Date/Time |
Displays the last date and time that the A/R Payment transaction was modified. |
||||||||||||||||||||||||
|
|
|
||||||||||||||||||||||||
|
Corporation |
Displays the corporation associated with this A/R Payments batch. |
||||||||||||||||||||||||
|
|
|
||||||||||||||||||||||||
|
Posting Status |
Displays the current posting status of the batch. |
||||||||||||||||||||||||
|
|
|
![]()
Related Topics:
|
|
|