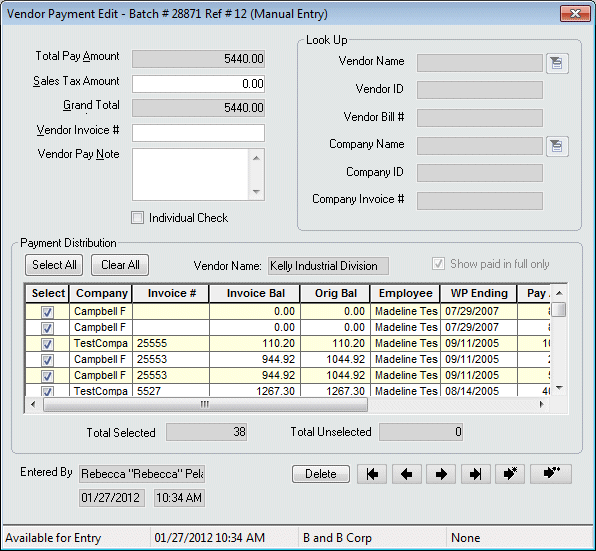
Add Vendor Pay Screen
|
Add Vendor Pay Screen |
![]()
Note: The screenshot below shows the Vendor Payment Edit window. The Vendor Payment Add window is identical except for the Title bar.

Click here to return to the Add Vendor Pay main topic page.
|
Total Pay Amount Sales Tax Amount Grand Total Amount
|
Total Pay Amount: Displays the sum of the Pay Amounts (see Pay Amt column in the Payment Distribution gird) for all selected transactions. This does NOT include any Sales Tax Amount. This field is calculated automatically as you select/deselect transactions and cannot be edited directly. Sales Tax Amount: Optional. Enter any sales tax associated with this vendor payment (normally this is listed on the invoice that the vendor sends you). Grand Total Amount: Displays the sum of the Total Pay Amount and the Sales Tax Amount. This field is calculated automatically as you add sales tax and select/deselect transactions. This field cannot be edited directly. |
|
|
|
|
Vendor Invoice # Vendor Pay Note |
Vendor Invoice #: Optional. Enter the number listed on the invoice sent to you from the vendor. Vendor Pay Note: Optional. Enter any information relevant to this payment. This note displays on the Vendor paycheck stub. |
|
|
|
|
Individual Check |
When this box is checked, the transactions selected will be paid on a separate check from any other payments made to this vendor. This is useful if you want to pay a vendor separately per company. |
|
|
|
|
Vendor Name Vendor ID Vendor Bill # Company Name Company ID Company Invoice # |
In the Look Up area, use any one of the six criteria to find the vendor you want to pay:
|
|
|
|
|
Select All Clear All |
Click the Select All button to select all listed transactions (a check will display in the box in the Select column). Click the Clear All button to deselect all listed transactions (all boxes in the Select column will be empty) |
|
|
|
|
Vendor Name |
Displays the vendor name for which transactions are listed in the Payment Distribution grid. You may not edit this field directly, but it will update when you perform another look up. |
|
|
|
|
Show paid in full only |
When this box is checked, only those timesheet transactions that have been billed and paid in full (invoice balance is zero) by your customer (the company) will display. When unchecked, all unpaid timesheet transactions for this vendor will display (whether paid in full or not). The box is checked by default. Clicking in the box toggles it between checked and unchecked. |
|
|
|
|
Payment Distribution grid |
Displays all unpaid secondary source timesheets that match the criteria entered in the Look Up area (and match the batch corporation information). Additionally, if the "Show paid in full only" box is checked, the grid will show only those transactions that have been billed and paid in full by your customer (the company). The following columns are listed in the grid:
Once you tab out of one of the Look Up fields (or if you click in a different field), the system searches for unpaid secondary source timesheets that match the criteria entered (and match the batch corporation information). The system defaults to showing only those timesheets which have been billed and paid (invoice balance is 0). If you would rather see all timesheets, uncheck the Show paid in full only field. Search results are displayed in the Payment Distribution area by transaction date (oldest to newest) and the Vendor's name displays in the Vendor Name field. By default, all items are selected for payment. NOTE: You may not enter a partial payment for any item. However, you can edit this by:
|
|
|
|
|
Total Selected Total Unselected |
Total Selected displays the total number of transactions selected for payment. Total Unselected displays the total number of transactions that have not been selected for payment. |
|
|
|
|
Entered By |
Information about the staffing service rep that originally entered the information on this window. |
|
|
|
|
Delete |
This button is initially disabled when adding a Vendor Pay transaction. However, if you return to edit the transaction, you can use this button to delete it. |
|
|
|
|
Movement Buttons |
|
|
|
|
|
Status Bar |
These fields display information once a vendor payment has been saved. From left to right, these four uneditable fields display:
|
|
|
|
![]()
Related Topics:
|
|