Relationship Manager
Operations > Company Basic Window > Relationship Button
|
Relationship Manager Operations > Company Basic Window > Relationship Button |
![]()
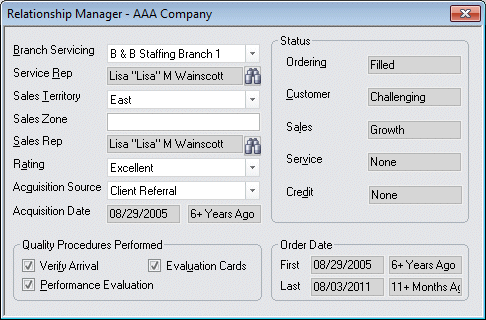
Relationship Manager contains information needed to service a company.
For more information on company, click here.
Using the Relationship Manager Window

Adding/Editing Basic Relationship Manager Information
NOTE: Only the Branch Servicing field is required. All the other fields may or may not be added, depending on your needs.
In the Branch Servicing field, use ![]() to select the staffing service branch that will be primarily responsible for servicing the company. This information is added during the Company Add Wizard, but can be changed here to any branch the user can access. NOTE: If the record is currently linked with TempBuddy, the Branch cannot be changed.
to select the staffing service branch that will be primarily responsible for servicing the company. This information is added during the Company Add Wizard, but can be changed here to any branch the user can access. NOTE: If the record is currently linked with TempBuddy, the Branch cannot be changed.
In the Service Rep field, use ![]() to open a Look Up Staffing Service Rep dialog and select the staffing service rep primarily responsible for servicing a company's account.
to open a Look Up Staffing Service Rep dialog and select the staffing service rep primarily responsible for servicing a company's account.
In the Sales Territory field, use ![]() to select the geographic region, location, or area where the company resides. This can help you track future growth or simply list companies that are in an area where your sales rep will be. The options in the drop-list are user-defined and can be changed using StaffSuite's Edit List functionality.
to select the geographic region, location, or area where the company resides. This can help you track future growth or simply list companies that are in an area where your sales rep will be. The options in the drop-list are user-defined and can be changed using StaffSuite's Edit List functionality.
In the Sales Zone field, type a name that identifies the sales zone for this company (optional). Any value added here is copied to all associated Company Rep records that have this Company as their Home Component (however, you can edit the Company Rep record if you wish). Any value edited here can be propagated to the Company Reps if you choose (you will be prompted after editing and saving the field).
In the Sales Rep field, use ![]() to open a Look Up Staffing Service Rep dialog and select the staffing service rep who was primarily responsible for bringing this company on board. Your selection here defaults into all Orders, but can be edited there if needed.
to open a Look Up Staffing Service Rep dialog and select the staffing service rep who was primarily responsible for bringing this company on board. Your selection here defaults into all Orders, but can be edited there if needed.
In the Rating field, use ![]() to select an overall client rating for the company. This incorporates the type of orders they place, the amount of time they give to fill an assignment, their payment history, etc. The options in the drop-list are user-defined and can be changed using StaffSuite's Edit List functionality.
to select an overall client rating for the company. This incorporates the type of orders they place, the amount of time they give to fill an assignment, their payment history, etc. The options in the drop-list are user-defined and can be changed using StaffSuite's Edit List functionality.
In the Acquisition Source field, use ![]() to select the way in which the company was acquired by your staffing service. The options in the drop-list are user-defined and can be changed using StaffSuite's Edit List functionality.
to select the way in which the company was acquired by your staffing service. The options in the drop-list are user-defined and can be changed using StaffSuite's Edit List functionality.
Acquisition Date has two fields. The first field shows the actual date the company was acquired. The second date shows the number of days that have passed since the acquisition. This information is entered during the Company Add Wizard and may not be edited on this window.
Adding/Editing Quality Procedures Performed
The Verify Arrival check box indicates whether your staffing service should make verify arrival calls for orders placed by this company. A check means the company wants you to call and check that employees show up for assignments. It also allows the Verify Arrival activity to default as a Next Activity if programmed using the Activity Workflow. Clicking in the box toggles it between checked and unchecked.
The Evaluation Cards check box indicates whether your staffing service should send evaluation cards for orders placed by this company. A check means the company wants you to send evaluation cards. Clicking in the box toggles it between checked and unchecked.
The Performance Evaluation check box indicates whether your staffing service should make quality control calls for orders placed by this company. A check means the company wants you to call and check on the employee's performance on an assignment. It also allows the Performance Evaluation activity to default as a Next Activity if programmed in Activity Workflow. Clicking in the box toggles it between checked and unchecked.
Viewing the Status Information
For a discussion of company statuses, click here.
The Order Date Fields
There are two fields for both the First and Last dates. The first field indicates the actual date of the company's first order and latest order. The second field indicates the number of days that have passed since the company's first order and latest order. These fields are automatically updated by the system and may not be edited on this window.
![]()
Related Topics: