Add/Change Social Security Number
Operations > Employee Basic Window > Social Security # Field
|
Add/Change Social Security Number Operations > Employee Basic Window > Social Security # Field |
![]()
You can add a Social Security Number for an employee who did not previously have one entered or change the Social Security number of someone who already has a number listed.
Note: You can delete a Social Security Number for an employee who has no payroll history and is not currently in one of the following statuses: Working, Probably Available, Future Fill. To do so, click the red X next to the Social Security # field on the Employee Basic screen.
To access this functionality, click the  icon next to the Social Security # field on the Employee Basic window.
NOTE: The screen that displays is context sensitive. If the employee does not have a Social Security Number, the Add window displays. If the employee already has a Social Security Number, the Change window displays. These are two different security settings, so it is possible that a user may have permission to do one and not the other.
NOTE: You may also use the Social Security Number field for Individual Taxpayer Identification Numbers (ITIN) if the Employee does not have and is not eligible for a Social Security Number.
The new social security number must:
Be unique (e.g., not duplicate any other social security number in the system)
Contain exactly 9 numeric characters
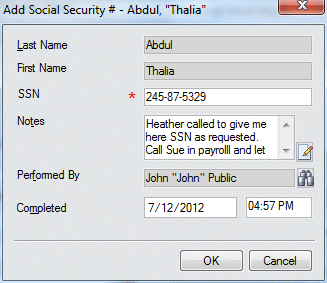
Adding a Social Security Number

The Last Name field displays the name of the employee in currency. This is a read-only field. Click here for more information on the Lookup Employee wizard.
The First Name field displays the name of the employee in currency. This is a read-only field.
In the SSN field, enter the social security number for this employee. NOTE: The system will automatically insert the dashes at the appropriate places.
In the Notes field, type any comments about the activity (optional). Click the  icon to expand the field in a re-sizable dialog where you can enter and view all your text and use spell checking. Click here for more information about the re-sizable dialog and spell checking.
The Performed By and Completed fields default to the current user and current date/time once the required fields are completed, but can be changed. The Performed By field indicates the staffing service rep that completed the activity. To change the field, click ![]() to open a Look Up Staffing Service Rep dialog and find a different staffing service rep for the Performed By field.
to open a Look Up Staffing Service Rep dialog and find a different staffing service rep for the Performed By field.
Click OK to complete the activity.
NOTE: Once a Staffing Service Rep has added a social security number for an employee, that rep may, or may not, be able to view that social security number in other screens. The Staffing Service Rep may have title security to add a social security number for an employee, but then may not have permission to view social security numbers set up in the Staffing Service Rep Basic screen. In that case, the numbers will be masked with only the last four digits revealed.
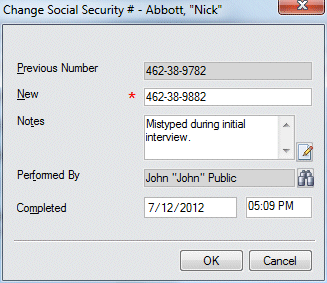
Changing a Social Security Number

The Previous Number field displays the current social security number of the employee in currency. NOTE: This field may be blank. This field may also be masked to only display the last four digits of the existing social security number. Permission to view social security numbers is set up in the Staffing Service Rep Basic screen. You may not edit this field.
In the New field, enter the new social security number. NOTE: The system will automatically insert the dashes at the appropriate places.
If you want to add any comments to the activity, enter them in the Notes field (optional). Click the  icon to expand the field in a re-sizable dialog where you can enter and view all your text and use spell checking. Click here for more information about the re-sizable dialog and spell checking.
The Performed By and Completed fields default to the current user and current date/time once the required fields are completed, but can be changed. The Performed By field indicates the staffing service rep that completed the Termination activity. To change the field, click ![]() to open a Look Up Staffing Service Rep dialog and find a different staffing service rep for the Performed By field. The Completed field indicates the date/time of the activity. You can change this field (in case you were recording the activity several days after the actual activity) by clicking
to open a Look Up Staffing Service Rep dialog and find a different staffing service rep for the Performed By field. The Completed field indicates the date/time of the activity. You can change this field (in case you were recording the activity several days after the actual activity) by clicking ![]() and selecting a new date. For more information on using StaffSuite's calendar, click here.
and selecting a new date. For more information on using StaffSuite's calendar, click here.
Click OK to complete the activity.
![]()
Related Topics:
|