Change Branch Servicing
Operations > Employee Basic Window > Branch Servicing Icon
![]()
|
Change Branch Servicing Operations > Employee Basic Window > Branch Servicing Icon |
|
![]()
Change Branch Servicing allows you to record that an employee will be serviced by a different branch of your staffing service in the future.
NOTE: If you already have an unfinished Change Branch Servicing activity outstanding, the system will warn you that you are entering a possible duplicate. Check the information on the grid presented. If the activity listed is a duplicate of the one being entered, click on the row displaying the activity and click OK. This allows you to edit the existing activity. If the activity listed is not a duplicate, click the Create New button. This allows you to create a new activity.
Changing the Servicing Branch
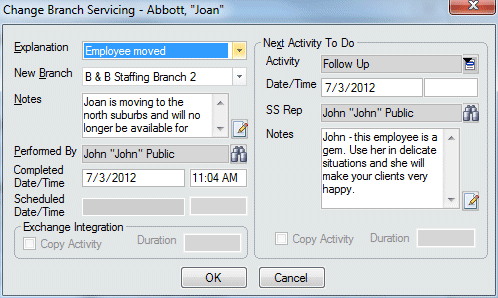
In the Explanation field, use ![]() to record the reason that the employee's servicing branch is being changed.
to record the reason that the employee's servicing branch is being changed.
In the New Branch field, use ![]() to record the branch that WILL be servicing the employee from now on.
to record the branch that WILL be servicing the employee from now on.
If you want to add any comments to the activity, enter them in the Notes field (optional). Click the  icon to expand the field in a re-sizable dialog where you can enter and view all your text and use spell checking. Click here for more information about the re-sizable dialog and spell checking.
The Performed By and Completed fields default to the current user and current date/time once the required fields are completed, but can be changed. The Performed By field indicates the staffing service rep that completed the activity. To change the field, click  to open a Look Up Staffing Service Rep dialog and find a different staffing service rep for the Performed By field. The Completed field indicates the date/time of the activity. You can change this field (in case you were recording the activity several days after the actual activity occurred) by clicking
 ![]() and selecting a new date. For more information on using StaffSuite's calendar, click here.
and selecting a new date. For more information on using StaffSuite's calendar, click here.
If you schedule the activity instead of completing it, you can send the activity to your Exchange calendar by using the fields in the Exchange Integration area. NOTE: If you create a Next Activity, you can send that activity to Exchange as well. Simply use the fields in the Exchange Integration area below the Next Activity To Do fields. For more information on using the Exchange Integration fields, click here. This is optional.
If you want to set up an activity to follow-up the Change Branch Servicing activity, use the fields in the Next Activity To Do area. This is optional. For more information on using the Next Activity To Do fields, click here.
Click OK to complete the activity.
![]()
Related Topics: