Generic Activity Window
|
Generic Activity Window |
![]()
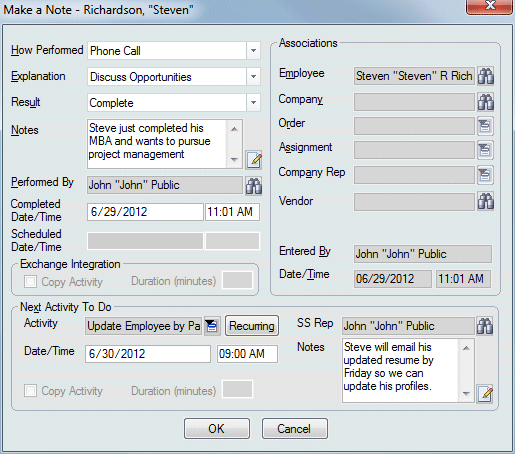
The generic activity window is used to add various activities. The screen shot below is of the Make a Note activity, but in most cases, the window is identical for each activity (except for the title bar). In certain circumstances, field names may change based on the activity.
NOTE: If you are viewing an activity from your Task List, from an Activity List window, or from a Possible Duplicates grid, the Activity window will look slightly different and be named the Activity Base window. Click here for more information about the Activity Base window.
StaffSuite offers the ability to complete a group of like activities that are pending. Click here for more information about using Mass Activity Complete.

|
How Performed
|
Use Typical choices include EMail, Phone, Fax, etc. NOTE: Unlike most of the other fields, the items appearing on the drop list for this field are the same regardless of the activity being performed. |
|
|
|
|
Explanation |
Use |
|
|
|
|
Result |
Use |
|
|
|
|
Notes |
This is a free-form field allowing you to add any comments concerning the activity. Click the |
|
|
|
|
Performed By Completed Date/Time Scheduled Date/Time |
Performed By indicates the staffing service rep that actually performed the activity (which might not be the person who created the activity). This field defaults to the current user when the activity is completed, but can be changed. Click Completed Date/Time indicates the date and time that the activity was concluded. This defaults to the current date and time that the activity was completed, but can be changed. This field only becomes active when all required fields have been completed. In general, users are allowed to modify the Completed Date and Time of all activities which are not yet completed, and users are never able to modify the Completed Date and Time of activities that are completed. Users who want to compare the Completed Date and Time that was entered by the user who saved the activity (in the user’s time zone) to the system date and time that the save was recorded by the system can look on the Details tab of the Activity Base screen. The System Completed date and time recorded there is the time the server recorded that the activity was completed and saved (in the server’s time zone). Scheduled Date/Time allows you to leave an activity open to be completed at a later date. The item will then show up on the staffing service rep's task list on the date specified as a pending activity. This field only becomes active when at least one required field has not been completed. |
|
|
|
|
Associations |
For each activity, there is at least one association. At its simplest, an employee activity must be associated with an employee. However, other activities require various associations. While most of these are self-explanatory, specific association requirements are listed on the activity's page in this help file. To access an employee, company or vendor look up wizard, click To select an order, assignment, position or company rep from a list, click NOTE: If this activity is associated with a position, the name "Position" will appear instead of the "Assignment" field in the screen shot above. If any employee, company, order, assignment/position, company rep or vendor is in currency when you create the activity, it will automatically default into the Associations' fields. |
|
|
|
|
Entered By Date/Time |
These read-only fields display the name of the rep who entered (but not necessarily completed) the activity and the date and time is was created. These fields are automatically generated by the system and may not be edited. |
|
|
|
|
Exchange Integration |
This allows you to copy the activity to your Exchange calendar. NOTE: You can only access this feature if: If either one of the above items is not true, then the fields in the Exchange Integration area will be grayed out (inaccessible). If you have access to these fields, place a check in the Copy Activity field to copy the activity to your Exchange mailbox calendar. StaffSuite uses the Scheduled Date/Time fields to identify where the activity should appear on your calendar. The Duration field indicates how long the activity should take (in minutes). This will cause Exchange to block off that time on your Exchange calendar. NOTE: The activity is not actually sent to Exchange until the OK button is clicked, saving the activity. |
|
|
|
|
Next Activity to Do |
This section allows you to set up an activity to follow-up on the current activity. For example, you may decide that you want to follow up a Fill Assignment activity with a QC (Quality Control) call. In the Activity field, use In the Date/Time field, use If you want this activity to recur from time to time, click the Recurring button. You will be presented a window that allows you to set up the activity to recur every x number of days, every x day of the week, every x day of the month, or yearly on a specific date. The SS Rep field defaults to the current user, but can be changed by clicking You can enter any special comments in the Notes field. Click the Finally, you can send the activity to your Exchange calendar by using the fields in the Exchange Integration area. See the Exchange Integration area explanation above for more details. |
|
|
|
![]()
Related Topics: