Maintain WorldLink/TimeKeeper Login
Operations > Company Rep Basic Window > WorldLink/TimeKeeper User ID Icon
|
Maintain WorldLink/TimeKeeper Login Operations > Company Rep Basic Window > WorldLink/TimeKeeper User ID Icon |
![]()
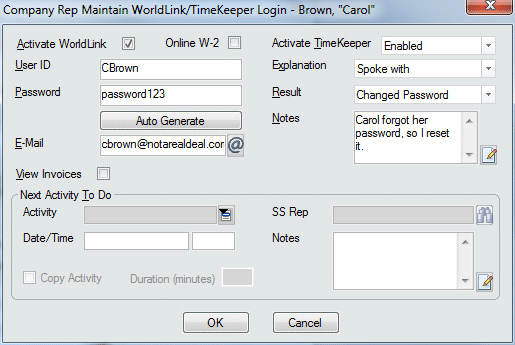
Maintain WorldLink and TimeKeeper Login allows you to set up or edit information allowing the company rep to access and submit his/her company information on your staffing service's WorldLink Web site, or to access the TimeKeeper application to approve timesheets. One User ID and Password is used to access either add-on application so users only have to learn and remember one password.
Maintain WorldLink Login is treated as an activity and tracked within the system so you can audit any changes to a company rep's account information.
NOTE: The WorldLink functionality is only necessary if you have purchased the WorldLink add-on. The TimeKeeper functionality is only necessary if you have purchased the TimeKeeper add-on.
For more information about WorldLink, click here.
For more information about TimeKeeper, click here.

Activating the Company Rep's Login
The Activate WorldLink field determines whether the company rep can log on using the User ID and Password in this screen to access WorldLink. A check in the box indicates the user is active (and can log on). An empty box indicates that the company rep is not active (and may not log on). Clicking the box toggles it between checked and unchecked.
The Activate TimeKeeper field determines whether the company rep contact can log in to TimeKeeper to approve timesheets using this User ID and Password. This option will only be blank for a new company rep; in that case this company rep's record will not be sent to TimeKeeper. Use ![]() to select Enabled from the drop list which will give this company rep access to TimeKeeper, and send this company rep's record to TimeKeeper if they are associated with a TimeKeeper assignment. Use
to select Enabled from the drop list which will give this company rep access to TimeKeeper, and send this company rep's record to TimeKeeper if they are associated with a TimeKeeper assignment. Use ![]() to select Revoked from the drop list to remove this company rep's access to TimeKeeper (the system actually sends a blank password to TimeKeeper that prevents the company rep from logging in with the password they were using).
to select Revoked from the drop list to remove this company rep's access to TimeKeeper (the system actually sends a blank password to TimeKeeper that prevents the company rep from logging in with the password they were using).
NOTE: Depending on how the system administrator has configured your TimeKeeper Configuration, users and their passwords can be sent automatically to TimeKeeper on an hourly or nightly basis, or can be set up not to auto send, but to wait for the Send Data to TimeKeeper to be launched manually. Whenever information is sent to TimeKeeper, all employee User IDs and Passwords that are associated with the filled assignments are transferred, PLUS the User ID and Password of any employee whose information in this screen has been changed. This is to ensure that you can control who has access to the TimeKeeper module. If you wish to revoke a users ability to log in to TimeKeeper, you must set their Activate TimeKeeper field to Revoked, AND you must Send Data to TimeKeeper, either manually or automatically.
Maintaining the Company Rep's Login
In the User ID and Password field, enter the ID and password that the company rep will use to log on to the web site. The User ID must be at least 5 digits long. The Password must be at least 5 characters long and contain at least 1 numeric character. Conversely, you can simply click Auto Generate to allow StaffSuite to automatically create a unique User ID and Password.
In the E-Mail field, enter the company rep's email address. You can click ![]() to open your email program with the company rep's address in the "To" field.
to open your email program with the company rep's address in the "To" field.
In the View Invoices field, check the box if the company rep is allowed to view his/her company's invoices online via WorldLink. Clicking the box toggles it between checked and unchecked.
In the Explanation field, use ![]() to record the information about the Login maintenance.
to record the information about the Login maintenance.
In the Result field, use ![]() to record the end-result of your additions/edits to this window (e.g. are you creating a new login, changing login information, deactivating an account, etc.).
to record the end-result of your additions/edits to this window (e.g. are you creating a new login, changing login information, deactivating an account, etc.).
In the Notes field, type any comments about the activity (optional). Click the  icon to expand the field in a re-sizable dialog where you can enter and view all your text and use spell checking. Click here for more information about the re-sizable dialog and spell checking.
If you want to add an activity to follow-up the Maintain WorldLink Login activity, use the fields in the Next Activity To Do area. This is optional. For more information on using the Next Activity To Do fields, click here. You can also send the next activity information to your Exchange calendar. For more information on using the Exchange Integration fields, click here.
Click OK to complete the activity.
![]()
Related Topics:
|
|