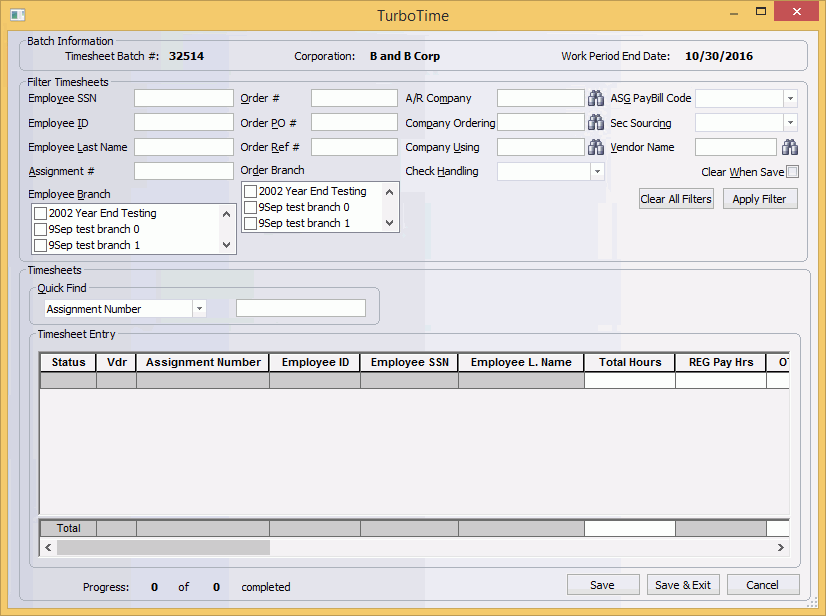
TurboTime Screen
|
TurboTime Screen |
![]()

Click here to return to the Enter TurboTime main topic page.
|
Batch Information
|
This section contains information about the batch, including the batch number (Timesheet Batch #), batch corporation (Corporation), and work week ending date (Work Period End Date). These fields may not be edited here. However, some of this information may be editable on the Batch Basic window IF there are no transactions in the batch. |
|
|
|
|
Filter Timesheets |
This section allows you to filter the assignments that display in the Timesheet Entry grid. You may enter one or more fields to filter information. However, if you enter information in more than one field, the resulting timesheet must match all the criteria listed. Thus, if you select an Employee Branch and a Company Using, only those assignments matching BOTH criteria will appear in the grid. You can filter based on the following criteria:
NOTE: Permission to view social security numbers is set up in the Staffing Service Rep Basic screen. A staffing service rep that does not have permission to view social security numbers will be able to enter a social security number but, as soon as results are displayed, the numbers will be masked with only the last four digits revealed.
Once you have made your selection(s), click Apply Filter. The rows in the grid will change based on your filtering. If you want to clear all filtering entries, click Clear All Filters. The Clear When Save field determines whether your filtering entries will clear whenever you click the Save button. If the box is not checked, your filtering options will stay active even after clicking Save. If it is checked, the filtering options will return to a normal (blank) state after clicking Save. Clicking the box toggles it between checked and unchecked. This entire section is optional. |
|
|
|
|
Quick Find |
These fields allow you to quickly find a specific assignment based on assignment #, employee ID, employee last name, or employee social security number. Clicking |
|
|
|
|
Timesheet Entry |
This grid display all filtered assignments that were worked on during the week that do not have a timesheet for the begin and end work period date for the specified pay frequency. You can control the look and presentation of data in the grid by right-clicking your mouse anywhere in the grid. The following options are available.
For more information on the grid and its columns, click here. The columns and rows of the grid can be accessed by clicking on them or by using your keyboard's arrow keys. Entering Hours: To enter hours, find the assignment for which you want to enter hours (either by filtering, quick finding, sorting, or searching) and click in the Total Hours cell. Type the total number of hours worked for the week. The REG and OT pay hours default automatically depending on the number of hours in a typical work week and the number of hours entered. For example, if your regular work week is 40 hours and you enter 45 total hours, 40 hours will go into the REG column and 5 will go into the OT column. Of course, you may edit the number of hours in either column. As you edit the REG and OT pay hours, the Total Hours column automatically updates. NOTE: If the employee is flagged as FLSA exempt, the pay and bill rates for overtime and doubletime will default to $0.00. The REG and OT Bill Hrs columns default to the same number of hours as the pay columns, but can be edited. The Pay and Bill rates default from the information on the assignment, but may be edited. If you wish, you may enter a one-time deduction in the Ded. Code column (by clicking on it and selecting a deduction from the list provided). The amount of the deduction can be entered in the Ded. Amount column. Finally, any special notes may be entered in the Notes column. When you have added enough information for a timesheet to be created for the assignment, the far left hand column (Status) will display a "C" for Complete. When you click the Save or Save & Exit button, TurboTime will make a timesheet out of every assignment with a status of "C". |
|
|
|
|
Save Save & Exit Cancel |
Save: Saves the work you have done and creates timesheets for all assignments with a TurboTime status of "C". The TurboTime window remains open and all assignments for which timesheets were created are removed from the grid. In addition, if the Clear When Save field is checked, all filtering options will be cleared. Save & Exit: Saves your work and creates timesheets for all assignments with a TurboTime status of "C". The TurboTime window closes. Cancel: Closes the TurboTime window WITHOUT saving your changes since the last time you saved. |
|
|
|
![]()
Related Topics: