Fill Mass Assignment
Employees Grid > Right Click > Mass Assign
![]()
|
Fill Mass Assignment Employees Grid > Right Click > Mass Assign |
|
![]()
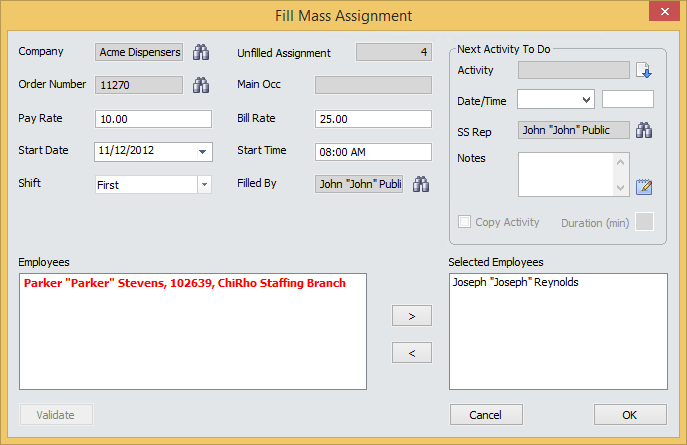
Fill Mass Assignment allows you to fill multiple assignments with multiple employees...in one quick action..
If you want to place a single employee on a single assignment, use the Fill Assignment functionality.
In order to mass fill an assignment, the following must be true:
The Assignments must have a status of Open.
The Assignments must be associated with a corporation.
The Company Owning must not have a 'Do Not Service' service status nor an 'On Hold' credit status.
Neither the Employee nor the Assignment may be of a secondary-source type.
The Employee must have a completed payroll record for the same corporation as the assignment.
The Employee must have a social security number (or, if a contractor, a contractor ID).
The Employee must not have a status of Terminated.
If your staffing service only allows an employee to be used once per order, the Employee cannot be filled on another assignment for the order.
The Employee must have completed all pre-hire requirements specified on the order associated with the assignment (although this can be overridden if the Staffing Service Rep has proper permission). In addition, warnings are presented when a form/procedure is about to expire, has already expired or does not have an expiration date.
You may not select more Employees than the total number of unfilled Assignments on the Job Order.
All Assignments must be from the same Job Order and have the same Corporation, Work Class and Workers Comp Code.
If your Employees, Job Order or Assignments do not fit the criteria above, use the Fill Assignment functionality.
Filling Mass Assignment
From the Employees Grid, use click, CTRL-click or Shift-click to select the employees you want to fill on assignments.
Right-click in the Grid and select Mass Assign. The Fill Mass Assignment window displays.
If an order is in currency, the information from the order and the first assignment will automatically populate the fields. If no order is in currency, click  on the Company field to find the Company associated with the assignment(s) you want to fill. After finding the Company, click on the Order Number field to find the Order associated with the assignments you want to fill.
The Unfilled Assignment field displays the number of open assignments on the job order. This is for informational purposes and the field cannot be edited.
The Main Occ field displays the Main Occupation associated with the first assignment on the order (if any). This is for informational purposes and the field cannot be edited.
The Pay Rate and Bill Rate fields default from the Assignment, but can be edited here These fields are REQUIRED. Keep in mind that whatever amounts you put in these fields will override the associated amounts in the assignments you are filling. Note: Unlike the Fill Assignment functionality, the Fill Mass Assignment does not check for National Account Manager status and therefore, any staffing service rep can edit the Pay Rate and Bill Rate fields.
The Start Date, Shift, and Start Time default from the assignment, but can be changed. For more information on using StaffSuite's calendar, click here. All three fields are REQUIRED. Again, any changes you make here will override the corresponding field on the assignments you fill.
The Filled By field defaults to the name of the logged in user, but can be edited by clicking to open a Look Up Staffing Service Rep dialog and find a different staffing service rep. This field is REQUIRED.
The Employees text box displays the names of the employees you selected from the Employees grid. Click Validate. The system will check to make sure the employee has all proper requirements in order to be filled on an assignment (see list of requirements above). Any employee that does not meet requirements will display in a bolded red font and the system will prevent you from selecting them to fill the assignment.
For those employees who are validated, you can move them from the Employees text box to the Selected Employees text box by using click, CTRL-click or Shift-click to select the employees you want to move and then clicking the right arrow button. Employees in the Selected Employees text box will be used to fill the assignments. Employees left behind in the Employees text box will not be used to fill the assignments.
You can schedule a next activity to follow up on each assignment you fill by completing the information in the Next Activity To Do area. For more information on setting this area up, click here.
Click OK to complete the Mass Fill.
A Fill activity is created for each employee filled on an assignment and a task is added to the Staffing Service Rep's Task List.
![]()
Related Topics: