Timesheet Export Configuration for Assignments
Operations > Assignment > Information > Timesheet Export Configuration
![]()
|
Timesheet Export Configuration for Assignments Operations > Assignment > Information > Timesheet Export Configuration |
|
![]()
Timesheet Export Configuration is for staffing services that use an external timesheet import application for timesheet preparation. StaffSuite interfaces directly with its TimeKeeper application to send filled assignments and retrieve completed and approved timesheets back into StaffSuite for payroll processing. StaffSuite also can use Amano and Ti3 FasTime™ third party timesheet preparation applications to import a file.
For more information about Timesheet Import, click here.
Due to the different configurations possible, the following instructions are presented separately for the two types of applications. We strongly suggest contacting Bond-US Support for help setting up your configuration information for Amano or Ti3 FasTime™.
The fields on this window describe the default settings for the assignment in currency and can be inherited from the company, or the company settings can be overridden with unique settings for each assignment. If the company has configuration settings, they will be displayed in the read-only fields on the right side of the screen as a reference to guide you in entering the correct settings for the assignment. For companies who do not have any export configurations, those fields will be blank. Any unique settings made for this assignment apply only to timesheet export for this assignment; the company settings will remain unchanged. Click here for more information on Company Timesheet Export Configuration settings.
Setting Timesheet Export Configuration for TimeKeeper
Click here for more information about TimeKeeper.
The Assignment fields display settings for the assignment in currency. The read-only Company Using settings on the right side of the screen are the current settings for the company that is associated with the assignment. Changing the settings for this assignment will not affect the Company Using settings.
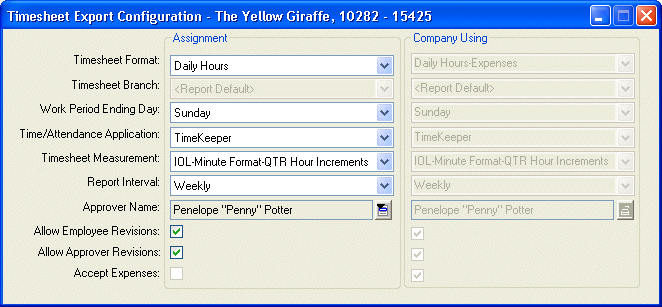
The Timesheet Format field describes the format that timesheets being exported from this assignment will use (this assignment format overrides any that are set at the company level). The Timesheet Export Report also uses this format for this assignment. Use ![]() to select from a list of valid choices. If you select a format that includes expenses, the Accept Expenses checkbox below also needs to be selected.
to select from a list of valid choices. If you select a format that includes expenses, the Accept Expenses checkbox below also needs to be selected.
Click here for detailed information on TimeKeeper timesheet formats.
NOTE: The TimeKeeper module only accepts certain timesheet formats combined with the correct Timesheet Measurement option selected below. Click here for a list of which format and measurements match.
In the Timesheet Branch field, use ![]() to select the staffing service branch used for the assignments associated to this company in the Timesheet Export Report. The Staffing service branch must belong to a staffing service that has been set up to use TimeKeeper.
to select the staffing service branch used for the assignments associated to this company in the Timesheet Export Report. The Staffing service branch must belong to a staffing service that has been set up to use TimeKeeper.
In the Work Period Ending Day field, use ![]() to select the day of the week that serves as the end of the reported work period for the assignments associated to this company in the Timesheet Export Report.
to select the day of the week that serves as the end of the reported work period for the assignments associated to this company in the Timesheet Export Report.
The Time/Attendance Application field indicates the time/attendance application used for the assignments associated to this company in the Timesheet Export Report. In this example, select TimeKeeper.
In the Timesheet Measurement field, use ![]() to indicate how time is measured for the assignments associated to this company in the Timesheet Export Report. For the TimeKeeper module, be sure to match the measurement to the correct format as indicated above.
to indicate how time is measured for the assignments associated to this company in the Timesheet Export Report. For the TimeKeeper module, be sure to match the measurement to the correct format as indicated above.
In the Report Interval field, use ![]() to indicate how often time is report for the company using this assignment.
to indicate how often time is report for the company using this assignment.
In the Approver Name field, use ![]() to select the name of the company representative who is primarily responsible for approving timesheets as a Contact in TimeKeeper for the assignments associated to this company. The rep must have a role of Timesheet Approver to appear on the list. The rep also needs a valid email address in the Company Rep Basic screen.
to select the name of the company representative who is primarily responsible for approving timesheets as a Contact in TimeKeeper for the assignments associated to this company. The rep must have a role of Timesheet Approver to appear on the list. The rep also needs a valid email address in the Company Rep Basic screen.
The Allow Employee Revisions checkbox does not control employee access to timesheets in TimeKeeper, but may be used by other applications that interface with StaffSuite.
The Accept Expenses checkbox indicates whether or not expenses can be entered in a timesheet in TimeKeeper. A check indicates that expenses are allowed. This checkbox must be selected if a format that includes expenses is selected in Timesheet Format above. Clicking on the box toggles it between checked and unchecked.
When you are satisfied with your selections, click the Save button on the StaffSuite toolbar.
Setting Timesheet Export Configuration for Amano or Ti3 FasTime™
See Company Timesheet Export Configuration for an overview of the default settings for the Amano or Ti3 timesheet export file that StaffSuite creates for assignments for the company. The settings you enter here will override the company defaults. For Ti3, you create the Ti3 timesheet export file in Crystal Enterprise to provide Ti3 with a list of expected timesheets. This report is called the "Timesheet Export Report". After Ti3 collects the time and attendance information, they create an import file for you to import into StaffSuite PayBill to create timesheets. Click here for more details on the PayBill functionality.
If your staffing service does not want to use the standard Ti3 field defaults as the report defaults in the Timesheet Export Report or you want to include mileage and expense information in your timesheets, then you must customize the export file using Crystal Report's report designer. Contact Bond-US Support for more information about this option.
The Assignment fields display settings for the assignment in currency. The read-only Company Using settings on the right side of the screen are the current settings for the company that is associated with the assignment. Changing the settings for this assignment will not affect the Company Using settings.
The Timesheet Format field describes the format in which time is reported in the Timesheet Export Report for the assignment. Use ![]() to select from a list of valid choices. The standard report default is Weekly - Total Hours per Day.
to select from a list of valid choices. The standard report default is Weekly - Total Hours per Day.
In the Timesheet Branch field, use ![]() to select the staffing service branch used for the assignment in the Timesheet Export Report.
to select the staffing service branch used for the assignment in the Timesheet Export Report.
In the Work Period Ending Day field, use ![]() to select the day of the week that serves as the end of the reported work period for the assignment in the Timesheet Export Report.
to select the day of the week that serves as the end of the reported work period for the assignment in the Timesheet Export Report.
The Time/Attendance Application field indicates the time/attendance application used for the assignment in the Timesheet Export Report. Currently, the only valid choice is FasTime.
In the Timesheet Measurement field, use ![]() to indicate how time is measured for the assignment in the Timesheet Export Report. The standard report default is Minutes-Decimal Format-QTR Increment.
to indicate how time is measured for the assignment in the Timesheet Export Report. The standard report default is Minutes-Decimal Format-QTR Increment.
In the Report Interval field, use ![]() to indicate how often time is report for the company using this assignment. The standard report default is Weekly.
to indicate how often time is report for the company using this assignment. The standard report default is Weekly.
In the Approver Name field, use ![]() to select the name of the company representative who is primarily responsible for approving timesheets for the assignments associated to this company. The rep must have a role of Timesheet Approver to appear on the list. The rep also needs a valid email address at either the assignment, company using, or parent company level for the timesheet import process to complete successfully.
to select the name of the company representative who is primarily responsible for approving timesheets for the assignments associated to this company. The rep must have a role of Timesheet Approver to appear on the list. The rep also needs a valid email address at either the assignment, company using, or parent company level for the timesheet import process to complete successfully.
The Allow Employee Revisions checkbox indicates whether or not employees are allowed to change the timesheets they submit prior to approval for the assignments associated with this company. The standard report default is to allow employee revisions. A check indicates that revisions are allowed. Clicking on the box toggles it between checked and unchecked.
The Accept Expenses checkbox indicates whether or not expenses are accepted in the Timesheet Export Report for the assignments associated with this company. The standard report default is to not accept expense information. A check indicates that expenses are allowed. Clicking on the box toggles it between checked and unchecked. NOTE: If you want to include expenses and/or mileage information, additional set-up is necessary. Click here for more information.
When you are satisfied with your selections, click the Save button on the StaffSuite toolbar.
![]()
Related Topics: