Company Rep Basic Screen
![]()
![]()
Company Rep Basic Screen |
|
![]()
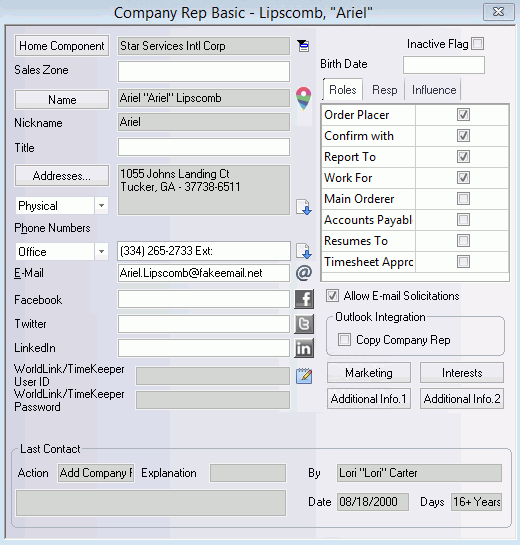
Click here to return to the Company Rep Basic main topic page.
Home Component
|
This field identifies the home company component of the company rep (usually the company component at which the company rep works). Clicking the Home Component button causes the Company Basic window for the component to display. Clicking
|
|
|
Sales Zone |
Identifies the Sales Zone for this company rep. This is a free-form text field. The information in this field can default from the Company Relationship Manager Sales Zone, but can be individually edited here for the specific rep. |
|
|
Name Nickname Title |
The
Name field displays the
name of the company rep in currency (first name, nickname, last
name). You can edit the name by clicking the Name
button. If the Company Rep is linked with TempBuddy, an icon ( The following is a list of Company Rep/Contact fields that are synced between StaffSuite and TempBuddy:
The Nickname field displays the nickname of the company rep. You can edit the nickname by clicking the Name button. The Title field shows the company rep's job title at the company. You can edit the title directly in the field. |
|
|
Addresses... |
Displays the company rep's address. Since a company rep may have several addresses (physical, mailing,
home, other), you can select the type of address to display by
clicking To edit the address, click the Addresses... button. This displays a small window allowing you to select the address type you want to edit and displaying the current information for editing purposes. If you want a quick view of all existing addresses for this
company rep, click |
|
|
Phone Numbers |
Displays the phone number(s) of the company rep. Since a company rep can have many different types of numbers
stored (backline, office fax, office, home, pager, cellular, other),
you can select the type of number to display (and edit) by clicking
If you want a quick view of all existing phone numbers for this
company rep, click |
|
|
Allow E-mail Solicitations Exchange Integration |
E-Mail displays the email address
of the company rep. Clicking Allow E-mail Solicitations allows you to tell the system what to do if an email (sent through StaffSuite's email functionality) is either marked as a solicitation or exceeds the SPAM (bulk) threshold. If the box is checked, the company rep will still receive the email. If the box is unchecked, the company rep will not receive any email marked as a solicitation or exceeding the SPAM threshold. Clicking on the box toggles it between checked and unchecked. Exchange Integration: If you want to copy the company rep's information into your Exchange system (and your system is set up to do so), place a check in the Copy Company Rep checkbox. NOTE: The Copy Company Rep field is only active if the user's (staffing service rep's) record is set up to allow Exchange Integration. For more information on setting up the staffing service rep's record, click here. |
|
|
Linked In WorldLink/TimeKeeper User ID WorldLink/TimeKeeper Password |
The first three fields allow you to enter URLs to the Company Rep's social networking (Facebook, Twitter and LinkedIn) pages. Once a URL has been entered into one of the fields, the associated social networking logo will become active. Clicking the logo takes you to the URL you entered. This next two fields display the User ID and Password that the company rep will use to log into your WorldLink web site and /or into the TimeKeeper module. The same User ID and Password are used for both modules. NOTE: As of the 2013 Q2 release, a new permission was added to enable you to view the password. If you do not have this permission, the password will display in a masked format (e.g. ******). If you want to change the login information (note: the company
rep can change their login information through WorldLink), click
|
|
|
Inactive Flag |
A check in this box indicates that the company rep is inactive. This means that the company rep will not show up on any drop-lists in the system. Clicking on the box toggles it between checked and unchecked. |
|
|
Birth Date |
Indicates the month and day of the rep's birthday. This is useful for sending birthday greetings as you can perform searches on birth dates. |
|
|
Roles Resp Influence |
The three tabs allow you to view the roles the rep plays, the responsibilities the rep has, and the influence that the employee carries at the company. On the Roles tab, you see a grid with a number of roles that the company rep might fill for the company. Click in the Choice box if the rep fills that role. You can select as many roles as are appropriate, but you must select at least 1 role. These roles determine when the company rep's name appears on drop-lists. For example, only reps with a "Report To" role will appear on Report To drop-lists. Click here to see a list of the available roles. NOTE: Only company reps that have the role of Timesheet Approver can approve timesheets in TimeKeeper. Click here for more information on TimeKeeper. Clicking on a box toggles it between checked and unchecked. On the Responsibilities tab, you see a grid with a number of responsibilities the company rep might have for the company. Click in the Choice box if the rep has that responsibility. You may select as many responsibility as necessary, but you do not have to select any. The choices in the grid are user-defined and can be changed by using StaffSuite's Edit List functionality. On the Influence tab,
use |
|
|
Marketing Interests Additional Info.1 Additional Info.2 Send to TempBuddy |
These buttons allow you to access and edit various Company Rep information. Click Marketing to track the marketing efforts directed at this company rep. Click Interests to see the areas of personal interest to this company rep. Click Additional Info.1 to view/edit any Company Rep UDFs assigned to the Additional Info.1 screen. Click Additional Info.2 to view/edit any Company Rep UDFs assigned to the Additional Info.2 screen. Click Send to TempBuddy
to export the record to the TempBuddy application. A message indicates
whether or not the export was successful. If not successful, the
message displays one of the reasons the export was unsuccessful.
If successful, the Send to TempBuddy disappears and a new icon
( NOTE: This button is not visible if the Branch is not set up for TempBuddy. Once a Company Rep has been sent to TempBuddy, the system will keep the information synced and there is no need for you to push/pull information again. When sending a Company Rep record to TempBuddy, the Rep must have an email address. If a Company Rep record is sent to TempBuddy and the Company has not been sent, it is automatically sent to TempBuddy. Also, since the TempBuddy Client record requires at least one contact, the Parent Company’s Main Contact (Company Rep) is also sent along with any exported parent company record (if it has not been sent already). IMPORTANT: While it is possible to send Company Reps from TempBuddy to StaffSuite, Bond highly recommends only sending Companies from StaffSuite to TempBuddy. New Company Reps and updated Company Rep information is sent immediately from StaffSuite to TempBuddy. New Company Reps and updated Company information entered via TempBuddy is sent to StaffSuite every 10 minutes. However, you can use PayBill > Payroll > Sync TempBuddy to manually synchronize StaffSuite and TempBuddy. |
|
|
Last Contact |
Displays (read-only) the last action taken associated with this company rep, including the date that it occurred (note: the second date field indicates how long ago the action took place), the staffing service rep who performed the update, an explanation for the update, and any applicable notes. These fields are automatically updated by the system as you perform company rep activities. |
|
|
![]()
Related Topics:
|