Employee Rejection
|
Employee Rejection |
![]()
Employee Rejection allows you to record that you reached an employee to offer them an assignment or position, but that he/she turned down the offer.
It is accessed by selecting Record Assignment Contact or Record Position Contact from the Activity Type drop-list on the Employee Ribbon.
NOTE: If you already have an unfinished Employee Rejection activity outstanding, the system will warn you that you are entering a possible duplicate. Check the information on the grid presented. If the activity listed is a duplicate of the one being entered, click on the row displaying the activity and click OK. This allows you to edit the existing activity. If the activity listed is not a duplicate, click the Create New button. This allows you to create a new activity.
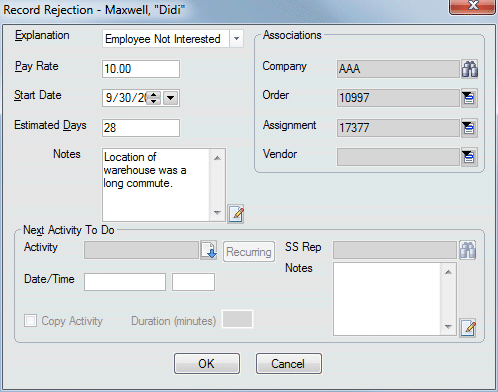
Recording Employee Rejection

NOTE: The above window displays an assignment rejection. The position rejection window is slightly different (see below).
In the Explanation field, use ![]() to record the reason that the employee rejected the offer.
to record the reason that the employee rejected the offer.
If there is a company in currency, the company name will default into the Company field in the Associations area. If there is no company listed in the Company field (or if you want to change the Company), use ![]() to open a Look Up Company dialog. You want to look up the name of the company that made the offer that was rejected.
to open a Look Up Company dialog. You want to look up the name of the company that made the offer that was rejected.
If there is an order in currency, the number will default into the Order field in the Associations area. If there is no number listed in the Order field (or if you want to change the Order), use ![]() to see a list of orders (associated with the selected company) and select one.
to see a list of orders (associated with the selected company) and select one.
If there is an assignment/position in currency, the number will default into the Assignment/Position field in the Associations area. If there is no number listed in the Assignment/Position field (or if you want to change the Assignment/Position), use ![]() to see a list of assignment/positions (associated with the selected order) and select one.
to see a list of assignment/positions (associated with the selected order) and select one.
The Pay Rate, Start Date, and Estimated Days (Assignment) or Minimum Salary, Maximum Salary, and Start Date (Position) fields default based on the information on the selected assignment/position. You can change this information, if needed. For more information about StaffSuite's calendar, click here.
You can schedule a next activity to follow up the rejection by filling out the information in the Next Activity To Do area. For more information on setting this area up, click here.
Click OK to complete the activity.
![]()
Related Topics: