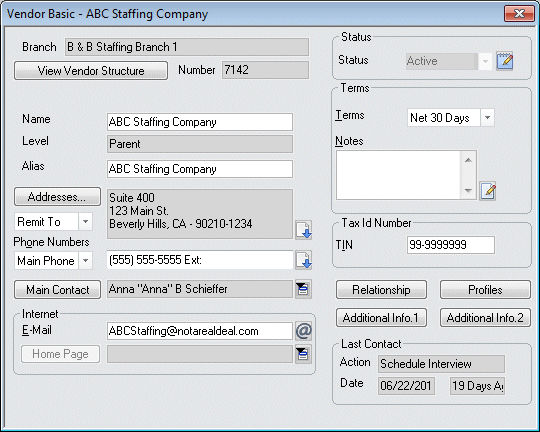
Vendor Basic Screen
![]()
![]()
|
Vendor Basic Screen |
|
![]()
Click here to return to the Vendor Basic main topic page.
|
Branch View Vendor Structure Number Parent
|
Branch: This read-only field indicates the branch servicing this vendor. Clicking the View Vendor Structure button opens a window that displays a tree-view of the vendor structure of which this vendor is a part (either as a parent or a division). For more information, click here. Number: This read-only field displays the vendor's ID number, which is assigned when the vendor is added. This number is system-defined and may not be changed. The Parent field is only available if the vendor is currency is not a Parent level vendor. This field displays the name of the vendor component that serves as Parent to the vendor in currency. Clicking on the Parent button causes the Vendor Basic window for the parent vendor to display. |
|
|
|
|
Name Level Alias |
The Name field displays the name of the vendor in currency. You can change the name by editing the field. Level indicates whether the vendor is a division or parent. Level is set-up when you add the vendor and may not be changed. The Alias field determines how the vendor will be sorted in Look Ups and reports. This is helpful for differentiating between multiple locations of a vendor, or for ensuring that all vendors whose name begins with "The" are not sorted together. For example: Vendor Name = The Acme Group, Alias Name = Acme Group. |
|
|
|
|
Addresses... |
Displays the vendor's address. Since a vendor may have several addresses (remit to, physical, other), you can select the type of address to display by clicking To edit the address, click the Addresses... button. This displays a small window allowing you to select the address type you want to edit and displaying the current information for editing purposes. If you want a quick view of all existing addresses for this vendor, click |
|
|
|
|
Phone Numbers |
Displays the phone number(s) of the vendor. Since a vendor can have different types of numbers stored (Main Phone, Fax, Other), you can select the type of number to display (and edit) by clicking If you want a quick view of all existing phone numbers for this vendor, click |
|
|
|
|
Main Contact |
Displays the name of the vendor rep who will be your staffing service's main contact at the vendor. To select another vendor rep, click Clicking Main Contact causes the Vendor Rep Basic window for the vendor rep to display. |
|
|
|
|
Internet |
E-Mail contains the email address for the vendor component, as opposed to an email address for an individual vendor rep (although if the rep's E-mail address IS the address for the vendor, you can enter the rep's E-mail address here) . Clicking Home Page displays the URL for the Internet home page of the vendor. To change the home page URL, click Clicking on Home Page opens your Internet browser to the URL listed in the Home Page field. |
|
|
|
|
Status |
This field shows the current status for the vendor. The following are valid statuses for the vendor:
You can change the status by clicking |
|
|
|
|
Terms |
Displays the payment terms for this vendor. The options in the drop-list are user-defined and can be changed using StaffSuite's Edit List functionality. The Notes field can be used for any information about the payment terms that are specific to this vendor. Click the |
|
|
|
|
TIN - Tax Id Number |
This is the Vendor's Taxpayer ID (TIN) for 1099 purposes (also known as the Employer ID#). The field must contain nine numeric characters. The TIN is entered at the parent level and defaults to the Division level. |
|
|
|
|
Relationship Profiles Additional Info.1 Additional Info.2 |
Click Relationship to access the Vendor Relationship Manager. The Profiles button allows you to access the skills, industries and occupations provided by the vendor. Click Additional Info.1 to view/edit any Vendor UDFs assigned to the Additional Info.1 screen. Click Additional Info.2 to view/edit any Vendor UDFs assigned to the Additional Info.2 screen. |
|
|
|
|
Last Contact |
Displays (read-only) the last action taken associated with this vendor, including the date that it occurred (note: the second date field indicates how long ago the action took place). These fields are automatically updated by the system as you perform vendor activities. |
|
|
|
![]()
Related Topics:
|
|
 . This opens the
  icon to expand the field in a re-sizable dialog where you can enter and view all your text and use spell checking.