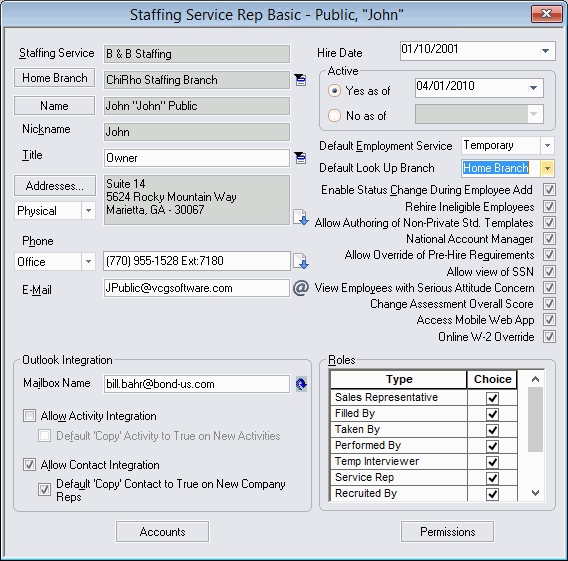
Staffing Service Rep Basic Screen
![]()
![]()
|
Staffing Service Rep Basic Screen |
|
![]()
Click here to return to the Staffing Service Rep Basic main topic page.
|
Staffing Service Home Branch
|
Displays the Staffing Service Component and Staffing Service Branch associated with the Staffing Service Rep. In terms of relationship, the rep works in the branch owned by the component. The Staffing Service field in for informational purposes and may not be edited. You can change the Home Branch of the rep by clicking To see the Staffing Service Branch Basic window for the Home Branch listed, click |
|
|
|
|
Name Nickname |
The Name field displays the first name, nickname, middle initial, last name, and suffix of the staffing service rep. The Nickname field displays only the nickname of the rep. To edit any part of the name (including nickname), click |
|
|
|
|
Title |
This is the rep's security title in his/her home branch. When you are selecting a staffing service rep in a field in StaffSuite, you can filter the lookup by title to narrow the results to only those reps who are assigned to that title. To change the title, click If you want to add/edit titles to branches you can currently access or to add branches to your access list, click If you want to change the actions and/or views accessible to a specific title, you will need to access Title Security. For more information about Title Security, click here. |
|
|
|
|
Addresses |
Displays and allows editing of the various addresses associated with this staffing service rep. To see a different address than the one currently displayed, use To see a quick list of all address stored for this rep, click To edit address information, click |
|
|
|
|
Phone |
Displays and allows editing of the various phone numbers associated with this rep. To see a different phone number than the one currently displayed, use To see a quick list of all phone numbers stored for this rep, click To edit phone number information, use |
|
|
|
|
|
Displays and allows editing of the email address of this staffing service rep. To send a quick email to the address listed, click |
|
|
|
|
Exchange Integration |
Allows you to designate whether Activity and/or Company Rep information should be copied to Exchange. To allow activity information to be copied to Exchange, check the Allow Activity Integration checkbox. If you want new activities to automatically default to copy, check the 'Copy' Defaults to True on New Activities checkbox. To allow company rep information to be copied to Exchange, click the Allow Contact Integration checkbox. If you opt for this, you must provide a Mailbox Name in the Mailbox Name field. You can simply type the name or click Note: These fields only become activated if the Staffing Service allows this integration. To learn how to set up the integration at the Staffing Service Component Level, click here. You may select both types of integration, one type, or neither types. Clicking the checkbox toggles it between checked and unchecked. |
|
|
|
|
Hire Date |
Displays the date that the rep was hired. You can change the date by clicking |
|
|
|
|
Active |
Determines whether the rep is active or not. Active reps show up in drop-down lists and picklists when you need to select a rep. To activate or inactivate a rep, click the Yes radio button (to activate) or the No radio button (to inactivate). Whichever option you choose, use |
|
|
|
|
Default Employment Service |
The Default Employment Service field determines whether the rep normally handles temporary or direct-hire orders. This affects which tab (temporary or direct-hire) defaults on the Employee Basic window, the default order type when adding an order, and the label (Assignment or Position) that will be active when adding/editing an Activity. |
|
|
|
|
Default Look Up Branch |
The Default Look Up Branch field determines whether the rep's home branch or <All> appears by default when doing a front office look up (Employee, Company, etc.). The droplist has two options. Select Home Branch if you want the rep's home branch to appear in the Branch Servicing field on look ups. Select All if you want <All> to appear in the Branch Service field on look ups. |
|
|
|
|
Enable Status Change During Employee Add |
The Enable Status Change During Employee Add checkbox determines whether the rep can change an employee's Direct Hire or Temporary status from the system default to a different status during the Employee Add process. If the field is not checked, the rep must accept the system default status for the employee being added. If checked, the rep can change the status. |
|
|
|
|
Rehire Ineligible Employees |
The Rehire Ineligible Employees checkbox gives the rep permission to rehire Employees with a status of Terminated, Ineligible for Rehire. If you want to give the rep permission to rehire ineligible employees, make sure the box is checked. If you do not want to give this permission, make sure the box is unchecked. |
|
|
|
|
Allow Authoring of Non-Private Std. Templates |
The Allow Authoring of Non-Private Std. Templates checkbox allows you to determine whether a rep can add, edit, and delete templates with a security of Global or Branch. This does not affect the rep's ability to add, edit, and delete Private templates. It only affects those templates that are not marked as Private. |
|
|
|
|
National Account Manager |
The National Account Manager checkbox allows you to determine whether a rep can edit pay and bill information for any assignment involving a company with a national account number, once a company has a national account number only those users designated as National Account Managers can edit these locked down rates. It also determines whether the rep can edit the National Account Number field on the Company Billing Information window. This option is unchecked (off) by default. A checked box allows the rep to edit national accounts. An unchecked box allows the rep to add information, but not edit it. |
|
|
|
|
Allow Override of Pre-Hire Requirements |
The Allow Override of Pre-Hire Requirements checkbox allows you to determine whether a rep can override a forms/procedures requirement when filling an assignment. For example, if the order requires a Background Check and one has not been completed for the employee, the system would normally refuse to allow the employee to be filled on the assignment. However, if this box is checked, the rep can go ahead and fill the assignment (although he/she will be warned that required forms/procedures have not been completed by the employee). If this box is unchecked, the rep may not override the pre-hire requirements and therefore, could not fill the assignment. |
|
|
|
|
Allow view of SSN |
The Allow view of SSN checkbox determines whether this rep can view the social security numbers of employees, or whether the social security numbers will appear masked. A Staffing Service Rep with this checkbox selected can see social security numbers in any screen they have title or branch security to access. However, a staffing service rep may have title security to add or change a social security number for an employee, or perform other tasks that require entry of a social security number, but if this checkbox is not selected, will not be able to view social security numbers. In that case, the numbers will be masked with only the last four digits visible as soon as the number is entered and the field exited. In screens that do not require entry of an SSN, the number will appear masked when the screen opens. |
|
|
|
|
View Employees with Serious Attitude Concern |
The View Employees with Serious Attitude Concern determines whether this rep can view Employees with a Serious Attitude Concern assessment. If this is not checked, the Assessment option on the Employee Look Up window is removed and search results do not include Employees with serious attitude concerns. If this box is checked, the Assessment option displays on the Employee Look Up window and the rep can choose whether to search all employees, only those employees with a serious attitude concern or only those employees without a serious attitude concern. |
|
|
|
|
Change Assessment Overall Score |
The Change Assessment Overall Score determines whether this rep can edit the Overall Result field on the Assessments option of the Employee Profiles window. If this is not checked, the rep can still view the overall rating, but cannot edit the field. If this is checked, the rep can edit the overall result. |
|
|
|
|
Access Mobile Web App |
The Access Mobile Web App determines whether this rep can log into and use the Mobile Web App for StaffSuite. If this is checked, the rep can use their normal StaffSuite login and password to access the app from their mobile source. If this is not checked, the rep will not be able to login to the mobile app. |
|
|
|
|
Online W-2 Override |
The Online W-2 Override determines whether this rep can change the Online W-2 status of an Employee. Employees can indicate (via WorldLink) that they want to receive an online W-2 instead of a printed copy. If the Online W-2 Override option is checked, the rep can either give or remove the Employee's access to online W-2s. If the option is not checked, the rep cannot change the status set by the Employee. Clicking on a checkbox toggles it from a checked to unchecked status. |
|
|
|
|
Roles |
The Roles grid allows you to select the roles that this rep fills at the staffing service. When you are selecting a staffing service rep in a field in StaffSuite, you can filter the lookup by role to narrow the results to only those reps who are assigned to that role. For example, if you check that this rep fulfills a "Taken By" role, then this rep's name will appear in any lookup result for the "Taken By" role. Click here for more information on the Staffing Service Rep Look Up wizard. Available types of roles are: Sales Representative, Filled By, Taken By, Performed By, Temp Interviewer, Service Rep, Recruited By, Placed By, Direct-Hire Interviewer. Since most reps fill more than one role, you may select more than one type of role, if needed. Clicking on the checkbox in the Choice column toggles the box between checked and unchecked. A check indicates that the rep fills this role. An empty box indicates the rep does not fill this role. |
|
|
|
|
Accounts |
Clicking this button takes you to the Staffing Service Rep Accounts window where you can enter your TalentWise Client ID and Authorization Key. This allows you to request and view TalentWise screenings on the Employee Basic window. |
|
|
|
|
Permissions |
Clicking this button takes you to the window that allows you to add/edit/remove branch access, as well as add/edit the title used by the rep in each branch. For more information about setting up staffing service rep permissions, click here. |
|
|
|
![]()
Related Topics:
|
|