The Main Grid
![]()
![]()
The Main Grid |
|
![]()
The grid displays the results of look-ups, lists, and queries. The columns that appear are determined by the Grid tab selected. For example, the Employee grid displays different information than the Company grid.
For information on customizing the Main Grid, click here.
NOTE: While the grid can display more records, it is optimized to display 1000 rows.
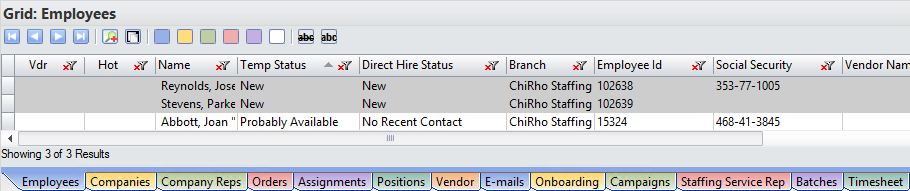
A grid entry may appear in gray text instead of black to indicate that the Staffing Service Rep that performed the search does not have permission to access the record. Click here to learn more about security.
Tabs
The Grid Tabs allow you to quickly move from grid to grid. For example, if you looked up an employee and later looked up a company, you could move back and forth between the two look-up results by clicking on the Employee and Company grid tabs. You can tell which tab is currently selected because 1) it will be the front tab in the tab list and 2) the name of the current grid will be listed in the upper left corner of the main grid.
There are too many tabs to display on the screen at the same time. To access tabs off screen, use the arrows to the far right of the tabs.
Using the Grid
View all rows and columns
Depending on your monitor resolution, and the number of columns in the grid, all of the information on the grid may not fit on your screen. If this is the case, a scroll bar will appear on the bottom of the Grid. Clicking on the scroll arrows will allow you to see all of the grid. If there are multiple rows in your grid results, you probably can't see them all. Click on the scroll arrows, move the slider bar on the right of the grid, or scroll within the grid using your mouse wheel to see all the results. These other options are available for your grid list:
Open a single record
Double click on an item in the grid to display the Basic information screen for that item. For example, if you double-click on an Employee name, StaffSuite displays the Employee Basic Info window with the selected Employee's data populating the fields.
Select a single record
Single-click on a record in the grid to select it without displaying the Basic Info screen for it. Most StaffSuite windows will refresh with information associated to the record when you single-click it in the grid. For example, if you are currently showing the Company Relationship Manager window in the Detail pane for AAA Company and you single click on BBB Company in the Main grid, the Company Relationship Manager window will refresh with data from BBB Company.
Select Multiple Records
You can select multiple records in the Main Grid using the CTRL-click and the SHIFT-click. If you have one record selected and then CTRL-click on another record, then the new record is selected while keeping the first record selected. If you have one record selected and you SHIFT-click on another record, both records and all records between the two records are selected.
This is useful since some activities can be performed on multiple records at the same time.
Moving Within the Main Grid
Once you are focused on the Main Grid and have selected a record, you can move to other records in the grid in a number of ways:
You can click on another row (or use the CTRL-click or SHIFT-click options)
You can use the Grid buttons on the Quick Access Toolbar.
You can use the Grid buttons at the top of the Main Grid.
You can use the up and down arrows on your keyboard to move to various rows.
Viewing Additional Records in the Main Grid
Below the grid rows, an indicator will specify how many records are
being displayed in the grid and the total amount of records that could
be displayed. For example, it might read "Showing 1000 records out
of 2500". If you would like to view more records, click  (located above the grid
rows). If you would like to view all available records, click
(located above the grid
rows). If you would like to view all available records, click  .
.
Formatting Rows
Only available if you looking a list (rather than viewing search results), the color buttons and the strikethrough buttons...

...allow you to shade the selected row (with a color) or strikethrough the text in the row. This is useful when working with a list.
For more information on Manage List, click here.
Right-Clicking in the Grid
Selecting records and right-clicking in the grid displays a menu allowing you to perform several actions on the grid itself or on the records selected. In some cases, the action shows up on every grid (for example, Zoom In and Zoom Out). In other cases, the action is specific to the selected grid (for example, Create Campaign only shows up on the Employee Grid). The following lists the actions that can be taken by right-clicking on the grid. NOTE: Right-clicking on a grid with no records does not display any menu).
For more information on those options available on every grid, click here.
For more information on those options available only on specific grids, see below.
These options will vary depending on the grid contents, but allow you to perform Email functions straight from grid results. For example, click to select one of the rows in the grid, then right click and select one of the email options. If you select Send Email To in the Employee grid, StaffSuite will open the Manage Email window with that employee's email address as recipient; if you choose Send Email About from the Employee grid, StaffSuite will open a list of associated documents to select from and then attach them to an email. See the Send Email To and Send Email About topics for more information.
From the Employees grid, you can select multiple rows, right-click in the grid and select Mass Assign to fill multiple assignments on the same job order...all in one action.
To learn more about Fill Mass Assignment, click here.
Click the light bulb button at the upper right of this help topic, or click the back arrow below, to return to the StaffSuite Main Window topic. From there, you can explore a different part of StaffSuite's main window or continue your step-by-step introduction to StaffSuite.
From the Employee, Company Rep, Orders and Assignments grid, you can select multiple-rows, right-click in the grid and select Mass Activity > Make a Note. This allows you to create a single Make a Note which is then applied to all of the records in the grid you selected.
A separate activity is created for each recipient in the same manner as if you created each of them individually using the traditional Make a Note workflow. For example, on Company Rep, an activity will be created for each Company Rep with an association to the company. On the Order, the activity will be created for the order with an association to the related company. On Assignments, an activity will be created for the Assignment with an associated to the related Order, Company and Company Rep (and...if filled...to the Employee).
For more information on the Employee Make a Note activity, click here.
For more information on Make a Note for other record types, click here.
From the Employee grid, you can select multiple rows, right-click in the grid and select Mass Activity > Terminate Employees. This allows you to terminate multiple employees at the same time. A separate activity is created for each employee in the same manner as if you performed the traditional Terminate workflow.
For more information on the Terminate activity, click here.
From the Employee grid, you can select multiple rows, right-click in the grid and select Mass Activity > <Activity> where <Activity> is the Healthcare Activity you want to perform. This allows you to perform an Exchange Notification, Offer, No Offer and Review activity on multiple employees at the same time. A separate activity is created for each employee in the same manner as if you performed the traditional Healthcare workflow.
For more information on the Exchange Notification activity, click here.
For more information on the Offer activity, click here.
For more information on the No Offer activity, click here.
For more information on the Review activity, click here.
For more information on the Accept activity, click here.
For more information on the Decline activity, click here.
From the Employee grid, you can select multiple rows, right click in the grid and select Mass Activity > Change ACA Classification. This allows you to change the ACA Classification (Variable, Non-Variable, Seasonal, Part Time) for the selected employees. From the Change ACA Classification window:
The Associations area displays the employees selected from the grid. If a name is grayed out, it means there are no tax records for the employee for the corporation selected and therefore, the employee will not be updated.
In the Corporation field, use the droplist to select the corporation. This is required.
In the New field, select the ACA Classification you want to assign to the associated employees. This is required.
In the Notes field, enter any notes you want associated with this classification change. This is optional.
When you are satisfied with your selections, click OK.
NOTE: ACA Details Records for the selected employees are not updated until the ACA Update Process is run.
From the Company Rep grid, you can select multiple rows, right click in the grid and select Mass Activity > Record Sales Call > xxxxxxxx (where xxxxxxxx is the type of sales call you want to record). This allows you to enter 1 activity which is then applied to all the records you selected in the grid.
A separate activity is created for each recipient in the same manner as if you created each of them individually. All of the expected associations are maintained behind the scenes, but will not display on the Mass Activity screen.
For more information on the Record Sales Call activities, click here.
From the Employees grid, you can select multiple rows, right-click in the grid and select Create Campaign. This causes the Create Campaign (Text/Call) window to display with all selected employees already added to the Campaign.
For more information on creating a Campaign, click here.
From the Employees grid, you can select multiple rows, right-click in the grid and select Request Onboarding. This sends an onboarding request to the Employee using the employee's email address. It basically does the same thing as if you had opened every employee's record and clicked the Request Onboarding button on the Employee Basic screen for each one.
For more information on Request Onboarding, click here to view the Employee Basic topic.
There are two options here. Unlike some of the other right-click options, Request Screening and Update Screening can only be performed on one Employee at a time. If you have multiple employees selected in the grid, the system will remind you to select only one.
Request Screening submits a screening request to Talentwise via a browser and populates the basic information to Talentwise via the StaffSuite to TalentWise integration workflow.
After you receive an email from TalentWise informing you that the Screening is complete, you can update the Employee's Screening tab by using the Update Screening option.
For more information about Screening and the Employee Screening tab, click here.
You can select the results of searches and save them as lists that can be shared with other users and/or re-accessed when needed. Think of a list as taking a snapshot of your search results (or a portion of your search results) that you can then share with others. The snapshot can then be accessed as needed, edited and saved again.
There are three options here. Create New List allows you to save all or a portion of your search results as a brand new list. Add to List allows you to add all or a portion of your search results to an existing list.
Due to the numerous advantages of using lists and the amount of functionality around them, a separate topic is devoted to the discussion of using lists. Click here to access more information about using lists.
Group Add Eligibility (Employees, Assignments)
You can add an eligibility program to one or more employees using the Employees or Assignments grid. This is the same functionality as can be found on the PayBill Navigator. If you are using the Assignments grid, the program will be added to employees associated with the assignments.
Right-clicking on the selected records causes a Process Eligibility Options window to display. Use the droplist on the Corporation field to select the Corporation associated with the eligibility program. In the Program Name field, select the name of the program you want to add to the selected records. The rest of the fields are read-only. When you are satisfied with your selections, click Process.
For more information on the Group Add process, click here.
Remove from WorldLink (Assignments)
You can mass unpublish Closed, Cancelled or Filled Assignments using the right-click Mass Activity > Remove from WorldLink option. When selected, the Mass Activity - Unpublish WorldLink dialog displays allowing you to select an Explanation and Result, as well as add any notes or set a next activity. When you are satisfied with your selections, click OK.
On the Employees, Companies and Company Reps (Contacts) grid, you can right-click and select "Send to TempBuddy". This exports all selected records in the grid to TempBuddy. The "Send To TempBuddy" option will not be available if no Branches are setup for TempBuddy.
For Employees, each selection should be fully qualified and ready to work before exporting to TempBuddy.
For Companies and Company Reps, each selection should be a good fit for the TempBuddy functionality.
If any record sent does not have all required information, an error message displays noting the names of the Employees that were not exported to TempBuddy. To see the specific information missing on the record, attempt to send the record to TempBuddy from the record itself. The message displayed when you attempt to send a single record displays at least one of the required fields that are missing.
Once a record has been sent to TempBuddy, the system will keep the information synced and there is no need for you to push/pull information again.
IMPORTANT: While it is possible to send Employees from TempBuddy to StaffSuite, Bond highly recommends only sending Employees from StaffSuite to TempBuddy. This ensures that all required information for putting the Employee on an assignment and creating timesheets from that assignment have been completed.
![]()
|