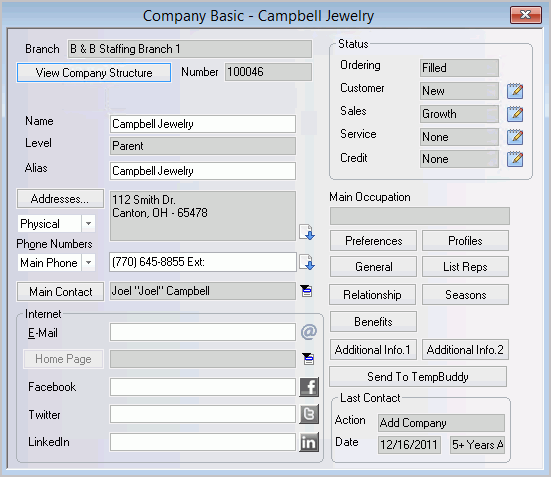
Company Basic Screen
![]()
![]()
Company Basic Screen |
|
![]()
Click here to return to the Company Basic main topic page.
Branch View Company Structure Number Parent
|
Branch: This read-only field indicates the branch servicing this company. You cannot edit this field here. If you want to change the Branch, use the Company Relationship Manager window. Clicking the View Company Structure button opens a window that displays a tree-view of the company structure of which this company is a part. For more information, click here. Number: This read-only field displays the company's ID number, which is assigned when the company is added. This number is system-defined and may not be changed. The Parent field is only available if the company is currency is not a Parent level company. This field displays the name of the company component that serves as Parent to the company in currency. Clicking on the Parent button causes the Company Basic window for the parent company to display. |
|
|
Name Level Alias |
The
Name field displays the
name of the company in currency. You can change the name by editing
the field. If the Company is linked to TempBuddy, an icon ( The following is a list of Parent Company/Client fields that are synced between StaffSuite and TempBuddy:
The following is a list of Child company/Location fields that are synced between StaffSuite and TempBuddy:
Level indicates whether the company is a department, division, location, or parent. Level is set-up when you add the company and may not be changed. The Alias field is one of the ways in which companies are sorted in Look Ups and reports. This name is often used internally by the staffing service as a nickname for a company and can be helpful for differentiating between multiple locations of a company, or for ensuring that all companies whose name begins with "The" are not sorted together. For example: Company Name = The Acme Group, Alias Name = Acme Group. Quick Company Lookup sorts by both the Company Name and the Alias. |
|
|
Addresses... |
Displays the company's address. Since a company may have several addresses (billing, mailing,
other, payroll tax, physical, sales tax), you can select the type
of address to display by clicking To edit the address, click the Addresses... button. This displays a small window allowing you to select the address type you want to edit and displaying the current information for editing purposes. If you want a quick view of all existing addresses for this
company, click |
|
|
Phone Numbers |
Displays the phone number(s) of the company. Since a company can have many different types of numbers stored
(backline, fax, main phone, other), you can select the type of
number to display (and edit) by clicking If you want a quick view of all existing phone numbers for this
company, click |
|
|
Main Contact |
Displays the name of the company rep who will be your staffing service's main contact at the company. To select another company rep, click Clicking Main Contact causes the Company Rep Basic window for the company rep to display. |
|
|
Internet Home Page |
E-Mail contains the email address
for the company component, as opposed to an email address for
an individual company rep. Clicking Home Page displays the
URL for the Internet home page of the company. To change the home
page URL, click Clicking on Home Page opens your Internet browser to the URL listed in the Home Page field. The final three fields allow you to enter URLs to the Company's social networking (Facebook, Twitter and LinkedIn) pages. Once a URL has been entered into one of the fields, the associated social networking logo will become active. Clicking the logo takes you to the URL you entered. |
|
|
Status |
These fields show the Ordering, Customer, Sales, Service, and Credit status for the company. For a discussion of Company statuses, click here. Ordering Status is system controlled and can only be changed by working with orders, assignments, and positions. The other statuses are user controlled and can be edited by
clicking |
|
|
Main Occupation |
Displays (read-only) the main occupation that the company desires or hires. You can change this using the Company Profiles option. |
|
|
|
Profiles General List Reps Relationship Seasons Benefits Additional Info.1 Additional Info.2 Send to TempBuddy |
These buttons allow you to access and edit various Company information. Click Preferences to see a list of what the company provides in terms of work environment, work schedule, location, etc. Click Profiles to see what the company expects including skills, personal attributes, occupations, etc. Click General to see a list of general information about the company including directions, facilities, etc. Click List Reps to see a list of all company reps associated with this company. Click Relationship to access the Company Relationship Manager. Click Seasons to set up seasonal information about the company. Click Benefits to see a list of benefits offered by the company. Click Additional Info.1 to view/edit any Company UDFs assigned to the Additional Info.1 screen. Click Additional Info.2 to view/edit any Company UDFs assigned to the Additional Info.2 screen. Click Send to TempBuddy
to export the record to the TempBuddy application. A message indicates
whether or not the export was successful. If not successful, the
message displays one of the reasons the export was unsuccessful.
If successful, the Send to TempBuddy disappears and a new icon
( NOTE: This button is not visible if the Branch is not set up for TempBuddy. Once a Company has been sent to TempBuddy, the system will keep the information synced and there is no need for you to push/pull information again. Parent Companies in StaffSuite become Clients in TempBuddy. Further, it becomes the Base Client Location in TempBuddy. Division, Location and Department Companies in StaffSuite become Locations in TempBuddy. If you send a child company from StaffSuite to TempBuddy before sending the parent company, the parent company is also sent to TempBuddy. If the parent company has already been sent, only the child company is sent. Also, since the TempBuddy Client record requires at least one contact, the Parent Company’s Main Contact is also sent with the parent company record (if it has not been sent already). If a Company Rep record is sent to TempBuddy and the Company has not been sent, it is automatically sent to TempBuddy. IMPORTANT: While it is possible to send Companies from TempBuddy to StaffSuite, Bond highly recommends only sending Companies from StaffSuite to TempBuddy. This ensures that all proper tax information exists before processing invoices. New Companies and updated Company information is sent immediately from StaffSuite to TempBuddy. New Companies and updated Company information entered via TempBuddy is sent to StaffSuite every 10 minutes. However, you can use PayBill > Payroll > Sync TempBuddy to manually synchronize StaffSuite and TempBuddy. |
|
|
Last Contact |
Displays (read-only) the last action taken associated with this company, including the date that it occurred (note: the second date field indicates how long ago the action took place). These fields are automatically updated by the system as you perform company activities. |
|
|
![]()
Related Topics:
|